INSTALLATION AND OPERATION MANUAL ASM-40 High-Speed Short-Range Modem Version 1.
ASM-40 High-Speed Short-Range Modem Version 1.0 Installation and Operation Manual Notice This manual contains information that is proprietary to RAD Data Communications Ltd. ("RAD"). No part of this publication may be reproduced in any form whatsoever without prior written approval by RAD Data Communications.
Limited Warranty RAD warrants to DISTRIBUTOR that the hardware in the ASM-40 to be delivered hereunder shall be free of defects in material and workmanship under normal use and service for a period of twelve (12) months following the date of shipment to DISTRIBUTOR.
General Safety Instructions The following instructions serve as a general guide for the safe installation and operation of telecommunications products. Additional instructions, if applicable, are included inside the manual. Safety Symbols This symbol may appear on the equipment or in the text. It indicates potential safety hazards regarding product operation or maintenance to operator or service personnel.
Handling Energized Products General Safety Practices Do not touch or tamper with the power supply when the power cord is connected. Line voltages may be present inside certain products even when the power switch (if installed) is in the OFF position or a fuse is blown. For DC-powered products, although the voltages levels are usually not hazardous, energy hazards may still exist.
Before connecting the DC supply wires, ensure that power is removed from the DC circuit. Locate the circuit breaker of the panel board that services the equipment and switch it to the OFF position. When connecting the DC supply wires, first connect the ground wire to the corresponding terminal, then the positive pole and last the negative pole. Switch the circuit breaker back to the ON position.
there are restrictions on the diameter of wires in the telecom cables, between the equipment and the mating connectors. Caution To reduce the risk of fire, use only No. 26 AWG or larger telecommunication line cords. Attention Pour réduire les risques s’incendie, utiliser seulement des conducteurs de télécommunications 26 AWG ou de section supérieure. Some ports are suitable for connection to intra-building or non-exposed wiring or cabling only.
FCC-15 User Information This equipment has been tested and found to comply with the limits of the Class A digital device, pursuant to Part 15 of the FCC rules. These limits are designed to provide reasonable protection against harmful interference when the equipment is operated in a commercial environment.
Declaration of Conformity Manufacturer's Name: RAD Data Communications Ltd. Manufacturer's Address: 24 Raoul Wallenberg St., Tel Aviv 69719, Israel declares that the product: Product Name: ASM-40 conforms to the following standard(s) or other normative document(s): EMC: Safety: EN 55022: 1998 Information technology equipment – Radio disturbance characteristics – Limits and methods of measurement.
Quick Start Guide Installation of ASM-40 should be carried out only by an experienced technician. If you are familiar with ASM-40, use this quick start guide to set it up for operation. This guide describes the standalone version of the modem. Perform the installation procedures for both the local and the remote units. 1. Installing ASM-40 Instructions given below detail the settings that you have to make in order to configure ASM-40 for proper operation.
Quick Start Guide DIP Switch Installation and Operation Manual Function Possible Settings Factory Setting the front panel pushbuttons OFF – The diagnostic tests cannot be activated via the front panel V54E section, SW3/2 Controls activation of the local digital loopback when remote digital loopback is initiated from the remote unit ON – Local digital loopback activation is enabled CNTE section, SW3/3 Selects the transmit carrier mode ON – Carrier follows the RTS line ON OFF – Local digital loo
Installation and Operation Manual Quick Start Guide DIP Switch Function Possible Settings Factory Setting J4, CHASS Controls the connection between the ASM-40 signal ground and the frame (chassis) ground CON – Signal ground is connected to the frame ground CON DIS – Signal ground is disconnected from the frame ground Note: Disconnecting the signal ground from the frame ground may render the unit unsafe for connection to unprotected telecommunication networks in some locations.
Quick Start Guide 4 Installation and Operation Manual • DCD: On • TEST: Off. Operating ASM-40 ASM-40 Ver. 1.
Contents Chapter 1. Introduction 1.1 1.2 1.3 1.4 Overview....................................................................................................................1-1 Versions .................................................................................................................1-1 Power Supply Options ........................................................................................1-1 Applications.................................................................................
Table of Contents Installation and Operation Manual Chapter 5. ASM-40/R Card 5.1 5.2 5.3 5.4 ASM-MN-214 Card Cage .............................................................................................5-1 Line Connector .......................................................................................................5-1 DB-25 DTE Connector .............................................................................................5-1 Power Supply ............................................
Chapter 1 Introduction 1.1 Overview ASM-40 is a high speed, synchronous short-range modem operating at full-duplex over unconditioned lines. ASM-40 also functions as a baud rate and interface converter. Product Options The following versions of the modem are available: • ASM-40 standalone unit • ASM-40/R: a plug-in card for installation in the ASM-MN-214, 19-inch modem rack, holding up to 14 cards.
Chapter 1 Introduction Installation and Operation Manual Features ASM-40 operates at 13 selectable rates of up to 2048 kbps, for a line attenuation of up to 40 dB on twisted pair or coax cable. This provides an approximate operating range of up to 1.75 km (1 mile). ASM-40 incorporates interface circuits for the terminal/computer, an automatic equalizer, a modulator and demodulator.
Installation and Operation Manual 1.2 Chapter 1 Introduction Physical Description ASM-40 is available as a standalone unit or as a rack-mount card for the ASM-MN-214 hub. Figure 1-3 shows the 3D view of the ASM-40 standalone unit. Figure 1-3. ASM-40 Standalone Unit The front panel includes seven LEDs, which display the status of power, data flow, control signals and diagnostics. Four front-panel switches control the three loopbacks and BER testing activation.
Chapter 1 Introduction Installation and Operation Manual Timing Generator This circuit is a PLL circuit. ASM-40 transmits data to the line at the following baud rates: 2048, 1544, 1536, or 1920 kbps. The baud rates support different data rates, which enable ASM-40 to be used as a rate converter. • 2048 kbps – 32, 64, 128, 256, 512, 1024 and 2048 kbps • 1536 kbps – 192, 384, 768 and 1536 kbps • 1544 kbps – 1544 kbps • 1920 kbps – 1920 kbps.
Installation and Operation Manual Chapter 1 Introduction ASM-40 ASM-40 INT TXD TX RCV TX TX TX PLL TC & RC TXD TC & RC Clock Recovery FIFO RX RXD RC RX RX RX FIFO RXD Clock Recovery ASM-40 ASM-40 TXD EXT CLK FIFO TD EXT RCV TX TX PLL TC & RC TXD TC & RC Clock Recovery FIFO RD RX RXD RC RX FIFO RXD Clock Recovery Figure 1-6. ASM-40 Clock Configuration G.
Chapter 1 Introduction Installation and Operation Manual Basic ASM-40 G.703-HDB3 Interface Internal, Receive Data and CLK (Input) RCV G.703-HDB3 Data TD XMT FIFO RC Data EXT or HDB Clock and Data TX PLL TC External Internal EXT CLK Receive Data and CLK (Output) XMT G.703-HDB3 RD Data RCV FIFO Data Clock and Data RX Figure 1-7. G.
Installation and Operation Manual Chapter 1 Introduction Receiver An AGC end equalizer provides the received signal for the clock and data recovery circuitry. NRZ Interface The digital side provides an interface choice of V.35, X.21, RS-232, RS-530, V.36 (via adapter cable), Ethernet/Fast Ethernet bridge, or IP router. ASM-40 can be ordered with G.703-HDB3 on the digital side, for data rates 2048, 1024, 512, 256, or 128 kbps. This enables operation as a baud rate converter or repeater for G.703.
Chapter 1 Introduction Connector Installation and Operation Manual DB-15 or 5-clip terminal block: • 100Ω for 1544 kbps and 1536 kbps balanced • 120Ω for 2048 kbps and 1920 kbps balanced BNC coax: • 75Ω for 2048 and 1920 kbps unbalanced DTE Interface Data Rate 32, 64, 128, 192, 256, 384, 512, 768, 1024, 1536, 1544, 1920, or 2048 kbps G.703-HDB3: 128, 256, 512, 1024, or 2048 kbps G.703 Codirectional: 64 kbps Signal Attenuation (G.703-HDB3 Interface) 6 dB Output Level (G.
Installation and Operation Manual Diagnostics V.54 Loopbacks Chapter 1 Introduction Local loopback (LLB): activated by a front panel pushbutton or by the DTE interface signal (V.24, V.35 and RS-530 only) Remote loopback (REM): activated by a front panel pushbutton or by the DTE interface connector signal (V.24, V.35 and RS-530 only) Local digital loopback (DIG): activated by a front panel pushbutton Indicators Physical Internal BERT Built-in pattern generator and tester, complies with ITU V.
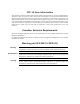
Chapter 1 Introduction 1-10 Technical Specifications Installation and Operation Manual ASM-40 Ver. 1.
Chapter 2 Installation and Setup This chapter describes installation and setup procedures for the standalone ASM-40 modem. ASM-40 is delivered completely assembled. It is designed for tabletop or 19-inch rack installation. For rack installation instructions, refer to the rack mounting kit for 19-inch racks guide that comes with the RM kit. After installing the unit, refer to Chapter 3 to assure normal operation. In case a problem encountered, refer to Chapter 4 for test and diagnostic instructions.
Chapter 2 Installation and Setup 2.2 Installation and Operation Manual Package Contents The ASM-40 package includes the following items: • One ASM-40 unit • Last Mile Access and Intelligent Modems CD • CBL-530/449 adapter cable for the ASM-40 units with V.36 interface • AC power cord or DC power supply connector kit • RM-28 rack mount kit (if ordered). 2.3 Installation and Setup ASM-40 is a standalone device intended for tabletop or bench installation. It is delivered completely assembled.
Installation and Operation Manual Chapter 2 Installation and Setup 3. Select the line code (SW4). The line code must be the same for both local and remote units. HDB3 – Select the 32, 64, 128, 256, 512, 1024, 1920 and 2048 kbps data rate. In this case the B8ZS and AMI section settings are irrelevant. B8ZS – Select the 192, 384, 768, 1536 and 1544 kbps data rate, and set the B8ZS section to OFF, and AMI – to OFF.
Chapter 2 Installation and Setup Installation and Operation Manual Table 2-1. ASM-40 Internal Jumpers and Switches DIP Switch Function Possible Settings Factory Setting EX/R and INT sections, SW4/1, 2 Select the transmit clock INT – ON, internal clock. EX/R section is disabled INT – ON EX/R – OFF EX/R – ON, INT – OFF, receive clock EX/R – OFF, INT – OFF, external clock Note: When set to external clock, ASM-40 automatically configures itself to the DTE data rate, disabling SW3 (baud rate).
Installation and Operation Manual Chapter 2 Installation and Setup Table 2-1. ASM-40 Internal Jumpers and Switches (Cont.) DIP Switch Function Possible Settings Factory Setting RLBE section, SW3/6 Enables remote digital loopback activation from the DTE (via pin 21 for V.24, RS-530, V.36 or via pin “HH” for V.
Chapter 2 Installation and Setup Installation and Operation Manual Connecting the Line The ASM-40 line connector may be optionally DB-15 female or a 5-port terminal block or two BNC coax connections. Refer to the appropriate section below for the description of the connection procedures for the relevant line interface types. To connect the DB-15 balanced interface: Use DB-15 male cable connector and connect it to the ASM-40 line port designated LINE.
Installation and Operation Manual Chapter 2 Installation and Setup Connector pin allocations for the IR-ETH, IR-IP, and IR-ETH/QN interface modules appear in Appendix B, Appendix C, Appendix D and Appendix E respectively; pin assignments for the rest of the DTE interface options are described in Appendix A. The pin assignment of the G.703-HDB3 DB-15 connector is the same as of the line side DB-15 connector (see Appendix A).
Chapter 2 Installation and Setup 2-8 Installation and Setup Installation and Operation Manual ASM-40 Ver. 1.
Chapter 3 Operation This chapter provides the following information for the ASM-40 standalone modem: • ASM-40 front-panel indicators and controls • Operating procedures (turn-on, front-panel indications, performance monitoring and turn-off). Installation procedures given in Chapter 2 must be completed and checked before attempting to operate ASM-40. 3.1 Front Panel Controls and Indicators Figure 3-1 shows the ASM-40 front panel. Table 3-1 lists the ASM-40 controls, indicators and their functions.
Chapter 3 Operation Installation and Operation Manual Table 3-1. ASM-40 Front Panel Controls and Indicators (Cont.) Name Type Function DIG Pushbutton The digital loopback pushbutton causes the local ASM-40 to loop received data to its transmitter. Data Set Ready changes to OFF (see Figure 4-3). ANA Pushbutton The local loopback (V.54 loop 3) pushbutton causes the local ASM-40 to loop its transmitter output back to its receiver (see Figure 4-1). The transmitter continues to send data to the line.
Installation and Operation Manual Chapter 3 Operation Normal Indications If the local and remote ASM-40 units are in operation and transmitting/receiving data, the following indicator conditions exist: • PWR: On • RTS: On • TD: Flashing when transmitting • RD: Flashing when receiving • DCD: On • TEST: Off. If the above LED indications are not obtained following initial power turn-on, check that none of the test pushbuttons is pressed.
Chapter 3 Operation 3-4 Operating Procedure Installation and Operation Manual ASM-40 Ver. 1.
Chapter 4 Troubleshooting and Diagnostics This chapter contains procedures for performing system diagnostic tests for ASM-40. Use the test procedures provided in this chapter to: • Verify normal system operation • Isolate faulty equipment • Identify other sources of system malfunction. Tests are activated by the pushbuttons on the ASM-40 front panel and monitored via LED indicators. For description of ASM-40 controls and indicators and their functionality, see Chapter 3. 4.1 V.
Chapter 4 Troubleshooting and Diagnostics Installation and Operation Manual Local Analog Loopback (LLB) The local analog loopback (LLB) test checks the performance of the local ASM-40 modem, the local data terminal, and the connections between them (see Figure 4-1). The test is performed separately at the local and the remote site. ANA Pressed Data Clock Transmit Line Interface DTE Clock Data Receive ASM-40 Figure 4-1. Local Analog Loopback To perform the local analog loopback test: 1.
Installation and Operation Manual Chapter 4 Troubleshooting and Diagnostics REM Pressed Data Clock Transmit Receive Link Interface Local DTE Clock Data Link Interface Transmit Receive Local ASM-40 Remote DTE Remote ASM-40 Figure 4-2. Remote Digital Loopback To activate the remote digital loopback: 1. Press the REM pushbutton on the local ASM-40 front panel. The following LEDs are ON: Local unit: TEST, DCD, RTS, TD and RD Remote unit: TD, RTS, and TEST. 2.
Chapter 4 Troubleshooting and Diagnostics Installation and Operation Manual DIG Pressed Data Receive Transmit Link Interface Local DTE Clock Link Interface Remote DTE Data Receive Transmit Local ASM-40 Clock Remote ASM-40 Figure 4-3. Local Digital Loopback To activate the local digital loopback: • Press the DIG pushbutton on the local ASM-40 front panel. The following LEDs are ON: Local unit: TEST, RTS, and TD Remote unit: DCD, RTS, TD and RD.
Installation and Operation Manual Chapter 4 Troubleshooting and Diagnostics 2. Press the PATT pushbutton. Verify that: TEST LED is lit ERR LED lights up momentarily. If errors are encountered, the ERR led lights (for continuous errors) or blinks (for intermittent errors), the ASM-40 unit is faulty and should be replaced. If the test executes correctly, restore all pushbuttons and switches to their normal positions.
Chapter 4 Troubleshooting and Diagnostics Installation and Operation Manual PATT Pressed (Disconnects External BERT) PATT Pressed (Disconnects External BERT) Pattern Generator Pattern Generator Line Interface Pattern Tester ASM-40 Line Interface Pattern Tester ASM-40 Figure 4-5. ASM-40 BER System Test (Two-BER Test) 4-6 Internal BERT ASM-40 Ver. 1.
Chapter 5 ASM-40/R Card This chapter describes the ASM-40/R card version, designed for installation in the ASM-MN-214 card cage. The chapter contains the following sections: • The ASM-MN-214 card cage • The ASM-40/R card version • Power supply to ASM-40/R card • Installing the ASM-40/R card. 5.1 ASM-MN-214 Card Cage The ASM-MN-214 card cage contains one or two power supplies and up to 14 plug-in cards.
Chapter 5 ASM-40/R Card Installation and Operation Manual ASM-40/R with one of the Ethernet interfaces (IR-ETH or IR-ETH/QN) uses a CIA/ETH interface adapter, which converts one DB-25 connector to an RJ-45 connector. The adapter cable and interface attachments are also shown in Figure 5-1. Terminal Block Terminal Block CIA/TB-BNC/214 CIA/V.35/1 CIA/X.21/1 CIA/ETH CBL-530/449 Figure 5-1. ASM-MN-214 Rear Panel 5.
Installation and Operation Manual Chapter 5 ASM-40/R Card DC Supply The DC power supply is -48 VDC (-36 to -72 VDC) or 24 VDC (18 to 32 VDC). It uses a DC/DC converter module to provide the power required for the cards. Power Supply with Redundancy This special ordering option is equipped with two separate power supplies, operating together and sharing the load of the whole card cage. If either of the power supplies fails, the other one will continue to supply power to the full card cage.
Chapter 5 ASM-40/R Card Installation and Operation Manual PWR RTS TD RD DCD TEST ERR DIG ANA REM PATT ASM-40 Figure 5-2. ASM-40/R Front Panel 5-4 ASM-40/R Front Panel ASM-40 Ver. 1.
Installation and Operation Manual Chapter 5 ASM-40/R Card Figure 5-3. ASM-MN-214 Front Panel 5.4 Installing the ASM-40/R Card Setting Internal Jumpers and Switches The ASM-40/R internal DIP switches are similar in their functionality to those of the standalone unit. The configuration DIP switches are located on the print side of the modem card. The J5 jumper is located on the component side of the card; it is identical to the J4 jumper of the standalone ASM-40.
Installation and Operation Manual F2 FUSE FUSE 250V F1 1A 1A DIS J5 CHASS 250V Chapter 5 ASM-40/R Card CON Figure 5-4 ASM-40/R PCB Layout, Component Side Installing ASM-40/R into the ASM-MN-214 Card Cage To install the ASM-40/R card in the ASM-MN-214 card cage: 1. Install the ASM-MN-214 card cage in the 19-inch rack. 2. Insert the ASM-40/R card into one of the ASM-MN-214 slots. 3. Push the card into the cage until it is fully inserted into the edge connector inside the rack. 4.
Installation and Operation Manual Chapter 5 ASM-40/R Card Connecting the Interfaces ASM-40/R uses the ASM-MN-214 rear panel terminal block ports for the line connections. The 25-pin D-type female connector serves as a DTE port. 1. Remove the protection cover from the terminal block connectors. 2. Connect the terminal block to the ASM-MN-214 terminal block connector. 3.
Chapter 5 ASM-40/R Card 5-8 Installing the ASM-40/R Card Installation and Operation Manual ASM-40 Ver. 1.
Appendix A Pinouts A.1 V.24, V.35, X.21 and RS-530 DTE Interface Connectors Table A-1 lists the pin assignments of the V.24/RS-232, V.35, X.21 and RS-530 interface connectors. Table A-1. DTE Interface Signal Assignments Signal Function RS-232 V.35 RS-530 X.
Appendix A Pinouts Signal Function Installation and Operation Manual RS-232 V.35 RS-530 X.21 Description DB-25 DB-25 34-Pin DB-25 DB-25 DB-15 Standalone Card Standalone Standalone and Card Standalone and Card Cage Card Cage Cage Cage Pin Circuit Pin Circuit Pin Circuit (Function) Request to 4 4 C RTS 105 Send 4 4 3 19 19 10 A positive level to ASM-40 when data (Control) transmission is desired.
Installation and Operation Manual Signal Function Appendix A Pinouts RS-232 V.35 RS-530 X.21 Description DB-25 DB-25 34-Pin DB-25 DB-25 DB-15 Standalone Card Standalone Standalone and Card Standalone and Card Cage Card Cage Cage Cage Pin Circuit Pin Circuit Pin Circuit (Function) Transmit 15 Clock 14 Y SCT(A) 114 15 15 6 S(A) A transmit data 10 a SCT(B) 114 12 12 13 S(B) rate clock for use (Signal Timing) by an external data source.
Appendix A Pinouts Installation and Operation Manual A.2 V.36 Interface Connector The ASM-40 V.36 interface is provided via an adapter cable converting between 25-pin RS-530 connector and 37-pin V.36 connector. Table A-2 lists the cable wiring. Table A-2. Cable Converting between RS-530 and V.36 Interfaces, Pin Assignment Signal Function A-4 V.
Installation and Operation Manual A.3 Appendix A Pinouts ASM-40/R with Ethernet Interface, DTE Connection ASM-40/R with the IR-ETH or IR-ETH/QN Ethernet interface module uses a CIA/ETH interface adapter, which converts one DB-25 connector to an RJ-45 connector. If you intend to prepare a DB-25/RJ-45 adapter cable yourself, refer to Figure A-1 and Table A-3 for the pin designations and their assignment. 7 9 11 12 13 Figure A-1. Pinout of the DB-25 Connector of ASM-MN-214 (Ethernet Interface) Table A-3.
Appendix A Pinouts Installation and Operation Manual Chassis Ground RCV1* (input) RCV2 (input) XMT1 (output) XMT2* (output) Figure A-2. Terminal Block Line Connector Table A-4. DB-25 Connector Pinout (G.703-HDB3 Interface) Note Pin Function 2 RX (data input) 22* RX (data input) 9 TX (data output) 11* TX (data output) On the DTE side (HDB3 board), the jumper marked J2 is for the receive side (input), and the jumper marked J3 is for the transmit side (output). A.5 ASM-40/R with G.
Installation and Operation Manual Appendix A Pinouts Table A-5. DB-25 and RJ-45 Pinout, G.703 Codirectional Pin Signal A.6 RJ-45 DB-25 RCV (+) 3 9 RCV (-) 6 11 XMT (+) 4 2 XMT (-) 5 16 GND 2 7 DB-15 Line Connector (Standalone ASM-40) Line interface of the standalone ASM-40 unit may terminate in DB-15 female connector, wired in accordance with Table A-6. Table A-6. DB-15 Line Connector Pin Assignment ASM-40 Ver. 1.
Appendix A Pinouts A-8 DB-15 Line Connector (Standalone ASM-40) Installation and Operation Manual ASM-40 Ver. 1.
Appendix B IR-ETH Interface Module IR-ETH is an interface module for RAD modems, used for converting the Ethernet (10BaseT or 10Base2) electrical levels to the modem TTL levels. It also converts the Ethernet protocol to HDLC to enable long-distance transmission and avoid the Ethernet collision limitation. IR-ETH includes an internal, self-learning Ethernet bridge, which enables a high performance link between two Ethernet segments at a low transmission rate.
Appendix B IR-ETH Interface Module Installation and Operation Manual 10BASE-2 XMT RCV GND RX COLL TX Figure B-3. ASM-40 Rear Panel with IR-ETH/BNC Table B-1. RJ-45 Connector Pinout B.2 General LAN Pin Signal 3 RCV (+) 6 RCV (-) 1 XMT (+) 2 XMT (-) – GND Technical Specifications LAN Table 10,000 addresses Filtering and Forwarding 15,000 pps Buffer 256 frames Delay 1 frame Standard Conforms to IEEE 802.
Installation and Operation Manual B.3 Appendix B IR-ETH Interface Module Installation and Operation Figure B-4 shows the IR-ETH layout, the locations of the DIP switch, and the rear panel components for the UTP version. 4 3 2 1 Figure B-4. IR-ETH Module Layout (UTP Option) Opening the ASM-40 Case You must open the ASM-40 case in order to access the DIP switch located on the IR-ETH board. To open the ASM-40 case: 1. Disconnect the power cord from the power source. 2.
Appendix B IR-ETH Interface Module Installation and Operation Manual Setting the DIP Switch Set the IR-ETH DIP switch according to Table B-2. Table B-2. DIP Switch Settings Switch Number Name Description 1 SQ/FD ON – Ethernet full-duplex mode Default Setting OFF – Ethernet half-duplex mode OFF Note: The SQ/FD switch is not used in the Ethernet bridge with the BNC connector option.
Installation and Operation Manual Appendix B IR-ETH Interface Module Connecting the LAN For 10BaseT installation, either a straight cable or a cross cable may be required. Use a cross cable when connecting to a port that does not implement the crossover function internally. Otherwise, use a straight cable. Note ASM-40 Ver. 1.0 Hubs usually do implement the crossover function internally while network interface cards and other devices do not.
Appendix B IR-ETH Interface Module B-6 Installation and Operation Installation and Operation Manual ASM-40 Ver. 1.
Appendix C IR-ETH/QN (IR-ETH/Q) Interface Module C.1 Introduction The IR-ETH/QN interface module includes a high performance self-learning Fast Ethernet bridge, which is connected to the LAN via a single 10BaseT or 100BaseT port, operating in full or half duplex and providing simple and cost-effective interconnection between 10/100BaseT LANs. The IR-ETH/QN interface module also supports IEEE 802.1/P frames and IEEE 802.1/Q frames, enabling VLAN applications.
Appendix C IR-ETH/QN (IR-ETH/Q) Interface Module C.2 Installation and Operation Manual IR-ETH/QN Connector Figure C-2 shows the rear panel of ASM-40, equipped with IR-ETH/QN module. Table C-1 lists the module's RJ-45 connector pinout. G.703 XMT RCV GND ACT LINK 100M IR-ETH/QN Figure C-2. Rear Panel of ASM-40 with IR-ETH/QN Module Table C-1. RJ-45 Connector Pinout C.
Installation and Operation Manual WAN Appendix C IR-ETH/QN (IR-ETH/Q) Interface Module Connector RJ-45 Protocol Point-to-point Data Rate Up to 2048 kbps C.4 Installation and Operation To set the internal switch on the IR-ETH/QN interface board, you have to open the ASM-40 case. Accessing the Internal DIP Switch To open the ASM-40 case: 1. Disconnect all the cables connected to ASM-40. 2. Slide the blue side panel forward to detach it from the case. 3.
Appendix C IR-ETH/QN (IR-ETH/Q) Interface Module Installation and Operation Manual SW2 1. 100 2. AN 3. FDX 4. BPR 5. MUL 6. NC ON SW1 1. MDI 2. LC1 3. LC2 4. FLC 5. NC 6. NC 7. NC 8. NC ON Figure C-3. Location of DIP Switches SW1 and SW2 Setting the DIP Switches Configure the IR-ETH/QN module by setting the DIP switches SW1 and SW2 in accordance with Figure C-3, Table C-2 and Table C-3. Note To make the changes effective, you have to restart the ASM-40 unit by turning it off and on. Table C-2.
Installation and Operation Manual Appendix C IR-ETH/QN (IR-ETH/Q) Interface Module Table C-3.
Appendix C IR-ETH/QN (IR-ETH/Q) Interface Module Installation and Operation Manual Connecting the LAN Use either a straight cable or a cross cable for the LAN connection. Use a cross cable when connecting to a port that does not implement the crossover function internally. Otherwise, use a straight cable. Note C-6 Hubs usually implement the crossover function internally, while NICs and other devices do not. Installation and Operation ASM-40 Ver. 1.
Appendix D IR-IP Interface Module D.1 Introduction Overview IR-IP is a high-performance, miniature IP router based on RAD's unique IP router chip, the ChipRouter. IR-IP works by taking each Ethernet frame from the LAN and determining whether the IP packet is destined for the IP net on the Ethernet LAN. If not, IR-IP forwards the packet to the WAN (line) link. IP packets received from the WAN link are automatically forwarded to the LAN if the IP net matches.
Appendix D IR-IP Interface Module Installation and Operation Manual Application Figure D-1 shows a typical application of the ASM-40 modem equipped with the IR-IP interface module. ASM-40 with IR-IP ASM-40 with V.35 Interface Router Figure D-1. Typical Application of ASM-40 with IR-IP D.
Installation and Operation Manual Appendix D IR-IP Interface Module IR-IP LEDs IR-IP contains three LEDs, which indicate module activity. Table D-1 lists the LEDs functions. Table D-1. IR-IP LEDs Functions Name Type Function INT Green LED ON – LAN integrity is established. ACT Yellow LED Blinking – Transmit/receive activity is detected on the Ethernet link. ERR Red LED ON – Buffer overflow occurred (during normal operation). During power-up, provides additional indications, as described below.
Appendix D IR-IP Interface Module Installation and Operation Manual IR-IP DIP Switch (Card version) IR-IP interface module on the card version of ASM-40 contains a six-section DIP switch, as seen in Figure D-3. Table D-2 lists the DIP switch functions. Figure D-4. IR-IP DIP Switch (card version) Table D-3. IR-IP DIP Switch Functions No Function Values Default Setting 1 – N/A – 2 Controls the remote WAN test loopback.
Installation and Operation Manual D.
Appendix D IR-IP Interface Module Installation and Operation Manual After configuring IR-IP, it starts normal operation and routes the traffic in accordance with the user-selected configuration parameters. To change the parameters of an already-configured IR-IP, establish communication from a Telnet host using the assigned IP address. Default IP Communication Parameters The default IP communication parameters of the interface module are: • The default IP address of the IR-IP Ethernet port is 192.168.
Installation and Operation Manual Appendix D IR-IP Interface Module 4. Establish again communication with IR-IP and continue the preliminary configuration in accordance with the Quick Setup Menu section below. Connecting the Telnet Host Before starting the management and configuration activities, it is necessary to establish IP communication between your Telnet host and the IR-IP interface module. For this purpose, it is necessary to provide a communication path.
Appendix D IR-IP Interface Module Installation and Operation Manual The IP learning mechanism enables IR-IP to learn its LAN interface IP address by receiving frames sent by a ping utility to the prescribed LAN IP address. Note To use the IP learning mechanism, you do not need to know the current address of IR-IP LAN interface, but only the prescribed IP address. The IP address is actually retrieved from the ARP frames sent during pinging to locate the ping destination, not from the ping frames.
Installation and Operation Manual Appendix D IR-IP Interface Module The ERR indicator must turn off. At this stage, the communication with IR-IP router is lost, because its IP address has been changed. Therefore, you must reconfigure the destination IP address of the Telnet host. If you wish, you may also change the temporary IP address assigned to the host (192.168.205.2) back to its permanent address.
Appendix D IR-IP Interface Module Installation and Operation Manual No ping replies from IR-IP • If your host does not begin to receive ping replies after three unsuccessful attempts, check the physical connection path between the Telnet host Ethernet interface and the IR-IP 10BASE-T connector. The IP learning process is not successful • Check that the prescribed IP address does not appear in the ARP table. D.
Installation and Operation Manual IR_IP 1. 2. 3. 4. 5. 6. Appendix D IR-IP Interface Module S/W Ver. 1.00 31/IR (date) Quick Setup Management Access Advanced Setup Device Control View Diagnostic Tool (PING terminal) Press one of the numbers to select or ESC: Figure D-5. IR-IP Main Menu To end the utility, press when the Main menu is displayed. This will also end the Telnet session. Menu Structure of Management Utility Figure D-6 shows the menu structure of the IR-IP management utility.
Appendix D IR-IP Interface Module D.7 Installation and Operation Manual Quick Setup Menu The Quick Setup menu is used to select the main parameters’ values that must be defined before you start using IR-IP. Use the Advanced Setup menu (see the Advanced Setup Menu section below) to specify values for other IR-IP configuration parameters not included in this menu. To access the Quick Setup menu: • From the Main menu, type 1. The Quick Setup menu appears (Figure D-7). IR_IP S/W Ver. 1.
Installation and Operation Manual Appendix D IR-IP Interface Module ASM-40 with IR-IP LAN IP Address: 192.168.1.2 Mask: 255.255.255.248 IP Address 192.168.1.2 Mask 255.255.255.248 Default Gateway 192.168.1.1 .3 .248 192.168.1.1 .4 .248 192.168.1.1 .5 .248 192.168.1.1 .6 .248 192.168.1.1 Figure D-8. Selecting the IP Subnet Mask WAN IP Address Used to enter the IP address for the IR-IP WAN interface, i.e., the IP address to be used by IP hosts on the WAN to reach this IR-IP interface module.
Appendix D IR-IP Interface Module Installation and Operation Manual Read Protocol from DIP Switches Selecting YES for this parameter forces IR-IP router card to use the WAN protocol selected by section 2 of its DIP switch: PPP or Frame Relay. If you want to be able to select the WAN protocol by means of the Protocol field (parameter 7) of the Quick Setup menu, select NO. Protocol Used to select the WAN protocol to be used by the IP router card: PPP, HDLC or Frame Relay.
Installation and Operation Manual Note Appendix D IR-IP Interface Module Since the IP router card does not support SNMP management, the SNMP Read Community, SNMP Write Community, SNMP Trap Community, and SNMP Management Table parameters are not used. Telnet Password By default, management access to IR-IP via Telnet is unrestricted. To restrict access, enter a Telnet password by selecting 1 in the Management Access menu. The password can include up to 10 characters, and is case-sensitive.
Appendix D IR-IP Interface Module Installation and Operation Manual Device Identification Menu The Device Identification menu is used to define and store in the IR-IP logistic information: the logical name of IR-IP, information on the contact person and device location. To access the Device Identification menu: • From the Advanced Setup menu, type 1. The Device Identification menu appears (Figure D-11). IR_IP S/W Ver. 1.00 31/IR (date) Quick Setup Management Access Advanced Setup ............
Installation and Operation Manual IR_IP Appendix D IR-IP Interface Module S/W Ver. 1.00 31/IR (date) Quick Setup Management Access Advanced Setup ................................................................. Device identification Interface Parameters ================================================================= 1. LAN Status :[ Open ] 2. WAN Status :[ Open ] 3. WAN Throttle :[ Full ] 4. Aging Timeout (min) :5. Press one of the numbers to select or ESC: Figure D-12.
Appendix D IR-IP Interface Module Installation and Operation Manual Aging Timeout Used to specify the time after which inactive LAN stations are removed from the IR-IP ARP table. A station is defined as inactive when no IP traffic is received from it by the IR-IP LAN interface.
Installation and Operation Manual IR_IP Appendix D IR-IP Interface Module S/W Ver. 1.00 31/IR (date) Quick Setup Management Access Advanced Setup ..................................................................... Device identification Interface Parameters Protocol Parameters ===================================================================== 1. Self Learn :[ Enabled ] 2. Maintenance Protocol :[ ANSI T1.617 ANNEX D ] 3. DLCI (0-None) :0.. 4. CIR :0....... 5. EIR :64000...
Appendix D IR-IP Interface Module Installation and Operation Manual User Name To Send The name by which an IP router card configured as guest identifies itself. Password To Send The password by which an IP router card configured as guest identifies itself. User Name To Accept The user name to be accepted by an IP router configured as host, when an incoming connection request is received.
Installation and Operation Manual Appendix D IR-IP Interface Module Multicast IP Menu The Multicast IP menu is used to specify the IP multicast frame forwarding parameters, and to access the static multicast groups’ table. To access the Multicast IP menu: • From the Advanced Setup menu, press 4. The Multicast IP menu appears (Figure D-15). IR_IP S/W Ver. 1.00 31/IR (date) Quick Setup Management Access Advanced Setup .....................................................................
Appendix D IR-IP Interface Module Installation and Operation Manual Static Groups Select this parameter to access the static multicast groups table. The table is used to specify the IP addresses for up to 10 IP multicast groups. You can add, change, or delete each entry in the table (see the prompt line). To access the Static Groups menu: • From the Multicast IP menu, type 2. The following screen appears: IR_IP S/W Ver. 1.
Installation and Operation Manual IR_IP Appendix D IR-IP Interface Module S/W Ver. 1.00 31/IR (date) Quick Setup Management Access Advanced Setup Device Control ---------------------------------------------------------1. New Software Download 2. View error LOG 3. Resets Press one of the numbers to select or ESC: Figure D-17.
Appendix D IR-IP Interface Module Installation and Operation Manual Server IP Address Used to enter the IP address of the TFTP server. File Name Used to enter the name and path of the file to be transferred from the TFTP server. Total Timeout Used to enter the time IP router should wait for an acknowledgment from the TFTP server, for example 60 seconds.
Installation and Operation Manual IR_IP Appendix D IR-IP Interface Module S/W Ver. 1.00 31/IR (date) Quick Setup Management Access Advanced Setup Device Control ..................................................................... New Software Download View error LOG Resets ===================================================================== 1. Reset Device 2. Reset LAN 3. Reset WAN Press one of the numbers to select or ESC: Figure D-19.
Appendix D IR-IP Interface Module Installation and Operation Manual D.11 View Menu The View menu is used to view the IR-IP configuration data, and display information on its ARP tables, multicast Groups tables and statistics. To access the View menu: • From the Main menu, type 5. The View menu appears (Figure D-20). IR_IP S/W Ver. 1.00 31/IR (date) Quick Setup Management Access Advanced Setup Device Control View ---------------------------------------------------------1.
Installation and Operation Manual Appendix D IR-IP Interface Module IR_IP (date) S/W Ver. 1.00 31/IR VIEW CONFIGURATION -----------------BOOT Version Device Name System Location Contact Person :1.06 18.03.1999 :IP router card :The location of this device :Name of contact Person MAC Address Default Gateway : 00-20-D2-16-3F-9B : WAN Intrf Type Baud(Kbps) Prot IP Address IP Mask Status ..................................................................... LAN UTP ------Ethr 192.168.205.005 255.
Appendix D IR-IP Interface Module Installation and Operation Manual To access the Multicast Groups Table screen: • In the View menu, type 3. The Multicast Groups Table screen appears (Figure D-23). IR_IP Multicast Groups Table ---------------------Group IP Address Status Press any key for exit S/W Ver. 1.00 31/IR (date) Group IP Address Status Figure D-23.
Installation and Operation Manual Appendix D IR-IP Interface Module IR_IP WAN WAN WAN WAN WAN WAN WAN WAN WAN Counter Name in Octets Out Octets Out Frames to LAN Frames Transfer IP Datagram Received to CPU Discarded to LAN Discarded Out Errors CRC Errors PPP Address Error PPP Control Error DLCI Unrecognized Error Frame Relay Forward Conge Frame Relay Backward Conge S/W Ver. 1.
Appendix D IR-IP Interface Module Installation and Operation Manual IR_IP S/W Ver. 1.00 31/IR (date) Quick Setup Management Access Advanced Setup Device Control View Diagnostic Tools (PING terminal) ===================================================================== 1. Ping IP Address :192.168.100.011 2. Start Pinging :>>> 3. Stop Pinging :>>> Press one of the numbers to select or ESC: Figure D-26.
Installation and Operation Manual IR_IP Appendix D IR-IP Interface Module S/W Ver. 1.00 31/IR (date) Quick Setup Management Access Advanced Setup Device Control View Diagnostic Tools (PING terminal) ===================================================================== 1. Ping IP Address :192.168.100.011 2. Start Pinging :>>> 3. Stop Pinging :>>> Pinging 192.168.212.001 Sent 27 Recvd 25 Lost 2 Resp.Time 60 ms Press one of the numbers to select or ESC: Figure D-27.
Appendix D IR-IP Interface Module Note Installation and Operation Manual If you do not set sections 1 and 2 to OFF within 15 seconds of power-up, the IP router card ignores the setting of all the four sections to ON and starts normal operation. In this case, it is recommended to turn ASM-40 off and then back on. To abort the whole operation, turn ASM-40 off, return all the four-switch section to the desired positions, and then turn ASM-40 on again. 5.
Installation and Operation Manual Appendix D IR-IP Interface Module To enable the downloading, IR-IP automatically activates its TFTP server application with the following factory-default IP parameters: • • IP address: Subnet mask: 192.168.205.1 255.255.255.252. Connect the computer serving as a TFTP client to the IR-IP 10BASE-T connector in the way as a Telnet host used for preliminary configuration (see the Performing Preliminary Configuration section).
Appendix D IR-IP Interface Module D-34 Erasing IR-IP Software Installation and Operation Manual ASM-40 Ver. 1.
Appendix E IR-G.703 Interface Module E.1 Introduction IR-G.703 is an interface module for RAD modems, converting G.703 64 kbps codirectional signals to TTL levels. The converted data is sent over the modem link using the modem modulation technique and converted back at the other end into G.703 64 kbps codirectional signals, or into any other digital interface signal possible. Note For the G.703 codirectional interface, end-to-end byte synchronization is not maintained.
Appendix E IR-G.703 Interface Module Installation and Operation Manual Table E-1. RJ-45 Connector Pinouts E.2 Pin Function 3 RCV (+) 6 RCV (-) 4 XMT (+) 5 XMT (-) 2 GND Selecting the IR-G.703 Timing The IR-G.703 interface module can operate with EXT or INT/RCV timing to match the clock reference of the ASM-40 modem. The clock selection is made via the JP1 jumper located on the module board (see Figure E-2). INT/RCV JP1 EXT Figure E-2. JP1 Location on the IR-G.
Installation and Operation Manual Appendix E IR-G.703 Interface Module Modem A Modem B IR-G.703 Module TX Data G.703 Codirectional 64 kbps Network TX Data Clock Recovery CLK Clock Out RX FIFO Clock Recovery Data Clock Recovery RX Data Timing Source FIFO RX TX Clock In EXT Clock Mode RCV Clock Mode Figure E-3. IR-G.703 EXT Timing INT/RCV Timing The INT/RCV clock is used in applications where the G.
Appendix E IR-G.703 Interface Module E-4 Selecting the IR-G.703 Timing Installation and Operation Manual ASM-40 Ver. 1.
24 Raoul Wallenberg Street, Tel Aviv 69719, Israel Tel: +972-3-6458181, Fax +972-3-6483331, +972-3-6498250 E-mail: erika_y@rad.com, Web site: http://www.rad.com Customer Response Form RAD Data Communications would like your help in improving its product documentation. Please complete and return this form by mail or by fax or send us an e-mail with your comments. Thank you for your assistance! Manual Name: ASM-40 Ver. 1.
Error Report Type of error(s) or problem(s): Incompatibility with product Difficulty in understanding text Regulatory information (Safety, Compliance, Warnings, etc.) Difficulty in finding needed information Missing information Illogical flow of information Style (spelling, grammar, references, etc.) Appearance Other Please list the exact page numbers with the error(s), detail the errors you found (information missing, unclear or inadequately explained, etc.
Publication No. 606-200-05/07 International Headquarters 24 Raoul Wallenberg Street Tel Aviv 69719, Israel Tel. 972-3-6458181 Fax 972-3-6498250, 6474436 E-mail market@rad.com North America Headquarters 900 Corporate Drive Mahwah, NJ 07430, USA Tel. 201-5291100 Toll free 1-800-4447234 Fax 201-5295777 E-mail market@radusa.com www.rad.