
Specifications


Introduction
RADring
Installation & Operation Manual
1-10 System Configuration 8/11/98 12:03
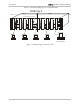
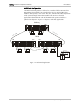
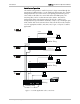
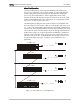
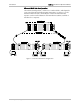
Figure 1-3 illustrates multiple rings in a stand-alone hub.
RADring II
RADview
Network Manager
CH1 CH2
CML/NM
RESET
1
2
1
2
TL-2/EDU
1
2
1
2
TL-2/EDU
1
2
TL-2/F
TX
RX
TX
RX
CH1
CH2
1
2
TL-2/F
TX
RX
TX
RX
CH1
CH2
1
2
TL-2/EDS
1
2
1
2
TL-2/EDS
1
2
1
2
3
4
TL-4/U
1
3
2
4
1
2
3
4
TL-4/U
1
3
2
4
TL-4/S
1
3
2
4
2
4
1
3
Terminated Access Module
Ring 1
Ring 2
Figure 1-3 Multiple Rings in Stand-alone Hub