
Specifications


ASMi-52CQ Ver. 2.12 Configuring ASMi-52CQ 1
Quick Start Guide
If you are familiar with ASMi-52CQ, use this guide to prepare the unit for
operation.
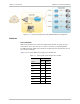
1. Installing ASMi-52CQ
³ To install the ASMi-52CQ card:
1. Insert the ASMi-52CQ card into a slot of the LRS-24 chassis.
2. Insert the interface module into the upper section of LRS-24F or back of
LRS-24B.
3. Connect the line and DCE cables.
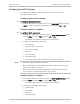
2. Configuring ASMi-52CQ
Accessing the Supervisory Terminal
³ To start the communication session:
1. Connect the terminal to the CM-2 RS-232 front connector of the LRS-24
chassis.
2. Power up the hub.
The opening screen appears, followed by the CM2> prompt.
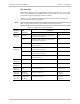
³ To access the Modem Setup menu:
1. At the CM2> prompt, select Modem Parameters and press <Enter>.
The following message appears:
Please enter the slot number (1-12)
2. Type the slot number of the ASMi-52CQ card and press <Enter>.
Configuring the Clock Source
³ To configure the clock source:
• In the Modem Setup menu, move the cursor to CLOCK SOURCE LOC/REM field
by pressing <Tab> and select the clock source for the selected modem.