
Instruction manual


Chapter 2 Installation and Setup RIC-E3/ETH, RIC-T3/ETH Installation and Operation Manual
2-6 Installation and Setup
Table 2-4. Ethernet Interface DIP Switch Settings (Cont.)
Section Name Description Possible Settings Factory Setting
7 MUL Controls LAN to WAN
multicasting
ON – Multicast messages from LAN to
WAN are blocked
OFF – Multicast messages from LAN to
WAN are not blocked
OFF
8 SCR Controls the scrambling of
Ethernet frames
ON – Ethernet frames are scrambled
OFF – Ethernet frames are left
unchanged
OFF
Closing the Case
Once you finish the internal settings, you have to close the RIC-E3/ETH and
RIC-T3/ETH case.
To close the RIC-E3/ETH or RIC-T3/ETH case:
1. Slide the unit's interior back into the case.
2. Screw in the two rear panel screws to fasten the main board in the case.
Connecting the Interfaces
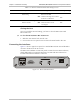
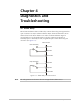
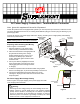
Figure 2-5 shows a typical rear panel of a standard RIC-E3/ETH unit and identifies
connector locations for the AC version.
The RIC-E3/ETH and RIC-T3/ETH rear panels contain also LAN status indicators,
which duplicate the front panel LAN LEDs. The LINK and ACT indicators are
located on the Ethernet interface connector.
LINE 10/100BASE-T
100M
ACT LINK
IN OUT
ALARMS
Figure 2-5. RIC-E3/ETH Rear Panel