
Specifications


RICi-E3, RICi-T3 Ver. 1.0 Installing RICi-E3, RICi-T3 1
Quick Start Guide
RICi-E3, RICi-T3 should be installed by an experienced technician. If you are
familiar with RICi-E3, RICi-T3, use this quick guide to prepare RICi-E3, RICi-T3 for
operation.
1. Installing RICi-E3, RICi-T3
This section instructs you on connecting RICi-E3, RICi-T3 to the power and the
network(s).
Connecting the Interfaces
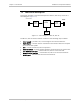
To connect RICi-E3, RICi-T3 to the network:
1. Connect the network to the coax connector designated E3 or T3.
2. Connect the user LAN to the RJ-45 connector designated 10/100 BaseT.
3. Connect the ASCII terminal to the CONTROL connector at the rear panel.
OR
Connect a Telnet host, a PC running a Web browser or an SNMP management
station to the Ethernet port.
Connecting the Power
To connect RICi-E3, RICi-T3 to the power:
• Connect the power cable to the power connector on the rear panel.
The unit starts running.