
Specifications


Chapter 4 Configuration Installation and Operation Manual
4-2 Configuring for Management RICi-E3, RICi-T3 Ver. 1.0
Configuring IP Host Parameters
You may manage RICi-E3, RICi-T3 using a network management station on the
LAN that is connected to RICi-E3, RICi-T3. In order to establish a proper
connection, you have to configure the host IP address, the subnet mask and the
default gateway. It is also possible to automatically receive these host IP
parameters via the DHCP client when starting the unit.
Configuring the DHCP Client
RICi-E3, RICi-T3 maintains a DHCP client that requests an IP address from a DHCP
server, when the unit is connected to the network. The DHCP client can be
enabled or disabled. RICi-E3, RICi-T3 ships with the DHCP disabled by default.
You have to configure the DHCP client via an ASCII terminal or an SNMP manager
such as RADview. This option is masked for Telnet and ConfiguRAD sessions.
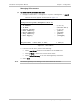
To enable the DHCP client:
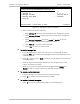
1. Navigate to Main Menu > Configuration > System > DHCP Client.
The DHCP Client menu appears as illustrated in
Figure 4-1
.
RICi-E3, RICi-T3
Configuration>System>DHCP Client
1. DHCP Client (Disable)
>
ESC-prev menu; !-main menu; &-exit 1 user(s)
Figure 4-1. DHCP Client Menu
2. From the DHCP Client menu, select DHCP Client and choose Enable.
RICi-E3, RICi-T3 receives all required host IP parameters once the DHCP
server has been identified.
You have to log on again once the unit has been reset.
To disable the DHCP client:
• From the DHCP Client menu, select DHCP Client and choose Disable.
RICi-E3, RICi-T3 releases the current IP address and then resets. You have
to manually reconfigure the host IP parameters as explained under
Managing IP Parameters
.
Note
Note