
Specifications


Chapter 4 Configuration Installation and Operation Manual
4-4 Configuring for Management RICi-E3, RICi-T3 Ver. 1.0
Entering Device Information
The RICi-E3, RICi-T3 management software allows you to assign a name to the
unit, specify its location to distinguish it from the other devices installed in your
system, and assign a contact person.
To enter device information:
1. Navigate to Main Menu > System >Management > Device Info.
The Device Information menu appears as illustrated in
Figure 4-3
.
2. From the Device Info menu, select Device Name and enter a desired name for
the RICi-E3, RICi-T3 unit.
3. Select Device Location and enter the desired name for the current RICi-E3,
RICi-T3 location.
4. Select Contact Person and enter name of a contact person.
5. Select Save.
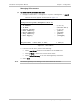
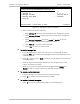
RICi-T3
Configuration>System>Management>Device Information
Description (T3 Intelligent Ethernet Converter)
1. Device Name ... (RICi-T3)
2. Location ... (The Location of the Device)
3. Contact Person ... (Name of Contact Person)
>
ESC-prev menu; !-main menu; &-exit; 1 user(s)
Figure 4-3. Device Information Menu
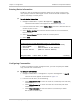
Configuring Communities
In order to establish a proper management link, you have to specify the SNMP
trap, read and write communities.
To configure communities:
1. Navigate to Main Menu > Configuration > System > Management > Host IP.
The Host IP menu appears as illustrated in
Figure 4-2.
2. From the Host IP menu, do the following:
Select Read Community to enter the name of a community with read-only
authorization.
Select Write Community to enter the name of a community with write
authorization.
Select Trap Community to enter the name of a community to which
RICi-E3, RICi-T3 sends traps.