
Specifications


Installation and Operation Manual Chapter 3 Operation
Optimux-106 Ver. 6.1 Configuration and Management Alternatives 3-5
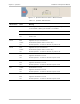
Link Loop type No Loop
Link LLB loop timeout (min)
[1-255]
5
Channel’s Loops No Loop
3.4 Configuration and Management Alternatives
Optimux-106 can be managed in the following ways:
• ASCII Terminal – connected to Optimux-106 via the control port
• Telnet – access to the configuration screens via any Telnet application
• RADview – RAD’s user-friendly SNMP-based GUI application, or by other
SNMP-based management application.
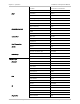
Use the terminal menus to set and view configuration parameters.
Figure
3-6
illustrates the main menu and its submenus. Use this tree as a reference aid while
performing configuration and control functions. Refer to
Chapter 4
and
Chapter 5
to find specific parameters.
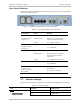
Working with an ASCII Terminal
Connect the ASCII terminal directly to the Optimux-106 control port using the
special cable provided with the product.
Use any standard ASCII terminal (a dumb terminal, or a PC running a terminal
emulation application) that is equipped with a V.24/RS-232 communication
interface to set up and configure Optimux-106.
³ To connect to a control terminal:
1. Make sure that all Optimux-106 connectors are properly connected to the
appropriate media.
2. Turn on the control terminal PC and set its default port parameters to 115,200
bps baud, 8 bits/character, 1 stop bit, no parity, flow control: none.
3. Set the terminal emulator to VT100 emulation for optimal view of system
menus.
4. If you are using Hyper Terminal, set the terminal mode to 132-column mode
for optimal view of system menus (Properties > Settings > Terminal Setup >
132 column mode).
5. Power-up Optimux-106.
At the end of the test, the PWR LED on the front panel lights green.
Logging In
To gain access to the main menu you must first log in.