
Specifications

Installation and Operation Manual Chapter 5 Monitoring and Diagnostics
Optimux-106 Ver. 6.1 Performing Diagnostic Tests 5-13
Optimux-106
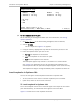
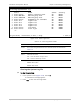
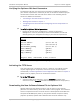
Diagnostics>T1 Loop
Number Loop Number Loop
1. Channel-1 No Loop Channel-2 No Loop
2. Channel-3 No Loop Channel-4 No Loop
1. No Loop
2. LLB
3. RLB
>
Please select item <1 to 3>
ESC-Previous menu; !-Main Menu; &-Exit 1 User(s)
Figure
5-11. T1 Loop Screen
³ To run a loopback on an T1 port:
Do the following in the Diagnostics Menu (for more information, see
Setting
Uplink Loopbacks
):
1. Set Device Number to the device being configured (Local or Remote).
2. Choose T1 Loop.
The T1 Loop Screen (
Figure
5-11
) appears.
3. Using the Tab key, highlight the Loop
field of the channel you want to set.
4. Enter the loopback status you want to set:
No loop: No loopback on the channel
LLB: Local loopback on the channel or uplink
RLB: Remote loopback on the channel.
The RLB option appears only if there is a connection to a remote device.
See
Chapter 5
for definitions of local T1 and uplink local loopbacks in the
remote Optimux-106. The uplink local loopback applies to the active link only.
The loopback test begins running immediately after a loopback has been set.
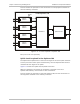
Local Loopbacks in Optimux-106
You can set two types of local loopback connections in Optimux-106:
• T1 local, which is set for each T1 interface separately from a terminal.
• Uplink local, which can be set from a terminal.
T1 Local Loopback in Optimux-106
The T1 local loopback returns the T1 transmit signal to the output of the receive
path. Simultaneously, an unframed all-ones signal is sent to the MUX.
Figure
5-12
shows the T1 local loopback connection.