
Specifications


Installation and Operation Manual Chapter 4 Configuration
Optimux-108 Ver. 6.1 Configuring Optimux-108 for Management 4-3
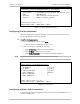
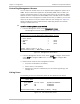
³ To configure Optimux-108 communities:
1. From the Management menu, select Host.
The Host (Management) menu is displayed (see
Figure
4-2
).
2. From the Host menu, do the following:
Select Read Community to enter the name of a community with read-only
authorization.
Select Write Community to enter the name of a community with write
authorization.
Select Trap Community to enter the name of a community to which
Optimux-108 sends traps.
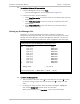
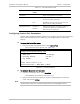
Setting up the Manager List
By default, any remote management terminal is allowed to change the
configuration of the Optimux-108. You may enhance the security of the site by
limiting remote management to specific management terminals or nodes. The
Manager List lists the network nodes from which management may take place.
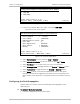
Optimux-108
Configuration>System>Management>Managers List
Num IP Address Trap
1 (0.0.0.0) Unmasked
2 (0.0.0.0) Unmasked
3 (0.0.0.0) Unmasked
4 (0.0.0.0) Unmasked
5 (0.0.0.0) Unmasked
6 (0.0.0.0) Unmasked
7 (0.0.0.0) Unmasked
8 (0.0.0.0) Unmasked
9 (0.0.0.0) Unmasked
10 (0.0.0.0) Unmasked
1. Change Cell ... (0.0.0.0)
>
ESC-Previous menu; !-Main Menu; &-Exit; ?-Help
Figure
4-3. Managers List Screen
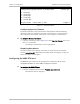
³ To define the managers list:
1. The list contains 10 entries. Press D to move down the list; press U to move
up the list. Press L to select the previous field; press R to select the next
field.
2. To change the value of a field, select the field (it will appear highlighted),
then choose Change Cell and then enter the new value.
When the Trap field is set to Unmasked, a trap is sent to this agent.