radenso radar radenso Pro M user manual nol imits
contents. Forward Features . . . . . . . . . . . . . . . . . . . . . . . . . . . . . . 1 Main Functions . . . . . . . . . . . . . . . . . . . . . . . . . 1 Installation What’s in the Box . . . . . . . . . . . . . . . . . . . . . . Additional Accessories . . . . . . . . . . . . . . . . . . Quick Start Guide . . . . . . . . . . . . . . . . . . . . . . . Installation . . . . . . . . . . . . . . . . . . . . . . . . . . . 2 3 4 4 Functionality Pro M Interface . . . . . . . . . . . . . . . . . . . . . . . . . .
foreward Congratulations on your new investment. You chose one of the best high-tech, GPS enabled, mobile radar and laser detector available on the market today. The Radenso Pro M is the evolution of the Radenso equipped with an additional circuit designed to detect the newest MultaRadar and Gatso RT 3 delivering astonishing detection range on all radar bands. Coupled with multiple lters against annoying false alerts your Radenso Pro M will alert only when it counts.
what’s inside. A D C B E A. Radenso Pro M D. Travel Case • Small, easily mountable radar detector • Intuitive OLED display • The travel case fits your detector and cords for compact travel B. Power Cable E. USB Cord • Provides power to the Pro M with its own on/ off switch • Mini USB cord connects your Pro M and computer to allows firmware updates C.
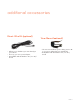
additional accessories Direct Wire Kit (optional) • Allows you to hardwire your unit directly to your vehicle • Frees up your car’s power adapter • Compatible with the Radenso Pro / Pro SE / Pro M Visor Mount ((optional) p ) • The visor mount allows you to clamp your Pro M to your visor rather than your windshield • Compatible with the Radenso Pro / Pro SE / Pro M PA G E 3
installation guide Quick Start Up Guide Installation To start using your Radenso Pro M radar detector, follow these easy steps: The Radenso Pro M windshield mount allows a rm and secure installation of the radar detector at the windshield. Locate an area at the windshield that enables an unobtrusive installation with a clear view to the road ahead. For best results, adhere the detector as high as you can. 1.
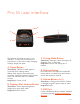
Pro M user interface D A F C E B The Radenso Pro M has an easy to use interface. The unit has four buttons on top and two on the side to make changing settings simple and quick. C. Driving Mode Button Short Press: Changes current driving mode (Highway, City, or AutoCity) Long Press: Stores user GPS point of interest A. Power Button Short Press: (When no radar signal is received): Enter settings menu. (When radar signal is presently being received): Mutes the volume of the current alert.
menu settings and features Setting Mode Minimum Speed Sensing Radar Description: selects the driving mode Options: Highway, City, AutoCity Description: Select the minimum speed to sense radar Options: off, 10-130 mph Display Mode Description: Select what the display should show Options: Speed/Time, Speed/Voltage, Voltage, Time, Speed, Speed/Compass Units Description: Select the unit of speed Options: English, metric Alerts X Band Description: Activate or deactivate X band Options: off, on K Band Descr
menu settings and features MRCT Band GPS detection by database type Description: Activate / deactivate MRCT band Options: off, narrow, wide Description: via middle button, you can select different types of GPS alert areas. For editing, use +/- buttons on the side. You can toggle each type of alert on and off.
settings Setting AutoCity Speed GPS Lockouts The AutoCity driving mode allows the setting of minimum alert detection speed for signal suppression and signal filtering resulting in significantly reduced false alerts. Select AutoCity in setting mode. The detector lets you mark known false alert areas so that you will not receive audio alerts in the future at the marked location.
troubleshooting The dectector will not turn on. • Check if the power cable is connected. • Ensure that the power cable has been switched on at the power plug. Make sure the red light at the power plug is lit. • Turn on ignition. The display will not turn on. • Check if the power cable is connected and turned on. • Check if the display is set to “dark” mode. The detector alerts visually but there are no voice or audio alerts. • The alert volume is turned down. Increase the volume.
warranty One (1) Year Limited Warranty RADENSO warrants, for one year, to the original retail owner, this RADENSO product to be free from defects in materials and craftsmanship with only the limitations or exclusions set out below. WARRANTY DURATION: This warranty, to the original user, is valid for 12 months after the date of the original retail sale.
tech specs the RADENSO product. 10. Packing materials or cosmetic items. 11. Installation and removal of RADENSO products from the vehicle. 12. Maintenance, cleaning or periodic check-ups. OBTAINING OF WARRANTY SERVICE: If, after contacting Radenso Customer Service, you are certain that the product is defective, pack the product carefully (preferably in its original packaging) and include evidence of original purchase and a note describing the defect.
support and contact Contact Information Thank you for purchasing the most advanced radar and laser defense in the world. Here at Radenso, we take your support very seriously; if you need support in any capacity please contact us. Address noLimits Enterprises 1100 Sycamore Street Floor 1 Cincinnati, OH 45202 Phone 1-888-RADENSO (1-888-723-3676) 9AM-5PM EST, Monday - Friday Email support@nolimitsenterprises.