BASSBONE • V2 USER GUIDE Radial Engineering Ltd. 1588 Kebet Way, Port Coquitlam BC V3C 5M5 Tel: 604-942-1001 Fax: 604-942-1010 email: info@radialeng.
RADIAL BASSBONE • V2 USER GUIDE Table of Contents Page Overview ................................................................................ 1 Features and Functions .......................................................... 2 Getting Started ....................................................................... 4 Making Connections ............................................................... 5 Channel Controls ....................................................................
OVERVIEW The Bassbone V2 is a powerful two channel instrument preamp that is able to handle all types of bass instruments and pickups depending on how it is configured. Some examples include: 1. Using with one bass: When one bass is connected, the Bassbone automatically converts to a two channel preamp. You can toggle to channel-B and use the powerful EQ to make a vintage passive bass sound like a modern active. INPUT-A A/B SELECT INPUT-B 2.
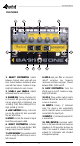
FEATURES 5 4 2 3 1 6 7 8 9 8. HPF-2: High pass filter on channel-2 rolls-off excessive low frequency resonance and cleans up signal. Choose between 80Hz, 150Hz and off. 1. SELECT FOOTSWITCH: Selects between channels when used with one bass. Selects between instruments when used with two basses. Features a large, bright LED indicator for each channel. 9. LOOP FOOTSWITCH: Turns the effects loop on and off. Features a large, bright LED indicator. 2.
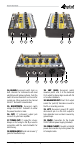
11 12 13 14 17 15 18 19 14. BLEND: Recessed switch turns on both channels for instruments with dual electric/acoustic pickup systems. Push the switch in to mix channels-1 and 2 or out for normal use. When pushed in the channel SELECT footswitch is deactivated. 21 22 23 19. 180° (XLR): Recessed switch reverses pins-2 and 3 at the balanced XLR output to phase align sound with PA or to reduce feedback. 20.
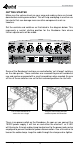
GETTING STARTED Make sure the volume levels on your amp and audio system are turned down before making connections. This will help avoid plug-in and turn-on transients that can damage more sensitive components such as tweeters. Set the controls and switches as illustrated in the diagram below. This represents a neutral starting position for the Bassbone from where further adjustments will be made. Some of the Bassbone functions are controlled by 'set & forget' switches on the side panels.
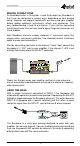
MAKING CONNECTIONS As described earlier in this guide, a cool thing about the Bassbone is that it can be configured in various ways, depending on your desired setup. However, we suggest testing with one bass and your amplifier before adding additional instruments, effects and electronics. This way troubleshooting is kept to a minimum. If you start by connecting everything at once it can be very hard to figure things out should you run into a problem.
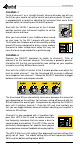
CHANNEL-1 Think of channel-1 as a ‘straight-through’ channel whereby you will use the EQ on your amp to set up the tone of your primary bass. Channel-1 is equipped with a control for adjusting the instrument level and a three position switch for selecting one of two EQ presets. Start with the LEVEL-1 control set to the 2 o’clock position and use your instrument amplifier to set the overall volume and tone. After you have dialed-in your traditional bass sound on your amp, try the EQ-1 presets with your amp.
USING A SECOND BASS Many players employ two basses when they perform. These typically include a traditional passive bass such as a Fender P-Bass® and a new generation 5 or 6 string with active pickups. These basses produce very different output levels and tonal ranges. This poses a problem when switching from one instrument to the other, as the amplifier settings must be dramatically adjusted to suit each instrument.
USING THE POWER BOOSTER The Bassbone is equipped with a footswitch activated power booster designed to add gain for soloing. It can also be used to compensate for effect pedals that reduce the amount of bass frequencies, such as pedals made for guitar. The power booster consists of a footswitch with LED indicator and a boost level control. Set the BOOST level fully counterclockwise for the minimum amount of boost.
USING THE BLEND CONTROL Some electric basses are equipped with a stereo jack that outputs the signals from two pickups such as a magnetic pickup and a piezo bridge transducer at the same time. To accommodate, the Bassbone is equipped with a BLEND switch that turns on both channels simultaneously and lets you use the LEVEL-1 and 2 controls to mix the sound of both pickups. The BLEND switch is recessed to prevent accidental use. Using a small screwdriver, push the switch inward to turn the blend function on.
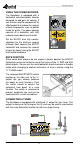
USING EFFECT PEDALS WITH THE BASSBONE Effect pedals can be positioned in a number of ways depending on what you are attempting to do. For example, you could have some effects dedicated to one bass by inserting them between the instrument and the Bassbone input. PA SYSTEM You could also introduce a series of pedals between the Bassbone's ¼” output and your amp. This way the pedals can be heard through your amp but the effects will not be sent to the PA system if using the balanced XLR output.
USING THE ON-BOARD EFFECTS LOOP Start by connecting the SEND jack to the input of your effect pedal and the output from your pedal to the RECV (receive) jack using standard ¼” coaxial guitar cables. In order to familiarize yourself with the setup, start with one pedal. This will make trouble shooting much easier. Depress the LOOP footswitch to turn the function on, the LED indicator will illuminate.
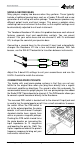
THE RADIAL DIRECT BOX The Bassbone V2 is equipped with a built in Radial direct box with a balanced XLR direct output. The direct output is used to feed a PA or recording console. You can use it to reinforce the sound from your bass amp or go direct without an amp using the Bassbone to control your sound through the PA. The direct output is particularly handy in the studio for direct recording, or where bringing an amplifier may not be practical.
The direct output is equipped with a ground lift and a polarity reverse. The recessed ground LIFT switch helps eliminate hum and buzz caused by ground loops. If you hear noise try pushing the ground LIFT switch inward. POLARITY REVERSE GROUND LIFT The recessed 180° polarity reverse switch inverts the pins-2 and 3 at the XLR. This is often used to phase-match the PA system to the stage amp in smaller venues where these two audio sources can sometimes compete.
THREE YEAR TRANSFERABLE LIMITED WARRANTY RADIAL ENGINEERING LTD. (“Radial”) warrants this product to be free from defects in material and workmanship and will remedy any such defects free of charge according to the terms of this warranty. Radial will repair or replace (at its option) any defective component(s) of this product (excluding finish and wear and tear on components under normal use) for a period of three (3) years from the original date of purchase.