
Use and Care Manual


SUN SHADE
CORDLESS WITH CRANK INSTALLATION INSTRUCTIONS
A
A
C
E
B
G
H
F
F
B C D E F
G
D
H
H I J K
1/16 in.
Dear customer:
The product you have purchased has been engineered and manufactured to the highest standards of quality and performance.
Please read the instruction sheet carefully before installing your new shade.
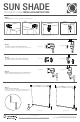
Hardware Contents:
Tools Needed:
(1) Pin Wheel Bracket (1) Crank Bracket (1) Pin Wheel (1) Crank Device (1) Crank Rail Connector (2) Wind Tie Downs
(2) Bottom Rail Caps
Machine Screws
(3) 4 x 18mm
Wood Screws
(4) 3.5 x 25mm
Wall Plugs
(4) 6mm Diameter
NOTE:
Crank Devise can be installed on the
Right or Left Side of the Sun Shade
Crank Handle on the Left: (Flip Crank Devise
and Bracket to the Left side of the shade)
30
min
Step 2
Measure Bracket Placement to desired mounting location, mark holes on each bracket with a pencil.
b). Top
Mounting overhead to a surface such as the top inside of
the window frame or the ceiling.
Step 1
Connecting the Crank Device (D) to the Crank Bracket (B) with Machine Screws (I).
(If desired handle position is on the left please see image below)
Outside Mounting
Top / Inside Mounting
(1) Crank Handle
Outside Mounting
Top / Inside Mounting
(Left Side Mounting) (Right Side Mounting)
For assistance with installation or missing parts, please call 1 (800) 860-1677
Pour obtenir de l’aide concernant l’installation ou des pièces manquantes, composez le 1(800) 860-1677
Para obtener ayuda con la instalación o si faltan piezas, comuníquese al 1 (800) 860-1677
www.hymaninc.com
Printed in China / Imprimé en Chine / Impreso en China 12.29.2016
Lewis Hyman Inc. | 860 East Sandhill Avenue • Carson, CA 90746 | 7950 Third Flag Parkway • Austell, GA 30168
a). Outside
Mounting to the face or outside the window frame.
c). Inside
Mounting to the inside or between the sides of
the window.