
Full Product Manual


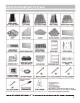


17. Attach the CUP HOLDER(S) with 3/4” SCREWS. Note: A sticker indicates the optimal position
for this accessory, but attaching it is optional. Consider the position carefully before driving any
screws into the sauna interior.
18. Attach the DOUBLE TOWEL HOOK with 3/4” SCREWS. Note: A sticker indicates the optimal
position for this accessory, but attaching it is optional. Consider the position carefully before driv-
ing any screws into the sauna interior.
19. Attach the COLOR THERAPY CONTROL PANEL into the designated position with 2”
SCREWS.
20. Remove the back cover of the OXYGEN IONIZER by turning is as indicated. Unwrap and
install the fragrance patch, then reattach the back cover. Attach the OXYGEN IONIZER in the
designated position with 3/4” SCREWS. Plug the power cable into the OXYGEN IONIZER.
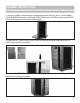
21. Plug the main power cable into a dedicated outlet. Note: No other appliances should share
the same outlet with this sauna.
The assembly of your sauna is now complete.
Please review the Operation Instructions and Health & Safety warnings before using your
sauna.
To ensure years of trouble-free use, follow the Cleaning & Maintenance guidelines carefully.
ASSEMBLY INSTRUCTIONS (CONT.)
10
CONGRATULATIONS!