20-501 PRO-83 200 Channel compact scanner w/sweep search and lighted keypad Read this user’s guide completely before using your scanner
Contents The Basics The FCC wants you to know . . . . . . . . . . . . . . . 4 powering your scanner . . . . . . . . . . . . . . . . . . . 5 using rechargeable batteries . . . . . . . . . . . . . . . 7 using AC power . . . . . . . . . . . . . . . . . . . . . . . . 10 using vehicle battery power. . . . . . . . . . . . . . . 11 setting up your scanner . . . . . . . . . . . . . . . . . . 13 connecting the antenna . . . . . . . . . . . . . . . . . . 13 connecting an optional antenna . . . . . . . . . . .
storing frequencies into channels during service search. . . . . . . . . . . . . . . . . . . . . . . . . 29 scanning the stored channels. . . . . . . . . . . . . . 30 manually selecting a channel . . . . . . . . . . . . . . 30 signal stalker . . . . . . . . . . . . . . . . . . . . . . . . . . . 31 Skywarn . . . . . . . . . . . . . . . . . . . . . . . . . . . . . . . 36 WX alert . . . . . . . . . . . . . . . . . . . . . . . . . . . . . . . 38 chain search. . . . . . . . . . . . . . . . . . . . . . . . . . .
The FCC wants you to know This equipment has been tested and found to comply with the limits for a Class B digital device, pursuant to Part 15 of the FCC Rules. These limits are designed to provide reasonable protection against harmful interference in a residential installation. This equipment generates, uses, and can radiate radio frequency energy and, if not installed and used in accordance with the instructions, may cause harmful interference to radio communications.
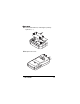
powering your scanner You can power your scanner from any of three sources: • internal batteries (not supplied) • standard AC power (using an optional AC adapter) • vehicle battery power (using an optional DC adapter) Before installing batteries, set the switch in the battery compartment to match the type of batteries you will use. Select RECHARGEABLE for all non-alkaline battery types, including lithium, Ni-Cd and Ni-MH. Remove battery cover and set battery switch.
Install 2 AA batteries, matching the polarity symbols (+ -). Replace the cover.
Warning: Set ALKALINE/RECHARGEABLE to RECHARGEABLE for use only with nickel cadmium (Ni-Cd) or nickel metal hydride (Ni-MH) rechargeable batteries. Never attempt to recharge nonrechargeable batteries. Non-rechargeable batteries can get hot or explode if you try to recharge them. Cautions: • Use only fresh batteries of the required size and recommended type. • Do not mix batteries of different capacities or different chemistries. • Always remove old or weak batteries.
RECHARGEABLE inside the battery compartment to RECHARGEABLE, install the batteries in the scanner, and connect an external AC or DC adapter to the scanner's DC 6V jack (see “using AC power” on Page 10 or “using vehicle battery power” on Page 11). Warning: Do not connect either the AC or DC adapter to the scanner if non-rechargeable batteries (such as alkaline batteries) are installed in the scanner and ALKALINE/RECHARGEABLE is set to RECHARGEABLE, or if you are unsure of the switch's position.
• If you connect an external power source to the scanner with ALKALINE/RECHARGEABLE set to ALKALINE, CHArg appears but the scanner does NOT charge the batteries. This is because the scanner's microprocessor unit does not recognize the switch position when you incorrectly connect an external power source. Make sure that you use the correct batteries and set ALKALINE/RECHARGEABLE to the correct position when you connect an external power source.
using AC power You can power the scanner using a 6V, 300 mA AC adapter and a size B Adaptaplug™ adapter (neither supplied). Both are available at your local RadioShack store. Cautions: • You must use a Class 2 power source that supplies 6V DC and delivers at least 300 mA. Its center tip must be set to positive and its plug must fit the scanner's DC 6V jack. Using an adapter that does not meet these specifications could damage the scanner or the adapter.
using vehicle battery power You can power the scanner from a vehicle's 12V power source (such as a cigarette-lighter socket) using a 6V, 300 mA DC adapter and a size B Adaptaplug (neither supplied). Both are available at your local RadioShack store. Cautions: • You must use a power source that supplies 6V DC and delivers at least 300 mA. Its center tip must be set to positive and its plug must fit the scanner's DC 6V jack.
If rechargeable batteries are installed and ALKALINE/RECHARGEABLE is set to RECHARGEABLE, the adapter powers the scanner and recharges the installed batteries at the same time. Note: If the scanner does not operate properly when you use a DC adapter, unplug the adapter from the cigarette-lighter socket and clean the socket to remove ashes and debris.
setting up your scanner connecting the antenna To attach the supplied flexible antenna to the connector on the top of your scanner, align the slots around the antenna's connector with the tabs on the scanner's BNC connector. Then slide the antenna's connector down over the scanner's connector and rotate the antenna connector's outer ring clockwise until it locks into place.
Note: Always use 50-ohm, RG-58, or RG-8, coaxial cable to connect an outdoor antenna. If the antenna is more than 50 feet from the scanner, use RG-8 lowloss dielectric coaxial cable. If your antenna's cable does not have a BNC connector, your local RadioShack store carries a variety of BNC adapters. connecting an earphone/headphone For private listening, you can plug a 1/8-inch (3.5 mm) mini-plug earphone or mono headphones (not supplied) into the headphone jack on top of your scanner.
• Once you set the volume, do not increase it. Over time, your ears adapt to the volume level, so a volume level that does not cause discomfort might still damage your hearing. traffic safety Do not use an earphone or headphones with your scanner when operating a motor vehicle in or near traffic. Doing so can create a traffic hazard and could be illegal in some areas. If you use an earphone or headphones with your scanner, be very careful. Do not listen to a continuous broadcast.
attaching the belt clip To make your scanner easier to carry when you are on the go, use the supplied belt clip. Use a Phillips screwdriver and the supplied screws to attach the clip to the scanner.
about your scanner We use a few simple terms in this manual to explain the features of the scanner. Familiarize yourself with these terms and the scanner's features, and you can put the scanner to work for you right away. Simply determine the type of communications you want to receive, and then set the scanner to scan those communications. A frequency, expressed in kHz or MHz, is the tuning location of a station. To find active frequencies, you use the search function or refer to a frequency reference.
a look at the keypad Your scanner's keys have various functions labeled on the key tops and below the keys. To select the function labeled on a key, simply press the key. To select the function labeled below a key, first press FUNC then release it. F appears on the display. Then quickly press the next key in the function key sequence while F appears. F appears or disappears as you press FUNC.
SCAN/SRCH: SCAN Scans the stored channels. FUNC+ SRCH Starts chain search or resumes searching. /KEYLOCK: Turns the display and key backlight on or off. FUNC+ KEYLOCK Locks and unlocks the keypad. FUNC Lets you use various functions by pressing this key in combination with other keys. Press and hold for more than 2 seconds to turn the scanner on or off. 1/PRIORITY: 1 Enters a 1. FUNC + PRIORITY Sets and turns the priority function on or off. 2/ : 2 Enters a 2.
3/SVC: 3 Enters a 3. FUNC + SVC Lets you search the five service search banks. 4/ALT: 4 Enters a 4. FUNC + ALT Turns the WX alert function on or off. 5/DLY: 5 Enters a 5. FUNC + DLY Turns the delay function on or off. 6/B.SLCT: 6 Enters a 6. FUNC + B.SLCT Goes to program band select mode. 7 Enters a 7. 8/ : 8 Enters an 8. FUNC + The Basics Selects the scan or search direction.
9 Enters a 9. ./CLR/ : ./CLR Enters a decimal point or clears an incorrect entry. Jumps directly to the last channel in memory (Ch#200) from any mode. 0/L/O: 0 Enters a 0. FUNC + L/O Lets you lock out a selected channel or skip a specified frequency. E/PGM: E Enters frequencies into channels. FUNC+ PGM Programs frequencies into channels.
a look at the display The display has indicators that show the scanner's current operating status. The display information helps you understand how your scanner operates. BANK - appears with numbers (1-10). P - appears when you select a priority channel. SCN - appears when you scan channels. SRCH - appears during search mode. PRI - appears when the priority feature is turned on. HOLD - appears during scan hold mode and search hold mode. DLY - appears when you select a delay.
L/O - appears when you manually select a channel you locked out or a skip frequency. - appears when you lock the keypad. - alerts you when the battery power gets low. PGM - appears while you store a frequency into a channel. or - appears during search mode. F - appears only when the function mode is on. WX, POL FIRE, AIR, MRN, or HAM - appears along with an indicator that shows the current service bank during a service search. ALT - appears during a WX alert or while the signal stalker function is on.
understanding banks service banks The scanner is preprogrammed with all the frequencies allocated to the weather, ham, marine, aircraft, and police (fire/emergency) services. channel storage banks To make it easier to identify and select the channels you want to listen to, the 200 channels are divided into 10 channel-storage banks. Each bank has 20 channels. Use each channel-storage bank to group frequencies, such as those for the police department, fire department, ambulance services, or aircraft.
operating your scanner turning on the scanner and setting squelch Your scanner is preprogrammed at the factory with 150 of the most frequently used frequencies in Channels 1 to 150. You can scan these frequencies as soon as you turn on the scanner. Note: Make sure the scanner's antenna is connected before you turn it on. Turn SQUELCH fully counterclockwise. Press and hold for about two seconds to turn the scanner on, and then turn VOLUME clockwise until you hear a hissing sound.
consider using a frequency guide. Excellent references for active frequencies are the RadioShack Police Call Guide including Fire and Emergency Services, and Official Aeronautical Frequency Directory. We update these directories every year, so be sure to get a current copy. Follow these steps to store frequencies into channels. Press HOLD. Then enter the channel number where you want to store a frequency. Then press FUNC and PGM. The channel number appears. Use the number keys and .
•When you enter a frequency into a channel, the scanner automatically turns on the delay function and DLY appears. When delay is turned on, the scanner automatically pauses scanning 2 seconds after the end of a transmission before scanning proceeds to the next channel. To turn the function off or on, press FUNC + DLY. •If you enter a frequency that has already been entered elsewhere, the scanner sounds an error tone and displays the channel that was duplicated.
searching for and temporarily storing active frequencies If you do not have a reference to frequencies in your area, use a search (except weather service search) to find a transmission. Note: When the scanner starts searching, it automatically turns on the delay function. To turn delay on or off, press FUNC + DLY. service search You can search for weather, ham, marine, aircraft, or police (fire/emergency) transmissions without knowing the specific frequencies used in your area.
To release the hold and continue searching, press HOLD. Or, if you did not press HOLD, simply press FUNC and or FUNC and to continue searching. Note: Because there are many different frequencies allocated to fire and police departments, it can take several minutes to search all the service frequencies. storing frequencies into channels during service search You can store frequencies you found during service search or service search hold mode into channels.
scanning the stored channels To begin scanning channels, press SCAN. The scanner scans through all non-locked channels in the activated banks. (See “locking out channels” on Page 48 and “turning channel-storage banks on and off” on Page 48). When the scanner finds a transmission, it stops on it. When the transmission ends, the scanner resumes scanning. Notes: • If you have not stored frequencies into any channels, the scanner does not scan.
To manually select a channel, press HOLD, enter the channel number and then press HOLD again. Or, during scanning, if the radio stops at a channel you want to listen to, press HOLD once. (Repeatedly pressing HOLD at this time causes the scanner to step through the channels.) Press SCAN to resume automatic scanning. signal stalker Your scanner's Signal Stalker feature lets you set the scanner so it detects, then displays the frequency of a nearby strong radio transmission.
Signal Stalker might not find the transmission you are searching for, or it might find a transmission other than the one you are searching for. • Signal Stalker cannot detect satellite dishes or any transmitter with a frequency above or below the frequency ranges listed under “setting the signal stalker options” on Page 32. • Signal Stalker works better with some types of transmissions than others.
If you selected S-S.bnd, one of the following band names appears. bnd Lo: VHF Low Band (25.0000 - 54.0000 MHz) bnd Air: AIR Low Band (108.0000 - 136.9875 MHz) bnd Hi: VHF High Band (137.0000 - 174.0000 MHz) bnd UHF: UHF Band (406.0000 - 512.0000 MHz) bnd 800: 800MHz Band (806.0000 - 956.0000 MHz) If you selected S-S.Alt, skip to Step 4. Repeatedly press or until the band you want to search appears, and then press E to select it. Otherwise, press ./CLR if you do not want to select it.
Repeatedly press or until the option you want appears, and then press E to select it. Otherwise, press ./CLR if you do not want to select it. Then skip to Step 7. Press E while S-S.Alt appears. One of the following alert options appears... ALt bEEP: The scanner beeps when a signal stalker signal is detected. ALt Light: The scanner flashes the display backlight when a signal stalker signal is detected. ALt bP-Lt: The scanner flashes the display backlight and beeps when a signal stalker signal is detected.
using signal stalker To turn on Signal Stalker, press FUNC + once except in WX search, band select, or program mode. appears. Every two seconds, the scanner searches for frequencies in the range you specified in “setting the signal stalker options” on Page 32. Note: To continue scanning normally while Signal Stalker works, simply press SCAN. When the scanner finds a frequency, it sounds the alert you specified in “setting the signal stalker options” on Page 32, and “Found” flashes.
Skywarn The skywarn function lets you jump directly to the last channel in memory (Channel 200) from any mode by pressing FUNC + . The scanner goes into scan hold mode and starts receiving transmissions in the last channel. If no frequency is programmed in the last channel, No Prg appears and the scanner sounds an error tone. about Skywarn Skywarn is an organized group of trained weather observers. A Skywarn group exists in virtually every US county with a significant population.
• high water areas • downed power lines • other emergency conditions that affect life or property Listening to Skywarn broadcasts makes it easy to quickly find out about and prepare for inclement weather conditions in your immediate area, even before your local NOAA weather broadcast and local TV or radio station can announce them.
it several minutes before it can be relayed for broadcast by NOAA and as much as 5 or 10 minutes sooner than you will hear it on local TV or radio! Those few minutes can be worth a lot when it comes to deciding if your family needs to take cover. WX alert turning on the weather alert feature Turn on the WX alert function by pressing FUNC and ALT in the WX search or WX search hold mode. ALT appears.
The preset frequency ranges are: Bank No. Frequency (MHz) Step (kHz) 1 25.0000-27.9950 5 2 28.0000-29.6950 5 3 29.7000-49.9950 5 4 50.0000-54.0000 5 5 137.0000-143.9950 5 6 144.0000-147.9950 5 7 406.0000-419.99375 6.25 8 420.0000-449.99375 6.25 9 450.0000-469.99375 6.25 10 806.0000-956.0000 12.5 chain search mode Press FUNC and SRCH to start chain search mode. SRCH, the enabled search bank number, and or (indicating the search direction) appear.
At least one search bank must be enabled. (The scanner sounds an error tone if you try to disable all the search banks). The search bank and the frequency where chain search starts depends on how the scanner was set before you selected chain search mode. chain search hold mode To start chain search hold mode, press HOLD in chain search mode. The scanner stops searching and HOLD appears.
storing frequencies found during chain search into channel memory You can store frequencies you find in chain search mode or chain search hold mode. Press FUNC and PGM in chain search mode or chain search hold mode. The lowest blank channel and bank appear. Press E to store the frequency into the blank channel. To select another channel, press FUNC + or before you press E. You can also press 0-9 to select the bank.
When you select the search bank, the lower limit and upper limit frequency assigned in the search bank alternate on the display. To select another search bank, press FUNC + B.SLCT or FUNC to increase the search bank number or FUNC + to decrease it. Hold down FUNC + or FUNC + for about 1 second to quickly move through the search bank numbers. After choosing the search bank, follow these steps to set the lower limit and upper limit frequency. Enter the lower limit frequency by using the 0-9 and ./CLR keys.
Enter the frequency you want to start from by using the number keys. (Press ./CLR to enter a decimal point). Press FUNC and or . The scanner searches, starting from the frequency you entered in Step 2. If you enter a frequency that is out of range, the scanner sounds an error tone and Error appears. Press FUNC + to change the search direction downward or FUNC + to change the search direction upward. Frequencies appear during the search.
upward. direction. or appears depending on the search Press FUNC + to decrease the frequency by one step or FUNC + to increase it by one step. Hold down or for about 1 second to quickly decrease or increase the frequency. To resume direct search, press FUNC + SEARCH or HOLD. ( or appears on the display, showing the search direction).
If you enter a frequency that has already been entered elsewhere, the scanner sounds an error tone and displays the channel that was duplicated. If you entered the frequency by mistake, press ./CLR. To enter the frequency anyway, press E to accept. The scanner moves to program mode after you stored the frequency. search skip memory You can skip up to 50 specified frequencies during a search. This lets you avoid unwanted frequencies or those already stored in a channel.
Follow these steps to clear a single frequency from skip memory so the scanner stops on it during a search. Press HOLD to stop the search. Press FUNC and or FUNC and the frequency. L/O appears. to select Press FUNC and L/O. L/O disappears. To clear all the skip frequencies at once while searching or search hold, press FUNC and then press and hold L/O until the scanner beeps. Notes: • If you selected all frequencies to be skipped within the search range, the scanner beeps 3 times and does not search.
delay Sometimes a user might pause before replying to a transmission. To avoid missing a reply on a specific channel, you can program a 2-second delay into any channel or frequency. The scanner continues to monitor the channel frequency for an additional 2 seconds after the transmission stops before resuming scanning or searching. The scanner automatically sets a delay when you store frequencies into channels or when you search frequencies. When the delay feature is on, DLY appears.
turning channel-storage banks on and off You can turn each channel-storage bank on and off. When you turn off a bank, the scanner does not scan any of the 20 channels in that bank. While scanning, press the number key that corresponds to the bank you want to turn on or off. Numbers appear at the top of the display, showing the currently selected banks. The scanner scans all the channels within the displayed banks that are not locked out (see "Locking Out Channels").
Note: You can still manually select locked-out channels. To remove the lockout from a channel, manually select the channel, and then press FUNC and L/O. L/O disappears. To unlock all channels in the banks that are turned on, press HOLD to stop scanning, and then press FUNC and press and hold L/O until the scanner beeps twice. priority The priority feature lets you scan through the channels and still not miss important or interesting calls on specific channels.
Press FUNC and PGM, and then press FUNC and PRIORITY. P appears to the left of the selected channel number. Repeat Steps 1 and 2 for the channel in each bank you want to program as a priority channel. To turn on the priority feature, press FUNC and PRIORITY during scanning. PRI appears. Then the scanner checks the designated priority channel every 2 seconds in each bank. To turn off the priority feature, press FUNC and PRIORITY. PRI disappears.
wired programming You can transfer programming data to your scanner using your PC and an optional interface cable (Cat. No. 20-289, available at your local RadioShack store) and software (available at your local RadioShack or www.radioshack.com). Note: If the scanner receives no data from the PC for more than 20 seconds, T-Err appears and wired programming stops. Make sure your scanner is turned off.
To set up the program, click on Tools, select Configuration, and select PRO-83 (if necessary). Turn on the scanner. The scanner automatically goes into the wired programming mode. PGM and WirEd appear. Then send the data from the PC. Data frame numbers being received appear. When the scanner has successfully received all data, End appears. If the scanner received an error while receiving data, End, d-Err, and its frame number appear.
frequently asked questions Q: My scanner isn’t working at all. How do I turn it on? A: The scanner might not be receiving power. Make sure the batteries are installed correctly and are good (if you installed alkaline batteries) or fully charged (if you installed rechargeable batteries). See “powering your scanner” on Page 5 for more information. If the batteries are good, make sure the AC adapter’s or DC adapter’s barrel plug is fully inserted into the scanner’s 6V 300 mA jack.
If you stored at least two frequencies, make sure the AC adapter’s or DC adapter’s barrel plug is fully inserted into the scanner’s 6V 300 mA jack. See “using AC power” on Page 10 for more information. Q: The scanner’s display is dim and hard to see. The scanner also beeps once every 15 to 30 seconds. What’s wrong? A: The scanner might not be receiving enough power or the batteries might not be correctly installed.
Q: flashes on the display. What is it? A: The batteries might be weak. Make sure the batteries are good (if you installed alkaline batteries) or fully charged (if you installed rechargeable batteries). See “powering your scanner” on Page 5 for more information. Q: My scanner is not receiving anything or reception is weak. What’s wrong? A: The batteries might be weak. Make sure the batteries are good (if you installed alkaline batteries) or fully charged (if you installed rechargeable batteries.
turned off. See “WX alert” on Page 38 for more information. Q: ERROR appears on the display. What does it mean? A: If you were trying to enter a frequency, you might have made a programming error. Re-enter the frequency correctly, including the decimal point. See “storing known frequencies into channels” on Page 25 for more information.
glossary ALKALINE/RECHARGEABLE Switch - Lets you select the type of batteries you want to use in the scanner (alkaline or rechargeable) .......................... 5 Service Banks - preset groups of frequencies categorized by the type of services that use those frequencies. ...................................................... 17, 24 Channel-Storage Banks - Groups of channels, used for frequency storage.............................................
index ALKALINE/RECHARGEABLE Switch ...................... 5 Antenna Connecting ........................................................ 13 Attaching a belt clip ............................................... 16 Backlight ................................................................. 52 Batteries Charging ............................................................. 5 Belt Clip Attaching ........................................................... 16 Chain Search ..........................................
Earphone Connecting ........................................................ 14 Extension Speaker Connecting ........................................................ 15 Frequently Asked Questions ................................. 53 FUNC Key ............................................................... 19 Keylock ................................................................... 50 Locking Out Channels ........................................... 48 Manually Selecting Channels ............................
Storing frequencies ............................................... During Service Search ..................................... Direct Entry Search Mode ................................ Chain Search Mode .......................................... 25 29 44 41 Signal Stalker ........................................................ 31 Setting Options ................................................. 32 Using .................................................................. 35 Skywarn .......................
warranty This product is warranted by RadioShack against manufacturing defects in material and workmanship under normal use for 90 (ninety) days from the date of purchase from RadioShack company-owned stores and authorized RadioShack franchisees and dealers. For complete warranty details and exclusions, check with your local RadioShack store.
accessories Beyond the Basics 62
Beyond the Basics
20-501 07A04 Beyond the Basics 64