Please read before using this equipment.
ˆ Features Your RadioShack USB Flatbed Color Scanner is designed for notebook or desktop PCs that have a universal serial bus (USB) port. You can use the scanner to quickly scan documents and photographs in color, grayscale, or black-and-white at up to 15 pages per minute. Then, you can use the software supplied with your scanner to convert the scanned images to electronic files. Supplied PageManager Software — makes it easy to quickly link images you scan with more than 150 applications you use every day.
SYSTEM REQUIREMENTS Before connecting the scanner, be sure your computer is an IBM PC or compatible, running Windows 2000, Windows ME, or Windows 98 or later, with a VGA or SVGA monitor, and having all of the following: • CD-ROM drive • one available USB port • at least 32 MB RAM • at least 160 MB free hard disk space (for installing supplied software) Note: You cannot use the scanner with Microsoft Windows 3.1 or Windows 95.
MONITOR REQUIREMENTS SUPPLIED ACCESSORIES To use the scanner with your computer’s monitor, set the monitor to High Color (16bit) or True Color (24- or 32-bit). Then set your monitor resolution to at least 800 × 600 DPI. Make sure you have all of the following accessories before disposing of the packing material. To set your monitor's colors and resolution, open the Windows Control Panel, doubleclick Display, then click Settings. 4 Features • AC adapter (Input: 120V AC; Output: 12V DC, 15 W max.
ˆ Important Safety Instructions 1. Read Instructions — All the safety and operating instructions should be read before the product is operated. 2. Retain Instructions — The safety and operating instructions should be retained for future reference. 3. Heed Warnings — All warnings on the product and in the operating instructions should be adhered to. 4. Follow Instructions — All operating and use instructions should be followed. 5.
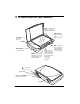
ˆ A Quick Look At Your Scanner SCAN — Displays the scanned object in a PageManager window. COPY/PRINT — Prints the scanned object to your printer or copier. CUSTOM — Lets you assign a function. STOP/CANCEL — Cancels a scan in progress. E-MAIL — Displays the scanned object in a new e-mail message in your e-mail application. OCR — Converts scanned text to a Windows Notepad file. You can then import that text into many word processing programs. /O — Turns the scanner on or off.
ˆ Preparation We recommend you connect only one scanner to your computer at a time. Connecting two or more fast USB devices (such as CDROMs, CD rewriters, scanners, printers or hard disk drives) at the same time degrades the performance. Cautions: You must use a Class 2 power source that supplies 12V DC and delivers at least 1250 mA. Its center tip must be set to positive and its plug must fit the scanner's power jack. The supplied adapter meets these specifications.
print a copy directly from your hard drive to your printer. To read the guide, click Start, Programs, Presto! PageManager, then PageManager User’s Manual. You do not need to turn off the computer before connecting or disconnecting your scanner. 1. Turn on your computer and start the installed Windows operating system (Windows 2000, Windows ME, or Windows 98 or later). 2. Insert the PageManager software CD into your CD-ROM drive. The CD starts automatically.
ˆ Operation You can operate the scanner directly by using the buttons on the front of the scanner, or from your computer by using the supplied PageManager software. Note: You must install the supplied PageManager software to use the scanner, even if you do not use PageManager to control the scanner’s operation. USING THE SCANNER’S BUTTONS To scan a document using the buttons on the front of the scanner, open the scanner's top cover and place the document face down on the glass.
6. From the File menu, click Acquire. The USB Scanner dialog box appears, letting you preview the scanned image. forms, and other text objects. It provides the fastest scan time and smallest file size. This setting defaults to grayscale, 200 DPI. • Black and White Photo — This setting is best for scanning of black-andwhite photographs. It defaults to grayscale, 100 DPI. 7. Make any adjustments, then click Scan to scan the final image. 8. Adjust the desired scanner settings as follows.
For example, if you put a photo in the middle of the glass, the scanner will automatically determine the size of the photo. When AutoCrop is selected, the scanner makes two passes. The first pass senses the object's size and the second scans the image. Note: This option overrides any selections you make using Size. • Mode — Click the drop-down arrow and choose True Color, Grayscale, or Black-and-White. • Res — This is the resolution setting for the scan in dots-per-inch (DPI).
• (Contrast) — Drag the slider to the left or right to adjust the contrast of the scanned image. Note: For more details about the Scan Manager's features, choose Scan Manager Help from the Help menu. • (Gamma) — Gamma correction allows you to achieve precise color matching. Because the computer cannot always transmit the exact color information to the hardware, you might have to make some color adjustments using the Gamma setting. 9. Click Preview.
Button SCAN Default Scan Setting 81/2 × 11 inch gray photo Resolution (DPI) 3. Adjust the scan and page settings for the buttons as follows. Scan Mode — Select Black/White to scan in black and white. For example, letters and memos are usually scanned in black and white. Select Grayscale to scan objects containing drawings or black-and-white photographs. The scanning produces an image in varying shades of gray. Select Color to scan color photographs and other color objects.
ˆ Troubleshooting If your scanner is not working as it should, these suggestions might help you eliminate the problem. If the scanner still does not operate properly, take it to your local RadioShack store for assistance. Problem Possible Cause Remedy appears in the Windows taskbar. The scanner’s cable is not securely connected, or was disconnected, then reconnected. Make sure the scanner’s cable is securely connected. Then rightclick on the Windows taskbar and select Search Scanner.
ˆ Specifications Bit Depth ............................................................................................................. 48-Bit Color (24-bit output) 16-Bit Grayscale ...................................................................................................................... 1-Bit Line Art Scanning Resolution .......................................................................... Optical Resolution: 1200 × 4800 DPI Maximum Resolution (interpolated) ..............................
Limited Ninety-Day Warranty This product is warranted by RadioShack against manufacturing defects in material and workmanship under normal use for ninety (90) days from the date of purchase from RadioShack company- owned stores and authorized RadioShack franchisees and dealers.