
Specifications
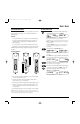


INSTALLING BATTERIES
Your remote requires four AAA batteries (not supplied) for power. For the
best performance and longest life, we recommend using RadioShack
alkaline batteries.
CAUTIONS:
• Use only fresh batteries of the required size and recommended type.
• Do not mix old and new batteries, different types of batteries (e.g.,
standard, alkaline, or rechargeable), or rechargeable batteries of
different capacities.
• If you do not plan to use the remote for an extended period,remove
the batteries. They can leak chemicals that can destroy electronic parts.
WARNING: Dispose of old batteries promptly and properly. Do not burn or
bury them.
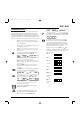
TO INSTALL BATTERIES:
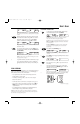
1. Press the tab on the battery compartment cover (located on the back
of the remote) and lift off the cover.
2. Place the AAA batteries in the compartment as indicated by the
polarity symbols (+ and –) marked inside.
3. Align the cover key with the compartment opening and replace the cover.
4. If batteries are inserted correctly, the entire LCD will turn on.After
5 seconds of inactivity, the remote control will turn itself off to con-
serve battery life.
5. Perform the steps in Setting The Clock (on the right) to set the correct time.
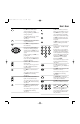
NOTE: When a battery icon appears in the display (see page 4,“Key Functions”),
the batteries are low. Simply replace them as soon as possible and the remote will be
restored to full functionality, complete with your favorite settings.
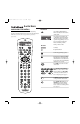
SETTING THE CLOCK
1. On the remote, press and hold P until the display changes
from the default device and time to [CODE SET].
NOTE: Default values for device, its code, and time are shown
above.Your remote control settings may be different.
NOTE: If you wish to exit the programming mode at any time, press
EXIT once. An [EXIT] message appears as the remote control returns
to normal operation.
NOTE:Ifan [INVALID] message appears, you have inadvertently
pressed an incorrect key. Simply note your error and continue
programming.
2. Press ▲ four times until [CLOCK SET] appears.
NOTE:Ifyou go past [CLOCK SET],press ▼ one or more times to
return to it.
3. Press SELECT once to begin programming.The default setting
(12:00 a.m.) or the current time (if previously set) appears.
4. Press
▲one or more times until the desired hour for morn-
ing or evening (a.m. or p.m.) appears.
5. Press
▼ one or more times until the desired minute appears.
6. Once the time is correctly set,press SELECT once to accept
the values.The display will confirm your entry with
[SUCCESS] and then [EXIT SETUP].
The remote will return to normal operation.
USER’S
GUIDE
Installing Batteries/Setting The Clock 3
(x 4)
❶
❸❷
RS 8in1 IR/RF UG rev 1/2/03 10:59 AM Page 3