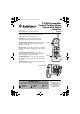
43-3880.book Page 1 Monday, June 28, 2004 2:07 PM www.radioshack.comSM User’s Guide — Please read before using this equipment. 2.4GHz Expandable Corded/Cordless Phone System with Digital Answerer 43-3872 Phone Pick-Up Detection — stops recording when you pick up any phone on the same line as the answering system, and resets to answer the next call. Speakerphone — lets you conduct a hands-free conversation using the handset and base speaker.
43-3880.book Page 2 Monday, June 28, 2004 2:07 PM CONTENTS Introduction ................................... 3 Important Information .................... 4 FCC Statement .................................. 4 Surge Protection ................................ 6 Important Safety Instructions ........ 7 Important Caller ID Information ..... 8 Read This Before Installation ............. 8 Installation ..................................... 9 Selecting a Location .......................... 9 Using AC Power .....
43-3880.book Page 3 Monday, June 28, 2004 2:07 PM INTRODUCTION • Your phone operates on standard radio frequencies as allocated by the FCC. • It is possible for other radio units operating nearby on similar frequencies to unintentionally intercept your conversation or cause interference. This possible lack of privacy can occur with any cordless phone. Introduction Thank you for purchasing a RadioShack 2.4 GHz Multi Handset Expandable Corded Telephone.
3-3880.book Page 4 Monday, June 28, 2004 2:07 PM Ô NOTE Ô You must not connect your phone to: • • coin-operated systems most electronic key telephone systems IMPORTANT INFORMATION This telephone has been tested and found to comply with all applicable UL and FCC standards. FCC STATEMENT This equipment complies with Part 68 of the FCC rules and the requirements adopted by the ACTA.
43-3880.book Page 5 Monday, June 28, 2004 2:07 PM If you use more than one phone or other device on the line, add up all of the RENs. If the total is more than five (three in rural areas), your telephones might not ring. If ringer operation is impaired, remove a device from the line. In the unlikely event that your phone causes problems on the phone line, the phone company can temporarily discontinue your service. If this happens, the phone company attempts to notify you in advance.
43-3880.book Page 6 Monday, June 28, 2004 2:07 PM For body worn operation, the FCC RF exposure guidelines were also met when used with the RadioShack accessories supplied or designed for this product. Use of other accessories may not ensure compliance with FCC RF exposure guidelines and should be avoided. SURGE PROTECTION Your telephone has built-in protection circuits to reduce the risk of damage from surges in telephone line and power line current.
43-3880.book Page 7 Monday, June 28, 2004 2:07 PM IMPORTANT SAFETY INSTRUCTIONS When using your telephone equipment, basic safety precautions should always be followed to reduce the risk of fire, electric shock and injury to persons, including the following: 1. Do not use this product near water, for example, near a bathtub, wash bowl, kitchen sink, or laundry tub, in a wet basement or near a swimming pool. 2. Avoid using a telephone (other than a cordless type) during an electrical storm.
43-3880.book Page 8 Monday, June 28, 2004 2:07 PM Important Caller ID Information IMPORTANT CALLER ID INFORMATION To use Caller ID and Call Waiting, you must be in an area where those services are available and you must subscribe to those services through your local phone company.
43-3880.book Page 9 Monday, June 28, 2004 2:07 PM INSTALLATION Ô NOTES Ô • If your home has specially wired alarm equipment connected to the telephone line, be sure that installing the system does not disable your alarm equipment. If you have questions about what will disable alarm equipment, contact your telephone company or a qualified installer. • The USOC number of the jack to be installed is RJ11C (or RJ11W for a wall plate jack).
43-3880.book Page 10 Monday, June 28, 2004 2:07 PM On a Desk Top 1. Insert the two tabs at the top of the narrow end of the supplied bracket into the base’s upper tab slots, then press down on the bracket’s latches and insert them into the lower slots. 2. Connect the handset cord to left side of the phone and corded handset. Installation 3. Plug one end of the supplied long modular cord into the TEL LINE jack on the back of the base. 4. Plug the modular cord’s other end into a modular phone line jack.
43-3880.book Page 11 Monday, June 28, 2004 2:07 PM On a Wall Plate or Wall To mount the phone directly on a wall, you need two screws (not supplied) with heads that fit into the keyhole slots on the base. Drill two holes 315/16 inches apart. Thread a screw into each hole, letting the heads extend about 1/8 inch. 1. Insert the two tabs at the top of the narrow end of the supplied bracket into the base’s lower tab slots, then press down on the bracket’s latches and insert them into the upper slots.
43-3880.book Page 12 Monday, June 28, 2004 2:07 PM For direct wall mounting, align the base’s keyhole slots with the mounting screws and slide the base downward to secure it. 6. Plug the adapter into a standard AC outlet. 7. Lift the base’s antenna to a vertical position. 8. Press and push up on the handset holder to lift and remove it. Turn it over and rotate it 180°, then slide it down into its slot and snap it back into place so it holds the handset.
43-3880.book Page 13 Monday, June 28, 2004 2:07 PM Insert the supplied AC adapter’s barrel plug into the DC IN 9V jack on the back of the charger. Route the cord through the strain relief slot and plug the adapter into a standard AC outlet. CONNECTING/CHARGING THE BATTERY PACK Installation The phone comes with a rechargeable nickel-metal hydride (Ni-MH) battery pack in the handset, but not connected. Before using your phone, you must connect the battery pack, then charge it for about 15–20 hours. 1.
43-3880.book Page 14 Monday, June 28, 2004 2:07 PM Recharging the Battery Pack ! IMPORTANT ! Be sure the battery pack is properly connected before you try to charge it. The CHARGE indicator lights when the handset is on the charger, even if the battery pack is not connected. • If the battery pack becomes weak during a call, Low Battery flashes. When this happens, you cannot make a call until you recharge the battery pack.
43-3880.book Page 15 Monday, June 28, 2004 2:07 PM INSTALLING THE BELTCLIP To attach the beltclip Insert the beltclip into the holes on each side of the handset. Press down until it clicks. To remove the beltclip Pull either side of the beltclip to release the tabs from the holes. USING A HEADSET You can make or answer calls with handsfree convenience using an optional headset that has a 3/32-inch (2.5-mm) plug. RadioShack has a variety of headsets available.
43-3880.book Page 16 Monday, June 28, 2004 2:07 PM DISPLAY AND ICONS Example of the standby mode display • Handset 570 # *CPFUGV 0 G Y ࠕ ࠗ ࠙ Day of the week and time / battery icon Handset ID and Banner Number of new Caller ID calls received / Ringer off icon (when the ringer is Off) • Base * Status of your Answering machine Day of the week and time **Number of message Number of new Caller ID calls received * appears if you have a new message.
43-3880.book Page 17 Monday, June 28, 2004 2:07 PM Soft Key Functions (Base) SOFT KEY FUNCTIONS (BASE) “Soft” keys are keys that change function during the operation of the phone. There are three soft keys on the base. Soft Keys allow you to: • Access the main menu • Store or edit phone numbers or Caller ID message The function of each soft key is determined by the icon that appears directly above it. For example, when the base is in standby mode, pressing soft key 1 will page the handset.
43-3880.book Page 18 Monday, June 28, 2004 2:07 PM SETTING MENU OPTIONS Ô NOTES Ô • • For Global Setup, Answ. Setup, and System Reset, and HS Registration menu options, make sure the line is not in use and the handsets are within range of the base. Setting Menu Options If you do not press a key within 30 seconds, the phone will time out and exit the menu mode. When setting Day and Time, the time-out perioid is extended to two minutes.
43-3880.book Page 19 Monday, June 28, 2004 2:07 PM DirectLink Mode In DirectLink® mode, a pair of handsets can function as two-way radios. DirectLink Mode allows two handsets to communicate with each other without the base unit or a telephone line. Use them at sporting events or while shopping to stay in contact with family members or friends. You must set both handsets to DirectLink Mode to activate this feature. Ô Using DirectLink Mode (Handset only) 1.
43-3880.book Page 20 Monday, June 28, 2004 2:07 PM 3. Press SELECT/ on the base). (or the OK soft key 4. To turn off the Room Monitor, press END (or the END soft key on the base). Handset Setup/Base Setup The following submenu options must be set separately for each handset and the base.
43-3880.book Page 21 Monday, June 28, 2004 2:07 PM Distinctive Ringer Setup Distinctive Ringer allows you to assign a designated ring tone to a stored phonebook number (100 stored locations available). When a call is received and the Caller ID information matches the information in one of the phonebook memory locations, the phone uses the distinctive ring assigned to that particular caller. You can assign distinctive rings to multiple phonebook memory locations.
43-3880.book Page 22 Monday, June 28, 2004 2:07 PM Setting the Anykey Answer (Handset only) Anykey Answer allows you to answer the phone by pressing any number key, */TONE/<, or #/> on the handset. 1. Press MENU/DEL. Select the Handset Setup menu, and then the Anykey Answer submenu. 2. Press is off). to select On or Off (default 3. Press SELECT/ . You will hear a confirmation tone. Setting the True Banner (Handset only) True Banner lets you customize the name your handset displays.
43-3880.book Page 23 Monday, June 28, 2004 2:07 PM 2. Press to choose “English”, “Français” (French), or “Español” (Spanish) (default is English). 3. Press SELECT/ (or the OK soft key on the base). You will hear a confirmation tone. Adjusting the LCD Contrast (Base only) Contrast adjusts the base LCD brightness. Choose one of the 10 levels for optimum viewing. 1. Press the MENU soft key. Select the Base Setup menu and then the Contrast submenu. 2. Press to adjust the contrast of the LCD (10 levels.
43-3880.book Page 24 Monday, June 28, 2004 2:07 PM Global Setup Ô NOTE Ô If no key is pressed for two minutes, the phone will exit the menu mode. If you change one of the global settings, you change that setting for all registered handsets and the base. Only one handset or the base can change global settings at a time. Setting Day and Time Day & Time sets the day and time of your display (Default is SUN 12:00 AM). Ô 1. Press MENU/DEL (or the MENU soft key on the base).
43-3880.book Page 25 Monday, June 28, 2004 2:07 PM 2. Press to select CW On/CWDX On, CW On/CWDX Off, or CW Off/CWDX Off, and then press the SELECT/ (or the OK soft key on the base). You will hear a confirmation tone (default is CW on/CWDX off). Ô NOTES Ô • 1. Press MENU/DEL (or the MENU soft key on the base). Select the Global Setup menu, and then the Area Code submenu. 2. Press the number keypad (0-9) to enter a 3-digit area code.
43-3880.book Page 26 Monday, June 28, 2004 2:07 PM 1. Press MENU/DEL (or the MENU soft key on the base). Select the Global Setup menu, and then the Dial Mode submenu. 2. Press to select Tone or Pulse (the initial setting is Tone). 3. Press SELECT/ (or the OK soft key on the base). You will hear a confirmation tone. System Reset (Handset only) System Reset is used to clear the handset’s ID from the main base unit, or the base ID from the handset.
43-3880.book Page 27 Monday, June 28, 2004 2:07 PM Handset Registration Handset Registration clears the base ID. Use this option, for example, if you wish to deregister the base to use the handset with 43-3570 or 43-3871. 1. Press MENU/DEL (or the MENU soft key on the base). Select the System Reset menu, and then the Replacing Base submenu. to select Yes, and then press . You will hear a confirmation tone. 2. Press SELECT/ The base information will be deleted.
43-3880.book Page 28 Monday, June 28, 2004 2:07 PM USING YOUR PHONE POWER FAILURE OPERATION Because the 43-3872 is a corded/cordless combination phone, it can still perform several of its functions during a power failure. The following features will function even during a power failure. -- Making and receiving calls with the corded handset -- Redialing the last number redialed.
43-3880.book Page 29 Monday, June 28, 2004 2:07 PM From the Handset Speakerphone 1. Remove the handset from the cradle. 2. Press SPEAKER. 3. Listen for the dial tone. 4. Dial the number. 5. When the other party answers, talk into the microphone. From the base 1. Pick up the corded handset, or press SPEAKER. Ô NOTES Ô • The handset microphone is located at the bottom of the handset. Position yourself as near to the handset as possible and speak clearly. • The base microphone is located under the base.
43-3880.book Page 30 Monday, June 28, 2004 2:07 PM From the base Press SPEAKER or pick up the corded handset. HANGING UP From the handset or handset speakerphone, press END or return the handset to the cradle (AutoStandby). From the base, press SPEAKER or return the corded handset to the base. SWITCHING TO SPEAKERPHONE DURING A CALL To switch a normal call to the speakerphone, press SPEAKER on the handset. To switch from a speakerphone call to a normall call, press SPEAKER again.
43-3880.book Page 31 Monday, June 28, 2004 2:07 PM PLACING A CALL ON HOLD 1. During a call, press HOLD/TRSF/INTCM on the handset or INTCM/TRSF/HOLD on the base. The call will be put on hold.Ô 2. To return to the call, pick up the corded handset or press TALK/FLASH on a handset. To talk to the caller on a speakerphone, press SPEAKER on the base or on a handset. REDIALING 1. Press REDIAL/PAUSE in standby mode. 2. Press REDIAL/PAUSE. Each press of the key will display one of the last three number redialed.
43-3880.book Page 32 Monday, June 28, 2004 2:07 PM ADJUSTING THE RINGER, EARPIECE AND SPEAKER VOLUME Ringer volume In standby mode, repeatedly press on the handset or base to select ringer volumes. You can select from one of three ringer volumes (Off, Low, or High) for the handset, and one of four ringer volumes (Off, Low, Medium, and High) for the base. Earpiece and Speaker Volume You can select earpiece volume from among six volume levels on the handset and the base.
43-3880.book Page 33 Monday, June 28, 2004 2:07 PM 3. Press the CHANGE soft key to scroll through audio tone levels. MUTING THE RINGER Do Not Disturb (DND) The do not disturb feature (DND) allows you to mute the ringer, the base, and any registered handsets at the same time. The phone must be in standby mode. Press and hold DND on the base. You will hear a confirmation tone, and the DND LED illuminates. To cancel the DND feature, press DND again.
43-3880.book Page 34 Monday, June 28, 2004 2:07 PM MUTE MICROPHONE You can temporarily mute the microphone so that the caller cannot hear you. 1. During a call, press MENU/DEL (or the MENU soft key on the base). 2. Press to move the pointer to MUTE, (or the OK soft and then SELECT/ key on the base). Mute On and appear in the display. To cancel muting, repeat above step again. Mute Off appears. Ô NOTES Ô • • The tone feature only applies when the dial mode is set to pulse.
43-3880.book Page 35 Monday, June 28, 2004 2:07 PM TRAVELING OUT OF RANGE During a call, as you begin to move your handset too far from your base unit, noise may increase. If you pass the range limits of the base unit, you will hear a beep and see Out of Range on the display, and then the handset returns to standby mode. BOOSTER (HANDSET ONLY) If you encounter interference while using your phone, you can manually improve the sound by setting the Booster to on. This works only when the phone is in use. 1.
43-3880.book Page 36 Monday, June 28, 2004 2:07 PM PRIVACY MODE Privacy Mode prevents interruption from other registered handsets or the base. This works only when the phone is in use. 1. Press MENU/DEL (or the MENU soft key on the base) during talk mode. 2. Press to move the pointer to Privacy Mode and then SELECT/ (or the OK soft key on the base). Privacy Mode On and appear in the display. To exit the Privacy Mode, repeat above step again. Privacy Mode Off appears.
43-3880.book Page 37 Monday, June 28, 2004 2:07 PM 2. To hang up, press SPEAKER or return the corded handset to the base. The handset(s) will still be connected to the call. From a second handset 1. Press TALK/FLASH or SPEAKER on the handset to join the call. 2. To hang up, return the handset to the cradle or press END on the handset. The base or other handset will still be connected to the call. FIND HANDSET To locate the handset, press the PAGE soft key on the base when the phone is in standby mode.
43-3880.book Page 38 Monday, June 28, 2004 2:07 PM PHONEBOOK Phonebook You can store names and numbers in your phone’s phonebook, search for names alphabetically, and dial phonebook entries with just a few key presses. Phonebook memory is stored independently in the cordless handsets or the base. You can store up to 100 numbers in each handset and the base. The phone uses the same memory locations to store phonebook entries and Caller ID messages.
43-3880.book Page 39 Monday, June 28, 2004 2:07 PM 4. Enter the name (up to 16 characters) by using the number keypad. If a name is not required, go to step 5. will be used as the name. Phonebook Refer to the letters on the number keys to select the desired characters. With each press of a number key (0-9), the displayed character appears in the following order:Upper case letters first, lower case letters next and finally the number corresponding to the key.
43-3880.book Page 40 Monday, June 28, 2004 2:07 PM 5. Press SELECT/ (or the OK soft key on the base) to store the name; Store/Edit No. appears. Ô NOTE Ô Phonebook The pause key counts as one digit. Pressing REDIAL/PAUSE more than once increases the length of the pause between numbers. Each pause represents a 2 second delay. 6. Use the number keypad, */TONE/<, to enter the phone number (up to 20 digits).
43-3880.book Page 41 Monday, June 28, 2004 2:07 PM Storing Caller ID Messages in the Phonebook 1. When the phone is in standby mode, select the Caller ID message to be stored. Ô NOTES Ô • If a call comes in via a telephone system that does not offer Caller ID service, no information is stored. • If the Caller ID message was received as a private/unknown number, or the message does not have the number, you cannot store the message in the phonebook.
43-3880.book Page 42 Monday, June 28, 2004 2:07 PM Deleting a Redial Record 1. With the phone in standby mode, press REDIAL/PAUSE. Phonebook 2. Press REDIAL/PAUSE repeatedly to display the number to be deleted. 3. Press MENU/DEL (or the DELETE soft key or DELETE on the base). 4. Press to choose Yes. (or the OK soft key 5. Press SELECT/ on the base). The redialed number is deleted. Viewing the Phonebook 1. Press . to 2.
-3880.book Page 43 Monday, June 28, 2004 2:07 PM Making Calls Using the Phonebook From Standby Mode Ô NOTE Ô During a call, don’t press END or the call will disconnect. Phonebook 4. To finish the viewing operation press END (or during a call) on the handset, or CID/EXIT on the base. Ô 1. When the phone is in standby mode, view the phonebook location to dial (see "Viewing the Phonebook" on page 42). 2. Press TALK/FLASH or SPEAKER (or SPEAKER on the base). 3.
43-3880.book Page 44 Monday, June 28, 2004 2:07 PM 2. Press SELECT/ (or the EDIT soft key on the base) to edit the entry. Phonebook To delete the entry, press MENU/DEL on the haneset. (or press DELETE or the DELETE soft key on the base, and use to select Yes and then press the OK soft key). 3. If you are editing the entry, follow the steps 4 to 9 under "Phonebook (Storing Phone Numbers, Names, Distinctive Rings, and Speed Dial)" on page 38 to complete the editing operation.
43-3880.book Page 45 Monday, June 28, 2004 2:07 PM COPYING PHONEBOOK LOCATIONS Phonebook Copy Phonebook allows you to transfer stored phonebook locations from handset to handset or from base to handset without having to manually re-enter names and numbers. You can transfer one memory (phonebook location) at a time, or all memory locations at once. Ô From the handset 1. Press MENU/DEL. Select the Global Setup menu, and then Copy Phonebook submenu.
43-3880.book Page 46 Monday, June 28, 2004 2:07 PM From the base Ô NOTE Ô Phonebook If the selected handset is in out of range or data transfer is canceled, Unavailable appears in the display. Phonebook locations will not be transferred. 1. When the phone is in standby mode, press .Ô 2. Press to select Copy , and then press the OK soft key. 3. Press to select the handset to which you want transfer the phonebook locations and then press the OK soft key.
43-3880.book Page 47 Monday, June 28, 2004 2:07 PM You must subscribe to Caller ID services through your local telephone provider to use these features. When the telephone rings, the Caller ID feature allows you to view the caller’s name, phone number, date and time of call. With CIDCW (Caller ID on Call Waiting), you will hear a call waiting tone while you are on a call, and the Caller ID data is displayed. To accept the waiting call, press TALK/FLASH (or the FLASH soft key on the base).
43-3880.book Page 48 Monday, June 28, 2004 2:07 PM Ô NOTES Ô • To activate features, select CW On/CWDX On in the CIDCW option. See page 24. • If you don’t press a key within 30 seconds while in the operation, the phone back to a call. To return back to a call, press TALK/FLASH (or SPEAKER on the base). • Caller ID and CIDCW (Caller ID on Call Waiting) Check with your local telephone company for a full list of options. CALL WAITING DELUXE FEATURES Your phone gives you new options for call waiting.
43-3880.book Page 49 Monday, June 28, 2004 2:07 PM 4. Press SELECT/ (or the OK soft key on the base). A confirmation screen will appear, and the phone returns to the call. VIEWING THE CALLER ID LIST The Caller ID list stores information for incoming calls - even unanswered calls. 1. Press CID (or CID/EXIT on the base). The summary screen appears. The screen shows the number of new messages and total messages. 2.
43-3880.book Page 50 Monday, June 28, 2004 2:07 PM Ô NOTE Ô Once the Caller ID data has been deleted, the information cannot be retrieved DELETING INFORMATION FROM THE CALLER ID LIST 1. When the phone is in standby mode, view the Caller ID information to be deleted (see "Viewing the Caller ID List" on page 49). 2. Press MENU/DEL (or DELETE or the DELETE soft key on the base). 3. Press to select Yes. 4. Press SELECT/ (or the OK soft key on the base). You will hear a confirmation tone.
43-3880.book Page 51 Monday, June 28, 2004 2:07 PM CALLING A PARTY FROM THE CALLER ID LIST Ô NOTES Ô From Standby Mode 2. To have the phone dial a "1" before the displayed Caller ID number, press */TONE/<. To have the phone dial the stored area code before the displayed Caller ID number, press #/>. 3. Press TALK/FLASH or SPEAKER (or SPEAKER on the base). The displayed phone number dials automatically. When a long distance call has been set, "1" appears in the display.
43-3880.book Page 52 Monday, June 28, 2004 2:07 PM EXPANDING YOUR PHONE Four Multi-Handset Expandability ! IMPORTANT ! If you purchase an extra handset, please register the handset to the original/main base befor using it. The handset will not operate until it is registered. Your phone supports up to four handsets. You can now place a fully- featured cordless handset anywhere AC power is available to connect the handset charger. ! Up to two handsets can be used for outside and/or intercom call.
43-3880.book Page 53 Monday, June 28, 2004 2:07 PM 4. On the handset, press and hold #/> for two seconds. To cancel registration, press the CANCEL soft key on the base. 5. While the handset is registering, Handset Registering will appear in the Handset LCD. When Registration Complete is displayed, the handset has been registered to the base. If Registration Failed appears, please try these steps again.
43-3880.book Page 54 Monday, June 28, 2004 2:07 PM FOUR-WAY CONFERENCING A fourth person, at either the handset or the base, may be added to the conference call. For example, to add a fourth party to an ongoing conference call at the base or another handset, press TALK/FLASH on the fourth party’s handset (or SPEAKER on the base or pickup the base corded handset). To remove either caller from your conversation, press END on the party’s handset (or SPEAKER on the base or return the handset to the base).
43-3880.book Page 55 Monday, June 28, 2004 2:07 PM From the base 1. With the phone in standby mode, press INTCM/TRSF/HOLD on the base. 2. Use to select the handset you want to talk with, and then press the OK soft key. If you select All, all other handsets will be paged. An intercom tone sounds. To cancel intercom, press INTCM/TRSF/ HOLD or the CANCEL soft key. Answering an Intercom Page When the intercom page tone sounds, the display will show the ID of the handset or base that is paging.
43-3880.book Page 56 Monday, June 28, 2004 2:07 PM From a handset 1. During a call, press HOLD/TRSF/INTCM on the handset. The Call will be put on hold. 2. Use press to select the base or the handset you want to transfer the call to, and then press SELECT/ . If you select All, all other handsets and the base will be paged. The call will automatically be placed on hold, and paging tone sounds. To cancel the transfer, press TALK/FLASH on the initiating handset. From the base 1.
43-3880.book Page 57 Monday, June 28, 2004 2:07 PM To answer a page from the base Pick up the corded handset. To answer with the base speakerphone, press HOLD/TRSF/ INTCM, SPEAKER, or the ANSWER soft key. Accepting the call transfer Expanding Your Phone After answering the page, if you want to accept the call and speak to the outside caller, press TALK/FLASH on the receiving handset or SPEAKER on the base.
43-3880.book Page 58 Monday, June 28, 2004 2:07 PM The Integrated Answering Device THE INTEGRATED ANSWERING DEVICE The phone has a built-in answering system that answers and records incoming calls. You can also use your answering system to record a conversation, leave a voice memo message or to announce a special outgoing message to callers when you’re away from your phone.
43-3880.book Page 59 Monday, June 28, 2004 2:07 PM This main menu option allows you to set up the built in answering device. Record a Personal Outgoing Message (Base Only) Record Greeting allows you to record a personal outgoing message (greeting) which the answering system automaticlly plays when you receive a call. Ô 1. Press the MENU soft key. Select the Answ. Setup menu, and then the Record Greeting submenu. To record greeting press [START] appears. 2. Press the START soft key.
43-3880.book Page 60 Monday, June 28, 2004 2:07 PM The Integrated Answering Device 2. Once you have recorded a personal greeting, press the CHANGE soft key to choose the greeting. The selected outgoing message is played. Each time you press the CHANGE soft key, the phone switches the outgoing message between the prerecorded and the personal outgoing message. Setting a PIN Code Security code selects a two-digit Personal Identification Number (PIN) code.
43-3880.book Page 61 Monday, June 28, 2004 2:07 PM The Integrated Answering Device 2. Press to select a Ring Time (Toll Saver, 2 Times, 4 Times, or 6 Times) (default is toll saver). (or the OK soft key 3. Press SELECT/ on the base). You will hear a confirmation tone. Setting the Record Time Record Time sets the duration for recording the incoming messages. You have three record time options. The options “one minute” or “four minutes” set the duration for recording the incoming messages.
43-3880.book Page 62 Monday, June 28, 2004 2:07 PM The Integrated Answering Device 3. Press SELECT/ (or the OK soft key on the base). You will hear a confirmation tone. Turning the message alert tone off by pressing any key To quickly turn off the Message Alert tone, press any key on the base unit; the tone will automatically deactivate.
43-3880.book Page 63 Monday, June 28, 2004 2:07 PM to select On or Off (default The Integrated Answering Device 2. Press is on). 3. Press SELECT/ (or the OK soft key on the base). You will hear a confirmation tone. TURNING THE ANSWERING SYSTEM ON/OFF 1. To turn the answering system On, on the base in press ANSWER standby mode. After the announcement “Answering System is on”, the current greeting message will be played and you will hear a confirmation tone.
43-3880.book Page 64 Monday, June 28, 2004 2:07 PM New Message LED The Integrated Answering Device The new message LED on the handset is designed to work with your answering system. The LED flashes when you have new messages in your answering system. The LED stops flashing when all new messages are played back. Ô NOTE Ô Time stamp will not be heard until you have set the time. Playing your messages 1. When the phone is in standby mode, press PLAY/STOP X/ .
43-3880.book Page 65 Monday, June 28, 2004 2:07 PM The Integrated Answering Device 2. To repeat the current message, press the |<< soft key after a few seconds of beginning the message. To quickly scroll backwards through a message, press and hold the |<< soft key. To repeat the previous message, press the |<< soft key within a few seconds (about four seconds during remote operation) after a message begins playing.
43-3880.book Page 66 Monday, June 28, 2004 2:07 PM The Integrated Answering Device 3. Press PLAY/STOP X/ at anytime to stop reviewing your messages and return to standby. The message counter shows the number of messages stored in memory. Deleting a message To maintain maximum record time, delete the old messages. When you press the DELETE soft key or DELETE∅ on the base, you are permanently deleting the message. Once deleted, the message cannot be replayed or retrieved. 1. Press PLAY/STOP X/ messages.
43-3880.book Page 67 Monday, June 28, 2004 2:07 PM Voice memo Ô NOTES Ô Voice Memo • The voice memo messages are recorded as an incoming messages. • When the answering 1. In standby mode, press the RECORD soft key on the base. 2. Press the START soft key. You will hear the announcement "Record Memo Message" and a confirmation tone. 3. Start your recording. 4. When you have finished, press the STOP soft key to stop recording. The system returns to standby. Recording a conversation system is full, (7.
43-3880.book Page 68 Monday, June 28, 2004 2:07 PM From the handset 1. While on a call, press MENU/DEL. The Integrated Answering Device 2. Press to move the pointer to Call Record, and then SELECT/ . Recording a Call and R appear in the display. To turn stop recorging, repeat above step again, Stop Recording appears. Ô NOTES Ô • Time stamp will not be heard until you have set the time. See “Setting Day and Time” on page 24.
43-3880.book Page 69 Monday, June 28, 2004 2:07 PM Command Ô NOTES Ô • For Repeat a Message function, press 0 then 1 within about four seconds to repeat the previous message, or press 0 then 1 after about four seconds to repeat the current message. • For Memo Record and Greeting Message Record function, the first time you enter the corresponding command, it starts the Recording function. If you want to stop the recording, enter the command again.
43-3880.book Page 70 Monday, June 28, 2004 2:07 PM Ô NOTES Ô The Integrated Answering Device Remote access with the handset • If you press END before the answering system answers, the phone will return to standby. • When the answering system does not answer within 6 seconds, you hear a beep and the phone will return to standby. • When you receive a call, the remote operation is canceled. • You can change the handset volume during a remote operation.
43-3880.book Page 71 Monday, June 28, 2004 2:07 PM The Integrated Answering Device 4. After the command has finished, you hear intermittent beeps indicating that the system is in the command waiting mode. You may enter another command at this time from the chart above. 5. When you are finished, press END to exit the system. The answering system automatically returns to standby.
43-3880.book Page 72 Monday, June 28, 2004 2:07 PM TROUBLESHOOTING If your phone is not performing to your expectations, please try these simple steps first Symptom Suggestion • Make sure the AC adapter is plugged into the charger and wall outlet. The CHARGE LED won’t • Make sure the handset is properly seated in the illuminate when the handset cradle. is placed in the cradle. • Make sure the charging contacts on the handset are clean. The audio sounds weak.
43-3880.book Page 73 Monday, June 28, 2004 2:07 PM Suggestion During power failure, can’t make or receive a call. • Make sure to use corded handset to make or receive a call. • Make sure that the line cord is connected. Severe noise interference. • Keep the handset away from microwave ovens, computers, remote control toys, wireless microphones, alarm systems, intercoms, room monitors, fluorescent lights, and electrical appliances. • Move to another location or turn off the source of interference.
43-3880.book Page 74 Monday, June 28, 2004 2:07 PM Symptom No sound on the base unit speaker during call monitoring or message playback. Suggestion • Adjust the speaker volume on the base unit. • Make sure the call screen feature is set to On. • Make sure you are using the correct PIN number. Cannot access remote call- • Make sure that the touch-tone phone you’re using can transmit the tone for at least two in features from another seconds. If it cannot, you may have to use touch-tone phone.
43-3880.
43-3880.book Page 76 Monday, June 28, 2004 2:07 PM Limited One-Year Warranty This product is warranted by RadioShack against manufacturing defects in material and workmanship under normal use for one (1) year from the date of purchase from RadioShack company-owned stores and authorized RadioShack franchisees and dealers.