TM 16-1003 User’s Guide 7” High-Resolution Digital Photo Frame One demo photo included, as illustrated Please read this user’s guide before using your new photo frame.
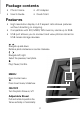
Package contents • Photo Frame • AC Adapter • User’s Guide • Quick Start Features • High resolution display in 4:3 aspect ratio shows pictures without streching or cropping. • Compatible with SD/ MMC/ MS memory cards up to 8GB. • USB port allows you to connect and view photos stored on USB mass storage devices. Navigate up and down. Rotate a photo clockwise or counter clockwise. Navigate left/ right. Select the previous/ next photo. Play/ Pause/ Confirm. MENU Press to enter menu.
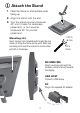
1 Attach the Stand 1. Place the frame on a flat surface, back facing up. 2. Align the stand with the slot. 3. Turn the stand counter clockwise 45° until it locks for landscape placement, or turn counterclockwise 90° for portrait placement. Mounting slot Use 2 screws (not included) with heads the size shown to hang the frame on the wall. Slide two mounting slots over the screws to mount either portrait or landscape. 0.23 in (6 mm) .
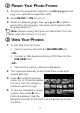
2 Power Your Photo Frame 1. Connect the supplied AC adapter to the DC – -C -+ jack and plug in to a standard household outlet. 2. Slide ON/OFF to ON to turn on. 3. Select a display language. Use or and to select and confirm the language. The demo photo appears after language selection. n Note: Always unplug the frame and disconnect from the adapter when the frame is not in use. 3 View Your Photos 1.
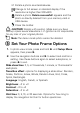
• Press to play/ pause. M: press MENU to reveal toolbar. • Press or to rotate a photo. • Press or to skip to the next/ previous photo. • 5. If you are using both a memory card and a USB device, press and hold until the menu appears showing SD/MMC/MS and USB. Use the navigation buttons or to select a source. Press to confirm and enter thumbnail mode. Press again to start slideshow. n Note: The demo photo appears if no memory card or USB device is connected.
Rotate a photo counterclockwise Change to full screen or standard display if the resolution is higher than 800×600. Delete a photo. Delete successful! appears and the photo is directly deleted from your memory card or USB device. Close the toolbar. w CAUTION: Delete with caution. Make sure you have backup copies saved elsewhere. L.P. Ignition is not responsible for any loss of your original photos. n Note: The demo mode photo cannot be deleted. 5 Set Your Photo Frame Options 1.
Default: Restore all default settings. The photo frame will automatically switch off, then on again and show the language selection screen. Select your language to proceed. n Notes: • • The demo photo appears if you remain in the Setup Menu for several seconds and have not pressed to proceed. Do not set Hint time to 0 if you want the photo frame to display the navigation hint bar.
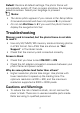
• Do not expose the frame to rain or moisture to prevent fire or electric shock hazard. • Do not insert any foreign objects into the frame through openings; do not spill or spray any liquids on or in the frame. • Do not place anything heavy on the frame. • To ensure proper ventilation and proper operation, never cover or block slots or openings. Keep the frame away from open flames (fires, candles, etc.), direct sunlight, and heat sources such as radiators or stoves.
FCC Information This equipment has been tested and found to comply with the limits for a Class B digital device, pursuant to Part 15 of the FCC Rules. These limits are designed to provide reasonable protection against harmful interference in a residential installation. This equipment generates, uses and can radiate radio frequency energy and, if not installed and used in accordance with the instructions, may cause harmful interference to radio communications.
service. Repaired or replaced parts and products are warranted for the remainder of the original warranty period. You will be charged for repair or replacement of the product made after the expiration of the warranty period. IGNITION L.P. EXPRESSLY DISCLAIMS ALL WARRANTIES AND CONDITIONS NOT STATED IN THIS LIMITED WARRANTY.