Please read before using this equipment.
ˆ The FCC Wants You to Know This equipment has been tested and found to comply with the limits for a Class B digital device, pursuant to Part 15 of the FCC Rules. These limits are designed to provide reasonable protection against harmful interference in a residential installation. This equipment generates, uses and can radiate radio frequency energy and, if not installed and used in accordance with the instructions, may cause harmful interference to radio communications.
ˆ Contents Features .................................................................................................................................. 4 Connections ........................................................................................................................... Connecting Microphones .................................................................................................. Connecting Other Audio Components ...................................................................
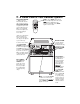
ˆ Features Your RadioShack Hi-Power CDG Karaoke System is one of the most versatile karaoke systems available. It lets you be the “star” as you sing along with your favorite recordings on a CD, a CD+G (a compact disc with a graphic track), a cassette tape, or a video tape, and hear your voice with the music through the powerful built-in speaker. 21-Key Remote Control — lets you control most of the system's functions from up to 23 feet away.
Auxiliary Output Jacks — for connecting another audio component, such as an equalizer/booster or a PA system. Audio Select — lets you choose between singing along to the music with or without the original singer's voice or a stereo effect. Automatic Search — lets you quickly locate and play any track on the loaded CD/CD+G. Supplied CD+G Demo Disc — lets you sing along with the music, adjust the volume of the prerecorded voice and music, and see the words to the music on a connected TV.
output jacks to AUX IN R and AUX IN L on the karaoke system. CONNECTING POWER Note: If your audio source does not have AUX OUT R and L jacks, but has only a headphone or line out jack (such as on a portable tape or CD player), use a shielded Yadapter cord with phono jacks on each end. Connect the single-plug end to the audio source’s headphone or line out jack, and connect AUX IN R and AUX IN L on the karaoke system.
ˆ A Quick Look at Your Karaoke System AUTO VOICE CONTROL — While you play a karaoke audio cassette tape or CD, you can use AUTO VOICE CONTROL to replace the prerecorded voice with your voice. When you stop singing into the microphone, the prerecorded singer’s voice returns. MUTE — Press MUTE on the remote control to temporarily silence the sound. 087( appears and MUTE on the karaoke system lights. Press MUTE again to restore sound.
ˆ Singing Along/Quick Start The instructions in this section provide a quick reference to help you get started singing along with your karaoke CD/CD+G system. SINGING WITH A CD/CD+G OR CASSETTE TAPE Follow these steps to sing along with a CD/ CD+G (such as the one supplied) or a cassette tape. 1. Press STANDBY to turn on the karaoke system. STANDBY on the front of the karaoke system turns off. 2. Press OPEN/CLOSE, then load a CD or CD+G in the CD compartment. Press OPEN/CLOSE to close the CD compartment.
13. To stop a tape, press STOP/EJECT on the deck you are using. Press STOP/ EJECT again to open the cassette compartment door and remove the tape. 2. Set FUNCTION SELECTOR to AUX. $8; lights. 3. Turn on the audio source or other component. 14. Set each microphone’s ON/OFF switch to OFF, then press STANDBY to turn off the system. STANDBY lights. 4. Use the karaoke system’s controls to adjust the sound. SINGING WITH ANOTHER AUDIO SOURCE 5. Set each connected microphone’s ON/ OFF switch to ON.
7. Press PLAY/PAUSE. The CD/CD+G begins to play from Track 1 and the track’s elapsed play time appears. SEARCH/SKIP • Repeatedly press to search forward to the beginning of the desired track. Note: While a CD/CD+G is playing, press REMAIN to see the remaining play time of the current disc. 5(0$,1 appears. Press REMAIN again to return to the elapsed time display. SEARCH/SKIP • Repeatedly press to search backward to the beginning of the desired track. 8. Use the controls to adjust the sound.
To continuously repeat a single track, press REPEAT once while the desired track is playing. 5(3($7#4 appears. To continuously repeat all tracks on the CD/ CD+G, repeatedly press REPEAT until 5(3($7 $// appears. To cancel repeat play during or after play, press REPEAT. 5(3($7 disappears. If you cancel repeat play during play, the CD/ CD+G player resumes normal play. Random Play You can set the system to play all tracks on a loaded CD/CD+G in random order before or during play.
programmed sequence, see “Repeat Play” on Page 10. To search through programmed tracks, see “Automatic Search” on Page 10. 7. Programmed play automatically stops at the end of the last programmed track. To stop the karaoke system at any time during programmed play, press STOP. The CD/CD+G’s programmed number of tracks and playing time appear. To review the programmed sequence, while play is stopped, repeatedly press PROGRAM.
play or record on facing you, and the full reel to the left. Notes: • To temporarily stop play, press PAUSE. Press PAUSE again to resume play. 4. Close the compartment door. PLAYING A TAPE You can play a cassette tape in either TAPE 1 or TAPE 2, or you can load cassette tapes in both decks and play them consecutively. Warning: To protect your hearing, set MASTER VOLUME to MIN before you play a cassette tape. Normal Play Follow these steps to play a cassette tape in TAPE 1 or TAPE 2. 1.
RECORDING TIPS 4. Press STOP/EJECT on TAPE 1 to stop recording. RECORD and PLAY release. • Tape quality greatly affects the quality of the recording. We recommend RadioShack Supertape Extended Range or Low-Noise Type 1 tape. We do not recommend long-play cassette tapes, such as C-120s, because they are thin and can easily tangle in the cassette mechanism. For low-noise, siderange recordings, use normal-bias tape. • Before recording, be sure the tape you are using has its erase-protection tabs in place.
TAPE TIPS Restoring Tape Tension and Sound Quality After you play a cassette tape several times, the tape might become tightly wound on the reels. This can cause playback sound quality to deteriorate. To restore the sound quality, fast-forward the tape from the beginning to the end of one side, then completely rewind it. Then loosen the tape reels by gently tapping each edge of the cassette on a flat surface. Caution: Be careful not to damage the cassette when tapping it.
LISTENING THROUGH ANOTHER AUDIO COMPONENT 3. Turn on the audio component. If you connected an audio component (such as a PA system) to your karaoke system, follow these steps to listen to the karaoke system’s sound through that component. 5. Use the controls to adjust the sound. To sing along with a CD or CD+G, see “Singing with a CD/CD+G or Cassette Tape” on Page 8. 1. Press STANDBY to turn on the system. STANDBY turns off. 6. To turn off the system, press STANDBY. STANDBY lights and AUX turns off.
CARE Keep the karaoke system dry; if it gets wet, wipe it dry immediately. Use and store the karaoke system only in normal temperature environments. Handle the karaoke system carefully; do not drop it. Keep the karaoke system away from dust and dirt, and wipe it with a damp cloth occasionally to keep it looking new. Modifying or tampering with the karaoke system’s internal components can cause a malfunction and might invalidate its warranty.
ˆ Specifications Power Output (at 10% THD) ..................................................................................... 25 Watts per Channel Bass ..................................................................................................................................... 100 Hz ±10 dB Treble ..................................................................................................................................... 10 kHz ±10 dB Track System .........................................
ˆ Notes Notes 19
Limited Ninety-Day Warranty This product is warranted by RadioShack against manufacturing defects in material and workmanship under normal use for ninety (90) days from the date of purchase from RadioShack companyowned stores and authorized RadioShack franchisees and dealers.