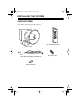
49-820.fm Page 1 Thursday, August 19, 1999 10:29 AM Cat. No. 49-820 OWNER’S MANUAL RS-2000 Auto Security Alarm System Please read this entire manual before you begin installation.
49-820.fm Page 2 Thursday, August 19, 1999 10:29 AM FEATURES Your RS-2000 Auto Security Alarm System warns away potential thieves and alerts you to trouble by sounding a piercing alert tone. It also includes other advanced features that help protect your vehicle from theft, yet you can install it in minutes. The two convenient key-chain remote controls lets you arm and disarm the system, sound a panic alert, or activate the car finder feature when you are away from your vehicle.
49-820.fm Page 3 Thursday, August 19, 1999 10:29 AM Violation Confirmation — beeps three times when you disarm the system after the alert has sounded, to let you know what happened while you were away from the vehicle. Programmable Options — let you customize several of your alarm’s options, such as shock sensor sensitivity and the valet mode.
9-820.fm Page 4 Thursday, August 19, 1999 10:29 AM CONTENTS Installing the System ..................................................................................... Supplied Items ........................................................................................... Installation Order ....................................................................................... Connecting the System to Power .............................................................. Activating the Remote Controls ...
49-820.
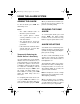
49-820.fm Page 6 Thursday, August 19, 1999 10:29 AM INSTALLATION ORDER You can install your system in just four easy steps: 1. Connect the system to power. 2. Train the remote controls. 3. Mount the system. 4. Install the status indicator. CONNECTING THE SYSTEM TO POWER Warning: We recommend that you muffle the alarm’s speaker before you connect the system to power. The alarm is extremely loud. Follow these steps to connect the system to power. 1.
49-820.fm Page 7 Thursday, August 19, 1999 10:29 AM Once you select a location, follow these steps to mount the system. MOUNTING THE SYSTEM Select a location for your alarm system in the engine compartment. For the best results, the location should meet the following conditions. • All wires should reach their connections without going near moving or hot engine parts. Note: If necessary, you can extend the wires using hook-up wire and butt connectors.
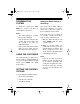
49-820.fm Page 8 Thursday, August 19, 1999 10:29 AM INSTALLING THE STATUS INDICATOR The alert indicator goes inside your vehicle’s passenger compartment. Either drill a mounting hole in a dash panel or use the supplied mounting bracket to hold the indicator. Follow these steps to install the indicator. 1. Locate an existing wire harness that goes through your vehicle’s firewall, and push the indicator into the passenger compartment through the existing hole. bottom of the bracket.
49-820.fm Page 9 Thursday, August 19, 1999 10:29 AM USING THE ALARM SYSTEM ARMING THE ALARM To arm the alarm, press ARM. The alarm chirps once. Notes: • The status indicator turns on when the system is armed. When you disarm and re-arm the system, the shock sensor returns to its previous sensitivity setting. SOUNDING THE PANIC ALARM • The system ignores currentsensing violations for 40 seconds after it arms. To sound a panic alarm, press and release PANIC. The alarm sounds loud tones for 30 seconds.
49-820.fm Page 10 Thursday, August 19, 1999 10:29 AM DISARMING THE SYSTEM Setting the Shock Sensor’s Sensitivity To disarm the system, press DISARM. The system beeps twice to confirm that it is disarmed. The shock sensor’s initial setting is fine for most situations. To test the shock sensor, strike your vehicle on the hood directly over the alarm. Notes: • The status indicator is off when the system is disarmed.
49-820.fm Page 11 Thursday, August 19, 1999 10:29 AM Setting the Current Sensor If your vehicle has electronic accessories that turn on and off automatically while you are away from the vehicle, the alarm might sound false alerts. (The system can detect an electric engine fan, and does not sound a false alert when the fan comes on.) To disable the current sensor so accessories will not trigger an alert, disarm the system. Then hold down PANIC for about 4 seconds. The system beeps twice.
49-820.fm Page 12 Thursday, August 19, 1999 10:29 AM TROUBLESHOOTING This section describes some problems you might encounter, and gives possible solutions. Problem Frequent false alerts Possible Solution • Another accessory is triggering the alarm. Try turning off current sensing to see if this solves the problem. If it does, try turning it back on, then removing other accessories, one by one, until you find which accessory is triggering the false alert.
49-820.fm Page 13 Thursday, August 19, 1999 10:29 AM Problem Alarm does not operate Possible Solution • Check all power connections. • Check the system’s fuse. If it has blown, see “Replacing the Fuse” on Page 15. • Check the remote control’s battery. See “Replacing a Remote Control’s Battery” on Page 15. Alarm does not sound when it should • The shock sensor is not sensitive enough. See “Setting the Shock Sensor’s Sensitivity” on Page 10.
49-820.fm Page 14 Thursday, August 19, 1999 10:29 AM CARE AND MAINTENANCE Your RadioShack RS-2000 Auto Security Alarm System is an example of superior design and craftsmanship. The following suggestions will help you care for the alarm so you can enjoy its protection for years. Keep the remote controls dry. If they get wet, wipe them dry immediately. Liquids can contain minerals that might corrode the electronic circuits. Handle the alarm and remotes gently and carefully.
49-820.fm Page 15 Thursday, August 19, 1999 10:29 AM REPLACING THE FUSE Follow these steps to check the system’s fuse and replace it if it has blown. The system uses a 5-amp 11/4 × 1/4-inch fast-acting fuse (RadioShack Cat. No. 270-1011). 1. Push together the two halves of the inline fuse holder (on the red power wire) and twist them to separate the halves.
49-820.fm Page 16 Thursday, August 19, 1999 10:29 AM SPECIFICATIONS Siren Sound Level ................................................. More than 115 dB at 1 Meter Current Drain .......................................................................... 22 mA (Standby) 1 Amp (Siren Sounding) Power Requirements .................................................................. 9–16 Volts DC Alarm Weight ........................................................................................
49-820.
49-820.
49-820.
49-820.fm Page 20 Thursday, August 19, 1999 10:29 AM RadioShack Limited Warranty This security product is warranted against manufacturing defects in material and workmanship for ninety (90) days from the date of purchase from RadioShack company owned stores and authorized RadioShack franchisees and dealers. Within this period RadioShack will repair the security product without charge for parts and labor. Simply bring your RadioShack sales slip as proof-of-purchase date to any RadioShack store.