9-1110.fm Page 1 Friday, March 24, 2000 9:42 AM Cat. No. 19-1110 A OWNER’S MANUAL Please read before using this equipment.
19-1110.fm Page 2 Friday, March 24, 2000 9:42 AM FEATURES Your RadioShack HTX-10 10-Meter Transceiver is ideal for use in your vehicle. Its 25-watt SSB/FM and 7-watt AM output provides the power you need to communicate, and its tuner covers the entire 10-meter Amateur Radio band (including the 28.3 to 28.5 MHz Novice band). You can connect a DC power supply and base station antenna to your transceiver to set up a base station in your home.
19-1110.fm Page 3 Friday, March 24, 2000 9:42 AM Important: You must have a Technician Class or higher Amateur Radio Operator’s License, and a call sign issued by the FCC, to legally transmit using this transceiver. Transmitting without a license carries heavy penalties. Getting a license is easier than ever. See “Introduction to Amateur Radio” on Page 6 for more information. We recommend you record your transceiver’s serial number here. The number is on the transceiver’s back panel.
19-1110.fm Page 4 Friday, March 24, 2000 9:42 AM MANUAL CONVENTIONS Your transceiver’s buttons perform multiple functions. The abbreviation or symbol for a function is printed on, below, or above each button. To activate certain transceiver features, you must press PUSH FUNC (function) then another button. Button names are printed in this manual in small, bold, capital letters (such as PUSH FUNC or SCAN).
19-1110.fm Page 5 Friday, March 24, 2000 9:42 AM CONTENTS Introduction to Amateur Radio ............................................. 6 Preparation ............................................................................. 8 Attaching the Microphone Holder ..................................... 8 Mounting the Transceiver ................................................. 8 Connecting an Antenna .................................................. 10 Connecting the Microphone ................................
19-1110.fm Page 6 Friday, March 24, 2000 9:42 AM INTRODUCTION TO AMATEUR RADIO This transceiver is a great intermediate-level tool for the experienced amateur radio operator. The transceiver opens a door for you to the world from almost anywhere! All you need is an Amateur Radio Operator’s License (Novice Class, or Technician Plus, or higher) issued by the Federal Communications Commission (FCC). If you do not have a license, it is easier than ever to get one and help from licensed operators is available.
19-1110.fm Page 7 Friday, March 24, 2000 9:42 AM Start studying for the license exams. Do not be intimidated by the word “study,” for most people can go from knowing absolutely nothing about amateur radio to passing the Novice and Technician written exams in less than a month. The exams test your knowledge of basic radio regulations and elementary radio theory. Many clubs hold license classes, which can be a fun and easy way to learn about amateur radio.
19-1110.fm Page 8 Friday, March 24, 2000 9:42 AM PREPARATION ATTACHING THE MICROPHONE HOLDER You can connect the microphone holder horizontally or vertically to either side of the transceiver or to another location in your vehicle. Use the supplied screws and lock washers to secure the holder to the side of the transceiver. Or, follow these steps to attach the holder to another location in the vehicle (such as the dashboard). 1.
19-1110.fm Page 9 Friday, March 24, 2000 9:42 AM If you are mounting the transceiver in a vehicle, choose a location where: • you can easily reach the transceiver. • wires and cables are clear of the vehicle's pedals or other moving parts. • the transceiver is not directly in front of heating vents. • all wires and cables can reach their connection points.
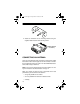
19-1110.fm Page 10 Friday, March 24, 2000 9:42 AM 4. Attach the transceiver to the mounting bracket using the supplied rubber washers and mounting knobs. (Rubber washers not shown) CONNECTING AN ANTENNA There are many different types of transceiver antennas for mobile transceivers. Each antenna type has its own benefits, so choose the one that best meets your needs. Your local RadioShack store sells a wide variety of antennas.
19-1110.fm Page 11 Friday, March 24, 2000 9:42 AM Once you choose an antenna, follow its mounting instructions. Then route the cable to the transceiver and connect the cable to the ANT jack on the back of the transceiver. Cautions: • Avoid routing the cable next to sharp edges or moving parts, which might damage the cable. • Do not run the cable next to power cables or other radio antenna cables. • Do not run the cable through the engine compartment or other areas that produce extreme heat.
19-1110.fm Page 12 Friday, March 24, 2000 9:42 AM CONNECTING THE MICROPHONE 1. Align the slot on the bottom of the microphone’s plug with the ridge inside the MIC jack. Then fully insert the plug into the jack. 2. Turn the plug’s locking nut clockwise to tighten it. 3. Slide the microphone onto the microphone holder. To disconnect the microphone, unscrew the locking nut and gently pull out the microphone plug. Never pull on the microphone cable to disconnect the microphone.
19-1110.fm Page 13 Friday, March 24, 2000 9:42 AM To connect the external speaker to the transceiver, insert the speaker's plug into the EXT jack on the back of the transceiver Note: Connecting an external speaker disconnects the transceiver's internal speaker. USING VEHICLE BATTERY POWER Follow these steps to connect the transceiver to your vehicle’s battery power. 1.
19-1110.fm Page 14 Friday, March 24, 2000 9:42 AM Caution: Do not connect the black wire to a non-metallic (plastic) part, or to any part insulated from the vehicle's chassis by a non-metallic part. 3. Connect the single connector end of the power cord to the connector on the back of the transceiver. USING THE TRANSCEIVER AS A BASE STATION Although this transceiver is designed mainly for mobile use, you can also use it as a base station with an AC power source.
19-1110.fm Page 15 Friday, March 24, 2000 9:42 AM Follow these steps to install the transceiver as a base station. 1. Mount the base station antenna as described in its owner's manual. Warning: Use extreme caution when you install or remove a base station antenna. If the antenna starts to fall, let it go! It could contact overheard power lines. If the antenna touches a power line, contact with the antenna, mast, cable, or guy wires can cause electrocution and death.
19-1110.
19-1110.fm Page 17 Friday, March 24, 2000 9:42 AM OPERATION SETTING SQUELCH AND RECEIVING 1. Rotate SQUELCH fully counterclockwise. 2. Rotate RF-G fully clockwise. 3. To turn on the transceiver, rotate OFF/VOLUME clockwise until it clicks. The display lights and the frequency appears. A bar graph also appears which shows the received signal’s strength. Frequency Bar Graph 4. Set OFF/VOLUME to a comfortable listening level. 5. Rotate SQUELCH clockwise until you hear a hissing sound.
19-1110.fm Page 18 Friday, March 24, 2000 9:42 AM Note: If the transceiver picks up unwanted weak transmissions, rotate RF-G slightly counterclockwise to decrease the transceiver’s sensitivity to signals. The transceiver blocks the weak transmissions. 6. Repeatedly press MODE to select the desired band (FM, AM, USB (upper sideband), or LSB (lower sideband)). 7. Rotate TUNE or press UP or DN on the top of the microphone to select a frequency. 8.
-1110.fm Page 19 Friday, March 24, 2000 9:42 AM 3. To transmit, hold down the push-to-talk button on the microphone, hold the microphone 2–3 inches from your mouth, and speak in a normal tone of voice. TX appears along with a bar graph which shows the strength of your transmission. 4. When you finish transmitting, release the PTT button. TX and the signal strength bars disappear. 5. To turn off the transceiver, rotate OFF/VOLUME counterclockwise until it clicks.
19-1110.fm Page 20 Friday, March 24, 2000 9:42 AM SPECIAL FEATURES USING THE SPECIAL FEATURES Your transceiver has several advanced features that give you additional control and convenience while using it. This list provides additional information about your transceiver’s special features. Feature See: Step — let’s you change the increment you set to tune frequencies in the 10-meter band. Page 21 Call — recalls a specific frequency in memory channel 2. Page 22 Scan — scans incoming signals.
19-1110.fm Page 21 Friday, March 24, 2000 9:42 AM Feature See: RF-G (RF Gain) — attenuates strong signals. Page 26 MIC-G (Microphone Gain) — reduces the microphone gain and SSB transmitting power, Page 26 Using STEP Repeatedly press STEP to select the frequency step your transceiver displays when it shows a frequency. As you press STEP, one of the three frequency digits flashes for about 2 seconds to show which digit is selected.
19-1110.fm Page 22 Friday, March 24, 2000 9:42 AM Using CALL The transceiver’s call memory lets you quickly recall a specific frequency in memory Channel 2. Note: See “Using M-SAVE (Memory Save)” on Page 25 for more information about storing a frequency in memory channel 2. Press CALL to recall the stored frequency at any time. The frequency flashes. Press CALL again and the last selected frequency appears. Using SCAN Press SCAN to scan incoming signals.
19-1110.fm Page 23 Friday, March 24, 2000 9:42 AM Using LCR (Last Channel Recall) Press LCR to return to the last channel you selected. Using M-LOAD You can recall frequencies stored in memory Channels 1–5. Note: See “Using M-SAVE (Memory Save)” on Page 25 for more information about storing frequencies in memory channels. To recall a memory channel, press M-LOAD so L appears, then, press the desired memory channel number.
19-1110.fm Page 24 Friday, March 24, 2000 9:42 AM Using SHIFT The transceiver’s shift function lets you set the transmit frequency shift from the receive frequency in either direction within the range of 0.0 Hz to 990 kHz. Follow these steps to set the frequency shift direction and offset frequency. 1. To set the frequency shift direction to +, press PUSH FUNC then press SHIFT while FUNC appears. +SHIFT appears. Press PUSH FUNC and SHIFT again while FUNC appears to set the frequency shift direction to -.
19-1110.fm Page 25 Friday, March 24, 2000 9:42 AM Using M-SAVE (Memory Save) Follow these steps to save up to five frequencies into memory channels. 1. Select the desired frequency. 2. Press PUSH FUNC then M-SAVE. S appears. 3. While S appears, press the desired memory channel number. The transceiver stores the frequency you selected into the memory channel you selected. 4. To recall a frequency you stored, see “Using M-LOAD” on Page 23.
19-1110.fm Page 26 Friday, March 24, 2000 9:42 AM Using RF-G (RF Gain) When you receive an extremely strong signal, rotate RF-G counterclockwise to attenuate the signal. Using MIC-G (Microphone Gain) Rotate MIC-G to adjust the transmitter’s microphone gain and SSB transmitting power for the best audio quality. TURNING THE KEY TONE ON AND OFF The transceiver is preset to sound a tone each time you press a key.
19-1110.fm Page 27 Friday, March 24, 2000 9:42 AM CARE AND MAINTENANCE Your HTX-10 10-Meter Transceiver is an example of superior design and craftsmanship. The following suggestions will help you care for your transceiver so you can enjoy it for years. Keep the transceiver dry. If it gets wet, wipe it dry immediately. Liquids might contain minerals that can corrode the electronic circuits. Use and store the transceiver only in normal temperature environments.
19-1110.fm Page 28 Friday, March 24, 2000 9:42 AM TROUBLESHOOTING If your transceiver is not working as it should, these suggestions might help you eliminate the problem. If the transceiver still does not operate properly, take it to your local RadioShack store for assistance. Problem Trouble with reception. Trouble with transmission. 28 Possible Causes Remedies The squelch might need to be adjusted. Adjust the squelch. The transmitter might not be set to an operating frequency.
19-1110.fm Page 29 Friday, March 24, 2000 9:42 AM Problem Possible Causes Remedies Trouble with transmission (continued) The microphone’s gain might not be properly set. Adjust MIC-G. Transceiver does not work at all. The power cord might not be connected. Make sure the power cord is connected. The power cord’s fuse might be blown. Replace the fuse (see “Replacing the Fuse” on Page 30). The transceiver should be serviced only by a qualified radio technician.
19-1110.fm Page 30 Friday, March 24, 2000 9:42 AM • Be sure that the chassis ground connection is secure. • Replace old ignition wires with new, high-voltage, noise suppression wires. • Install noise suppressors on your spark plugs, or install new spark plugs that have built in noise suppressors. • If problems persist, check your alternator/generator and regulator gauges. You can reduce the noise from these sources by using bypass capacitors at the various output voltage points.
19-1110.fm Page 31 Friday, March 24, 2000 9:42 AM Caution: The supplied fuse has the proper ratings. Make sure you replace a fuse only with another fuse of the same rating. 4. Reassemble the fuse holder by squeezing it together until it snaps shut.
19-1110.fm Page 32 Friday, March 24, 2000 9:42 AM SPECIFICATIONS GENERAL Frequency Range ........................... 28.000 MHz to 29.699 MHz Tuning Step ......................... 1 kHz/10 kHz/100 kHz (selectable) Frequency Generation ........................... Digital PLL Synthesizer Antenna Connector ............................ 50 ohm coaxial connector Microphone ........................................... Electret condenser type Operating Temperature ...................
19-1110.fm Page 33 Friday, March 24, 2000 9:42 AM TRANSMITTER Power Output ....................................... 7w (AM), 25w (FM/SSB) Distortion ............................................................................... 5% Deviation ......................................................................... ±2 kHz S/N Ratio............................................................................ 40 dB Spurious Emission ............................................
19-1110.
19-1110.
19-1110.fm Page 36 Friday, March 24, 2000 9:42 AM Limited Ninety-Day Warranty This product is warranted by RadioShack against manufacturing defects in material and workmanship under normal use for ninety (90) days from the date of purchase from RadioShack company-owned stores and authorized RadioShack franchisees and dealers.