Cat 20-527 PRO-97 1,000 Channel Triple Trunking Hand Held Scanner Please read this user’s guide before installing, setting up and using your new product www.radioshack.
Contents Thank you for purchasing your Pro-97 1,000 channel tripple trunking hand held scanner from RadioShack. Your hand held scanner is one of a new generation of scanners designed to track Motorola® Type I and II (such as Smartnet® and Privacy Plus®) and hybrid analog trunking systems, GEEricsson (EDACS®) type systems, and EF Johnson (LTR) type systems which are extensively used in many communication systems.
The Basics contents your scanner’s controls power sources 7 12 using batteries charging rechargeable batteries using AC power using vehicle battery power connecting an earphone/headphones listening safely traffic safety connecting an extension speaker connecting the supplied antenna connecting an optional external antenna using the belt clip transferring data to or from another scanner or PC quick start 12 14 15 16 16 17 17 17 18 18 19 19 20 understanding your scanner’s modes AM mode FM mode CTCSS (C
The Basics storing text tags assigning a text tag to a channel assigning a text tag to a group ID assigning a tex tage to a bank text input chart 34 34 35 35 36 finding and storing active frequencies 37 searching a preprogrammed frequency range band charts search bank: SR0 marine band search bank: SR1 CB band search bank: SR2 FRS/GMRS/MURS band search bank: SR3 police/fire band search bank: SR4 aircraft search bank: SR5 amateur band search bank: SR6 programmable limit search searching active frequencies i
The Basics using CTCSS and DCS deleting frequencies from channels deleting all frequencies in a channel bank using dealy locking out channels or frequencies locking out channels reviewing locked-out channels locking out frequencies reviewing locked-out frequencies clearing a locked-out frequency clearing all locked-out frequencies in a search bank priority changing the receive mode using the attenuator turning the key tone on and off using the display/key backlight using the keylock changing the display con
The Basics clearing talk group IDs clearing all talk group IDs in a single bank changing the open/closed mode care 78 78 79 80 service and repair birdie frquencies 80 80 specifications 81 initializing your scanner 84 The FCC wants you to know scanning legally 85 85 glossary 86 FAQs (Frequently Asked Questions) 87 warranty 88 Hypersearch, Hyperscan, and Adaptaplug are trademarks used by RadioShack Corporation.
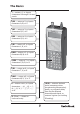
The Basics your scanner’s controls SCAN/ — scans through the programmed channels, or activates the Signal Stalker II function. FUNC (function) — lets you use various functions by pressing this key in combination with other keys. MAN — stops scanning and lets you directly enter a channel number. TRUNK — stores the trunking ID code or holds the trunking ID while scanning. WX/ — scans through the seven preprogrammed weather channels, or jumps to a Skywarn channel you programmed (997-999).
The Basics TUNE — lets you input a frequency and allows you to fine tune a frequency along with e or d. ATT (Attenuate) — turns attenuation on to reduce the scanner’s sensitivity and block extremely strong signals, or turns it off to return the sensitivity to normal. e or d — selects the scan or search direction. SRCH — lets you search the seven search banks. L/OUT (Lock Out) — lets you lock out a selected channel, skip a specified frequency during search, or lock out a selected ID code.
The Basics 1 — enters a 1, or inputs characters 0 through 9 in text mode. 2/ABC — enters a 2, or inputs characters A, B, or C. 3/DEF — enters a 3, or inputs characters D, E, or F. 4/GHI — enters a 4, or inputs characters G, H, or I. 5/JKL — enters a 5, or inputs characters J, K, or L. 6/MNO — enters a 6, or inputs characters M, N, or O. 7/PQRS — enters a 7, or inputs characters P, Q, R, or S. 8/TUV — enters an 8, or inputs characters T, U, or V. 9/WXYZ — enters a 9, or inputs characters W, X, Y, or Z. .
The Basics PWR DC 9V — connect a power source here. PC/IF — connect an optional PC interface cable here to use the scanner with your computer.
The Basics ANT — connect the supplied antenna or an external antenna here. — connect an earphone or headphone here. OFF VOL/SQ — turn the scanner on or off and adjust the squelch.
The Basics power sources You can power your scanner from any of these sources: Notes • internal non-rechargeable batteries or rechargeable batteries (not supplied – see “Using Batteries”). • standard AC power (with an optional AC adapter – see “Using AC Power”). • vehicle power (with an optional DC adapter – see “Using Vehicle Battery Power”).
The Basics recommend RadioShack nickel-metal hydride (Ni-MH) batteries. You must charge rechargeable batteries before you use them the first time. See “Charging Rechargeable Batteries”. Warning! Notes Never install non-rechargeable batteries in the rechargeable yellow battery holder. Non-Rechargeable batteries can get hot or explode if you try to recharge them. The battery holder fits only one way. Do not force it. Use only fresh batteries of the required size and recommended type.
The Basics 5. Replace the cover. When battery power is low, Low battery! appears and the scanner beeps continuously. When battery power is depleted, the scanner turns itself off. Replace all four non-rechargeable batteries, or recharge the rechargeable batteries. See “Charging Rechargeable Batteries”. Always dispose of old batteries promptly and properly. Do not bury or burn them. Notes If you do not plan to use the scanner with batteries for a month or longer, remove the batteries.
The Basics It takes about 16 hours to recharge fully discharged 1600 mAh Ni-MH rechargeable batteries. You can operate the scanner while recharging the rechargeable batteries, but charging takes longer. Notes The scanner can also charge Ni-Cd batteries. 600 mAh batteries require 6 hours and 850 mAh batteries require 8 hours to charge. When you charge rechargeable batteries, do not overcharge them. Overcharging shortens battery life.
The Basics using vehicle battery power You can power the scanner from a vehicle’s 12V power source (such as cigarette-lighter socket) using a 9V, 300 mA DC adapter and a size C Adaptaplug™ adapter (neither supplied). Both are available at your local RadioShack store. Notes You must use a power source that supplies 9V DC and delivers at least 300 mA. Its center tip must be set to positive and its plug must fit the scanner’s PWR DC 9V jack.
The Basics listening safely To protect your hearing, follow these guidelines when you use an earphone or headphones. • Set the volume to zero before putting on headphones. With the headphones on, adjust the volume to a comfortable level. • Avoid increasing the volume once you set it. Over time, your sensitivity to a volume level decreases, so volume levels that do not cause discomfort might damage your hearing. • Avoid or limit listening at high volume levels.
The Basics connecting the supplied antenna To attach the supplied flexible antenna to the antenna jack on the top of your scanner, align the slots around the antenna’s connector with the tabs on the antenna jack. Press the antenna down over the jack and turn the antenna’s base clockwise until it locks into place.
The Basics using the belt clip To make your scanner easier to carry when you are on the go, use the supplied belt clip by attaching it to the back of the scanner. To remove the battery clip, slide it upward while pulling the tab toward you. transferring data to or from another scanner or PC You can transfer the programmed data to and from another PRO-97 scanner using a connecting cable which has 1/8 -inch phone plugs on both ends (not supplied). Connect the cable between each scanner’s PC/IF jacks.
The Basics quick start To help familiarize yourself with the scanner’s functions, keypad, and available frequencies, you can utilize one of these four features before you begin programming the scanner. Signal Stalker II — searches nearby strong signals quickly. See “Signal Stalker II”. Preprogrammed Search Banks — allow you to listen to frequencies and decide which frequencies you want to store when you are ready to program the scanner. See “Searching a Preprogrammed Frequency Range”.
The Basics military, some amateur radio, and some government transmissions. (Refer to “Specifications” for a list of the frequencies covered.) When the scanner receives a transmission on a channel set to the AM mode, it always stops on the transmission. FM mode The FM mode sets the scanner to receive transmissions using frequency modulation (FM), used for most public safety transmissions, as well as broadcast, business, and amateur radio transmissions.
The Basics transmissions. In your PRO-97 scanner, the DCS feature can be used to block the reception of transmissions on a shared channel to only those that use the DCS tone that you have specified. DCS mode also features a Code Search setting that allows you to instantly display and store unknown codes into the channel memory. DCS data can sometimes be heard as a low “purring” sound in the background of a voice transmission.
The Basics bank’s talk group ID list and have not locked out. Motorola trunking systems come in three categories: Type I, Type II, and Type I/II Hybrid. Each category displays and uses talk group IDs in slightly different ways. Motorola Type II IDs are in the form FFF-SS, where; FFF=Fleet ID SS=Subfleet ID Type I systems are usually organized with different user groups assigned to different fleets.
The Basics EDACS mode You can set your scanner so it decodes the talk group IDs used with EDACS (GE/Ericsson) trunking systems. This setting is called the EDACS mode. EDACS systems are trunking systems used primarily by business or private communications service providers, as well as by some public safety organizations. EDACS systems transmit active talk group information only on a dedicated control channel. EDACS frequencies are organized in a specific order.
The Basics LTR mode You can set your scanner so it decodes the talk group IDs used with LTR systems. This setting is called the LTR mode. LTR frequencies are organized in a specific order. Each frequency is assigned a Home Repeater Number (HR). For the scanner to correctly switch to an active frequency, you must program the frequencies in HR order, starting with Memory X01 in the selected bank.
The Basics LTR system are assigned to specific talk groups, which are identified by the radio as six-digit numbers. These numbers are in the form AHHUUU, where: A = Area code (0 or 1) H = Home repeater (01 through 20) U = User ID (000 through 254) When the scanner receives a transmission on a channel set to the LTR mode, it first decodes the LTR data included with the transmission. In the open mode, the scanner stops on the transmission and displays the talk group ID on the bottom line of the display.
The Basics When no ID code is programmed into the scanner, it receives the signal in MO, ED, or LT mode. In open mode, the scanner stops on any transmission. If the ID is stored, the text tag appears on the display. Otherwise, the talk group ID appears on the display. In closed mode, the scanner only stops on a transmission if the ID is stored. You can set each of the scanner’s channel storage banks to open or closed mode. In open mode, the scanner scans signals transmitted in all systems.
The Basics setting up your scanner turning on the scanner and setting squelch 1. To turn on the scanner, turn VOL clockwise. Multi-system Trunking Scanner appears. After about 3 seconds, you might hear a hissing sound. Then adjust VOL to a comfortable level. 2. Turn SQ fully counterclockwise, then turn SQ clockwise until the hissing sound stops. 3. To turn off the scanner, turn VOL counterclockwise to OFF. The scanner does not scan if there are no frequencies Notes stored in channels.
The Basics storing known frequencies into channels Good references for active frequencies are RadioShack’s Police Call, Aeronautical Frequency Directory, and Maritime Frequency Directory. We update these directories every year, so be sure to get a current copy. Follow these steps to store frequencies into channels. Notes If you are storing frequencies for an EDACS system, you must store them in order, with the first frequency in channel 1 for the current bank.
Beyond the Basics 2. Press PGM. M changes to P. 3. Use the number keys and ./DELAY to enter the frequency (including the decimal point) you want to store. If you make a mistake, press CL to delete a single digit or press and hold CL about 2 seconds to delete all digits. 4. Press ENT to store the frequency into the channel. If you made a mistake in Step 3, Invalid Freq. briefly Notes appears and the scanner beeps when you press ENT. Start again from Step 3.
Beyond the Basics CTCSS and DCS Your PRO-97 scanner features an advanced, DSP based CTCSS and DCS decoder. CTCSS and DCS allow you to program frequencies into your scanner that are used by more than one group in your area and listen only to the group that is of interest to you by specifying the group’s specific CTCSS or DCS code. CTCSS and DCS can also help reduce instances where interfering signals cause your scanner to stop on one channel.
Beyond the Basics 3. By default, the search code (indicated with Code Search in the bottom of the display) is programmed. To program a specific code, press FUNC, MODE, and then use the arrow keys to scroll to the desired CTCSS or DCS code. You can also use the keypad to enter the code manually. Note that the scanner will automatically fill the code field as you enter the code. 4. Once the desired code is selected, press ENT to store the code in the channel memory. 5.
Beyond the Basics 82.5 Hz 114.8 Hz 159.8 Hz 189.9 Hz 233.6 Hz 85.4 Hz 118.8 Hz 162.2 Hz 192.8 Hz 241.8 Hz 88.5 Hz 123.0 Hz 165.5 Hz 196.6 Hz 250.3 Hz 91.5 Hz 127.3 Hz 167.9 Hz 199.5 Hz 254.
Beyond the Basics 6. Repeat Steps 4 and 5 to enter the other trunking group frequencies for EDACS or additional control channel frequencies for Motorola systems. 7. If necessary, press MODE to change the receiving mode. storing text tags You can customize your scanner by storing text tags (up to 16 characters) for easy identification of channel transmissions, trunk IDs, or banks. assigning a text tag to a channel 1. Press MAN, enter the channel number where you want to enter the text, then press MAN again.
Beyond the Basics Press 6 then 1. • A space is entered by pressing ./DELAY. • “6” is the sixth number associated with 1 on the keypad. Press 1 then 6. • “m” is the first letter associated with 6 on the keypad. Press 6 and FUNC (for the lower case set), then press 1. 5. Press ENT to input the text. assigning a text tag to a group ID 1. Press PGM. 2. Press TRUNK. 3. Press FUNC then e or d to select the desired bank. 4. Press TRUNK to select the desired sub-bank. 5.
Beyond the Basics text input chart To access the numbers, after you press TEXT (when you Notes assign the text tag to a channel) or you press FUNC and bank number (when you assign the text tag to a bank), press 1. Then press the desired number you want to enter. To enter lowercase character or a character from the second set for the key 0, press FUNC after pressing the first numeral key.
Beyond the Basics finding and storing active frequencies You can search for transmissions in the scanner’s preprogrammed search bank. The search bank is divided into seven search bands. You can change the search range of Bank SR6 manually by setting the lower and higher ends of the search range. Notes You can use the scanner’s delay feature while searching the search bank. See “Using Delay”. The scanner does not search locked-out frequencies while searching ranges.
Beyond the Basics 2. In the marine, CB, and FRS/GMRS/MURS bands, you can directly select a channel or search through the band. When MAN appears at the right of the third line, you can directly select a channel (refer to “Band Charts”). Press the desired channel number while MAN appears to select it. You can also change the channels by pressing e or d. 3. Press FUNC then SRCH while MAN appears. MAN changes to SRCH and now you can search through the band.
Beyond the Basics 08 156.4000 09 156.4500 10 156.5000 11 156.5500 12 156.6000 13 156.6500 14 156.7000 15 156.7500 16 156.8000 17 156.8500 18 156.9000 19 156.9500 20 157.0000 161.6000 21 157.0500 22 157.1000 23 157.1500 24 157.2000 161.8000 25 157.2500 161.8500 26 157.3000 161.9000 27 157.3500 161.9500 28 157.4000 162.0000 63 157.1750 64 156.2250 160.8250 65 156.2750 66 156.3250 67 156.3750 68 156.4250 69 156.4750 70 156.5250 71 156.5750 72 156.
Beyond the Basics search bank: SR1 CB band Receive mode: AM Ch. Frequency (MHz) Ch. Frequency (MHz) 01 26.9650 02 26.9750 03 26.9850 04 27.0050 05 27.0150 06 27.0250 07 27.0350 08 27.0550 09 27.0650 10 27.0750 11 27.0850 12 27.1050 13 27.1150 14 27.1250 15 27.1350 16 27.1550 17 27.1650 18 27.1750 19 27.1850 20 27.2050 21 27.2150 22 27.2250 23 27.2550 24 27.2350 25 27.2450 26 27.2650 27 27.2750 28 27.2850 29 27.2950 30 27.3050 31 27.
Beyond the Basics 03 462.6125 04 462.6375 05 462.6625 06 462.6875 07 462.7125 08 467.5625 09 467.5875 10 467.6125 11 467.6375 12 467.6625 13 467.6875 14 467.7125 15 462.5500 16 462.5750 17 462.6000 18 462.6250 19 462.6500 20 462.6750 21 462.7000 22 462.7250 23 151.8200 24 151.8800 25 151.9400 26 154.5700 27 154.6000 search bank: SR3 police/fire band Receive Mode: FM Group 0 Frequency (MHz) Step (kHz) 33.420 – 33.980 20 37.020 – 37.420 20 39.020 – 39.
Beyond the Basics 1 153.770 – 154.130 60 154.145 – 154.445 15 154.650 – 154.950 15 155.010 – 155.370 60 155.415 – 155.700 15 155.730 – 156.210 60 158.730 – 159.210 60 166.250 170.150 2 3 453.0375 – 453.9625 12.5 458.0375 – 458.9625 12.5 460.0125 – 460.6375 12.5 465.0125 – 465.6375 12.5 851.0125 – 860.9875 25 866.0125 – 868.9875 12.5 search bank: SR4 aircraft Receive mode: AM Frequency (MHz) Step (kHz) 8.33 108.000 – 136.99166 Notes All scanners tune by steps.
Beyond the Basics search bank: SR5 amateur band Receive mode: FM Group Frequency (MHz) Step (kHz) 0 28.0000 – 29.7000 5 1 50.0000 – 54.0000 5 2 144.0000 – 148.0000 5 3 222.0000 – 225.0000 5 4 420.0000 – 450.0000 12.5 5 1240.0000 – 1300.0000 6.25 search bank: SR6 programmable limit search Receive mode: FM (Default setting) searching active frequencies in a range You can program the desired frequency range for a search. 1. Repeatedly press SRCH to select SR6. 2. Press PGM then SRCH.
Beyond the Basics 7. Rotate SQ clockwise and leave it set to a point just after the rushing sound stops. When the scanner finds an active frequency, it stops searching. You can copy and save a frequency into a specified bank, Notes channel, or priority channel when the scanner finds an active frequency. See “Using Frequency Copy” to save the frequency. The frequency copy works only in search banks 1 through 6. While the scanner is searching, you can use the seek search by pressing FUNC then 7. Seek Search ON.
Beyond the Basics manually tuning a frequency You can manually set the scanner to move through all receivable frequencies, or select a specific frequency as a starting point. 1. Press TUNE. The currently-tuned frequency , *** PAUSED ***, and Fine Tune Mode appear. 2. Use the number keys to enter the frequency where you want the scanner to start. 3. Press ENT. 4. Press PSE. The scanner starts the tune operation. To change the tune direction, press e or d to tune up or down.
Beyond the Basics listening to a weather channel To hear your local forecast and regional weather information, press WX. Your scanner scans through the weather band then stops within a few seconds on the next available weather broadcast. SAME standby mode The National Weather Service precedes each weather alert with a digitally encoded SAME (Specific Area Message Encoding) signal, then a 1050 Hz tone.
Beyond the Basics 6. Press WX to exit the FIPS code entry table. Press WX then a number key to quickly review stored FIPS Notes codes. Press L/OUT to toggle lockout status. Your scanner can also detect the 1050 Hz weather alert tone when a weather channel is set as the priority channel and weather priority operation is enabled. (see “Priority”). In this mode all alerts are received. FIPS settings are ignored. The scanner sounds an alert or beep when it receives the SAME code.
Beyond the Basics Skywarn Many areas of the country have amateur radio repeaters that have been designated as “Skywarn” repeaters. During times of severe weather, these repeaters are used to relay reports of severe weather directly to meteorologists at a local National Weather Service (NWS) forecast office.
Beyond the Basics 2. Press the desired bank and the channel number where you want to store the frequency. The display indicates the bank and channel number. After about 1 second, the frequency to be copied flashes. 3. Press ENT. All the conditions such as receive mode and delay condition are copied onto the channel. Channel Stored! briefly appears. The scanner automatically returns to search mode.
Beyond the Basics copying a frequency into the priority channel You can copy a frequency into the priority channel (see “Priority”) when the scanner stops on the frequency during Search, Scan, Manual, Tune, or WX mode. Press FUNC then PRI when the frequency appears. The display flashes twice and the frequency is copied to the priority channel.
Beyond the Basics using Signal Stalker II Your scanner’s Signal Stalker II functions when you press and hold for approximately 1 second. The Signal Stalker II function can be set to watch for activity on all band frequencies or Police/Fire frequencies only. To change the all bands to police/fire or vice versa, press FUNC then . You can also turn on/off frequency sub-bands using the corresponding number keys while Signal Stalker II is active.
Beyond the Basics due to their high transmitter output power. You can press L/OUT when the Signal Stalker II stops on these undesired transmissions to prevent the Signal Stalker II from stopping on them in future sweeps, however, the Signal Stalker II will still see their RF signal energy when sweeping through the 1 MHz segment. This will cause the Signal Stalker II to execute another fine step search of the 1 MHz segment.
Beyond the Basics key so the bank’s number disappears. For example, to turn off bank 1, press 1. The scanner does not scan any of the channels within the banks you turned off. To turn on banks while scanning, press the number key until the bank’s number appears. For example to turn bank 1 on again, press 1. Notes You cannot turn off all banks. There must be at least one active bank. You can manually select any channel in a bank, even if the bank is turned off.
Beyond the Basics scanner to stop on one channel. When your scanner stops on a conventional frequency that is configured for CTCSS or DCS, it checks for a match between the transmitted and stored codes match, the scanner stops on the transmission and allows the audio to pass to the speaker. If the codes do not match, the scanner resumes scan operation.
Beyond the Basics 2. Press FUNC then the bank number you want to clear. Bank X selected. Fn+CLR to delete all frequencies. TEXT to edit tag appears. 3. Press FUNC then CL. Clear entire bank? Press 1 to clear all, any other key aborts appears. 4. Press 1 to clear the selected bank’s all channel memory. please stand by. appears while the scanner clears all channel memory. Press any other than 1 to cancel clear. using delay Many conversations might have a pause of several seconds between a query and a reply.
Beyond the Basics You can still manually select locked-out channels. Notes To remove the lockout from a channel, manually select the channel and press L/OUT so LO changes to lo. reviewing locked-out channels To review all locked out channels, press MAN. Then repeatedly alternate between pressing FUNC and then L/OUT to view each locked-out channel. When you finish reviewing locked-out channels, press MAN.
Beyond the Basics L/OUT again to cancel reviewing locked-out frequencies. clearing a locked-out frequency To clear a locked-out frequency, select that frequency (see “Reviewing Locked-Out Frequencies”), then press CL. If all locked-out frequencies are cleared within a bank, No Lockout appears. clearing all locked-out frequencies in a search bank 1. Press SRCH. 2. Select the search bank in which you want to clear all locked-out frequencies. 3. Press FUNC then press L/OUT. Lockout list appears. 4.
Beyond the Basics on, the scanner checks that channel every 2 seconds, and stays on the channel if there is activity until the activity stops. Notes The priority feature does not operate while the scanner receives a trunking voice channel or during trunking delay time. Therefore, the priority check seems random during peak hours. If you program a weather channel as the priority channel, the scanner stays in the priority channel only when the scanner detects the weather alert tone.
Beyond the Basics 1. Press WX. 2. Select the weather channel you want to program as the priority channel. 3. Press FUNC then PRI. The display flashes two times. To turn on the priority feature, press PRI so pri changes PRI on the display while scanning. If the scanner detects activity on the priority channel, Priority Channel appears. Or if the scanner detects a weather alert tone in Priority WX mode, Priority Channel! appears for 3 seconds then changes to Weather ALERT and the scanner sounds an alert tone.
Beyond the Basics CT – accesses the FM mode, CTCSS System DC – accesses the FM mode, DCS System MO – accesses the FM Mode, Motorola Trunking System (with 4- or 5-digit ID code) ED – accesses the FM Mode, EDACS Trunking System (with 4-digit decimal ID code or 5-digit AFS code) LT – accesses the FM mode, LTR Trunking System (with 6digit ID code) Notes MO (MOT), ED, and LT modes are not available when the scanner tunes up or down through the frequency ranges in which the trunking operation is not used.
Beyond the Basics mode. Normal ATT. appears on the bottom line for about 2 seconds. Notes If you turn on the attenuator, the scanner might not receive weak signals. turning the key tone on and off Each time you press any of the scanner’s keys, the scanner sounds a tone. To turn the scanner’s key tone off or on: 1. If the scanner is on, turn OFF/VOL counterclockwise until it clicks to turn the scanner off. 2. Turn OFF/VOL clockwise to turn the scanner on. Multi-system Trunking Scanner appears. 3.
Beyond the Basics With Ignore mode, the backlight functions as described in Keypress mode, except that the scanner ignores the first keypress. This mode is useful when you wish to quickly illuminate the display and keypad without having to search for the key. The first keypress is ignored, and the scanner sounds the low pitched error beep to remind you that the first key pressed to activate the backlight is ignored by the scanner.
Beyond the Basics using the keylock Once you program your scanner, you can protect it from accidental program changes by turning on the key lock feature. When the keypad is locked, the only controls that operate are FUNC, / , SQ, and VOL. You cannot activate the keylock while you are entering a frequency into a channel. / . Key locked. To turn on the keylock, press FUNC then appears for about 1 second. Key locked. appears when you press any key after locking the keypad. / .
Beyond the Basics cloning the programmed data You can transfer the programmed data to and from another PRO-97 scanner using an optional connecting cable with 1/8-inch (3.5 mm) phone plugs on both ends (not supplied, available at your local RadioShack store). Notes “CLONE MODE” Incorrect Model appears if the scanner receives data from another scanner other than a PRO-97. Follow these steps to clone the data. 1. Turn on both scanners. 2. Connect the connecting cable to each scanner’s PC/IF jack.
Beyond the Basics trunking how trunking works The scanner tracks transmissions that use the Motorola Type I and Type II (such as Smartnet and Privacy Plus) and hybrid analog trunking systems, plus GE/ Ericsson (EDACS) and EF Johnson (LTR) type systems extensively used in many communication systems. Trunking systems allocate a few frequencies to many different users. When the mobile unit transmits a signal, one frequency is chosen from among the allocated frequencies in that trunking system.
Beyond the Basics To listen to the transmission, the mode of the programmed channel must be the same as that of the trunking channel (MO, ED, or LT). Notes When an ID code is received, the ID list for the bank is searched, and if found, the text name stored for the ID appears. If not found, scanning resumes immediately unless the bank is in open trunking mode. Notes There might be more than one talk group transmitting at a time in some Motorola trunking systems.
Beyond the Basics setting squelch for trunking mode Your scanner automatically mutes the audio during trunk scanning when it decodes control channel data. However, we recommend you turn SQ clockwise and leave it set to a point just after the rushing sound stops. This lets the scanner quickly acquire the data channel. programming trunking frequencies You program trunking frequencies the same as non-trunked frequencies, except that you must store the appropriate mode (MO, ED, or LT) with each frequency.
Beyond the Basics one at a time, repeat the sequence of PGM, FUNC then e or d until you reach the desired bank. 2. Press TRUNK to enter the ID program mode. 3. Repeatedly press MODE to select Motorola, EDACS (GE/ Ericsson), or LTR (EF Johnson) system to scan. This sets the talk group ID decoding method to be used for the bank. Notes If you select conventional mode instead of Motorola, EDACS, or LTR, the scanner does not scan trunked frequencies. Trunking mode not selected, press Mode key. appears. 4.
Beyond the Basics 6. To enter additional trunking frequencies as subsequent channels in the same bank, press PGM or e to access the next open channel then enter the frequencies. (See “Storing Known Frequencies into Channels”). 7. Press SCAN to start scanning. If you enter a frequency that has already been entered, Notes the scanner sounds an error tone and displays Dupl. Freq. and the channel number that has been duplicated. If the dual entry is an error press CL and enter the correct frequency.
Beyond the Basics Notes Base and offset frequencies vary for each type of trunking system. You can get information about these frequencies for the trunking system you want to scan using www. trunkscanner.com, other Internet sources, or locally published guidebooks. If you try to program an offset frequency in the UHF-Hi bands (806-960 MHz), the scanner ignores the entry. Follow these steps to program Motorola trunking frequencies in the UHF-Lo band: 1. Press PGM then TRUNK to enter the ID program mode. 2.
Beyond the Basics programming Motorola trunking systems (800 MHz) Follow these steps to program 800 MHz band Motorola trunking. Notes On the 800 MHz trunking band, you can select a base frequency (normal or offset). On the 900 MHz trunking band, you do not need to set the base frequency (base, offset, step). 1. Press PGM then TRUNK to enter the ID program mode. 2. Press FUNC then e or d to select the desired bank. 3. Press MODE and select Motorola trunking mode. 4. Press FUNC then 3.
Beyond the Basics 3. Press FUNC. Then press 8. Size Code Setting appears. 4. Enter the size code supplied with the Type I system information, referring to the instruction that appears on the display. If the information was not supplied, try the following common fleet maps.
Beyond the Basics 5. Press ENT for each entry. If you make a mistake, press CL and enter the correct size code. The default setting of the bank is for Motorola Type II. Notes However, if you set Type I and you want to return to Type II, enter 15 at Step 4. To confirm the input, repeat Steps 1-5 and press ENT. Each time you press ENT, you confirm the size code. If you find an error, press CL and begin again at Step 1. 6. Press SCAN to start scanning.
Beyond the Basics Notes When you try to store more than 150 talk group IDs in a bank, Memory Full! appears. Clear some talk group IDs in order to store new ones (see “Clearing Talk Group IDs”). Follow these steps to manually store talk group IDs or to edit a stored ID. 1. Press PGM. 2. Press TRUNK. 3. To select the bank where you want to store the ID, repeatedly press FUNC then e or d until you reach the desired bank. 4. Press MODE to select MOT, ED, or LTR. 5.
Beyond the Basics 9. To store the next ID memory in sequence, press e and repeat Step 7. 10. Press SCAN to start scanning. If you made a mistake in Step 4, Invalid ID value appears Notes and the scanner beeps when you press ENT. Start again at Step 3. You can enter either a decimal or AFS code for ED (EDACS) IDs. The default setting is decimal ID entry. When you press FUNC then 2, AFS Format appears for about 2 seconds. Now you can enter the ID code with AFS format.
Beyond the Basics talk group ID hold You can set your scanner to follow a trunking signal that you want to track during scanning. While the scanner is stopped on a voice channel (VC appears), hold down TRUNK until ID hold ON. appears. When ID hold is activated and the scanner receives a voice channel, the scan indication S at the first digit in the top line changes to H. To release ID hold, press SCAN or TRUNK.
Beyond the Basics locking out talk group IDs 1. Press PGM. You can only lock out talk group IDs when the scanner is Notes in the closed mode (see “Open and Closed Modes”). 2. Press TRUNK. 3. Press FUNC, e or d to move to the desired bank. 4. Press e or d to select the ID memory. 5. Press L/OUT to lock out the ID. lo changes to LO. 6. To remove the lockout from a trunking ID, manually select the ID memory, and press L/OUT. LO changes to lo.
Beyond the Basics 3. Press ENT. When activated, ID delay watches the control channel Notes command for the delay time when the signal disappears from the voice channel. reviewing locked-out talk group IDs You cannot clear all lockouts from a talk group at the same time. 1. Press PGM then TRUNK. 2. Press FUNC. Then L/OUT. The locked out ID appears. If the ID memory bank has no locked-out ID, you hear the low beep tone. clearing talk group IDs 1. Press PGM then TRUNK. 2.
Beyond the Basics appears. To cancel the deletion, press any key except 1. The scanner returns to the talk group ID memory mode. changing the open/closed mode 1. Press MAN. 2. Press FUNC then e or d to select the channel storage bank. 3. Press FUNC then ./DELAY. Bank OPEN. or Bank CLOSED. appears. After that message disappears, the fifteenth digit on the second line of the display changes from + to – or vice versa. 4. Repeat Steps 2 and 3 for each bank.
Beyond the Basics care Keep the scanner dry; if it gets wet, wipe it dry immediately. Use and store the scanner only in normal temperature environments. Handle the scanner carefully; do not drop it. Keep the scanner away from dust and dirt, and wipe it with a damp cloth occasionally to keep it looking new. service and repair If your scanner is not performing as it should, take it to your local RadioShack store for assistance.
Beyond the Basics specifications Frequency Coverage: 25–54 MHz ............................................................................ (in 5 kHz steps) 108–136.99166 MHz ........................................................ (in 8.33 kHz steps) 137–174 MHz ........................................... (in 5, 6.25, 7.5, or 12.5 kHz steps) 216.0025–225.0000 MHz ...................................................... (in 5 kHz steps) 225.025–405.975 MHz .....................................................
Beyond the Basics 1240–1300 MHz .................................................................................... 0.7 µV AM: 25–54 MHz ............................................................................................... 1 µV 108–136.99166 MHz ................................................................................ 1 µV 137–174 MHz ........................................................................................ 1.5 µV 216–225 MHz .................................................
Beyond the Basics 21.4 MHz at 154.1 MHz ....................................................................... 100 dB Squelch Sensitivity: Threshold (FM and AM) ........................................................................0.5 µV Tight (FM) .............................................................................................. 25 dB Tight (AM) .............................................................................................. 20 dB Antenna Impedance .............................
Beyond the Basics initializing your scanner If the scanner’s display locks up or does not work properly after you connect a power source or install batteries, you might need to initialize it. Notes This procedure clears all information you stored in the scanner’s memory. Initialize the scanner only when you are sure the scanner is not working properly. 1. Turn off the scanner, then turn it on again. Multi-system Trunking Scanner appears. 2. Press 0 while Multi-system Trunking Scanner appears. 3. Press 1.
Beyond the Basics The FCC wants you to know This equipment has been tested and found to comply with the limits for a scanning receiver, pursuant to Part 15 of the FCC Rules. These limits are designed to provide reasonable protection against harmful interference in a residential installation. This equipment generates, uses and can radiate radio frequency energy and, if not installed and used in accordance with the instructions, may cause harmful interference to radio communications.
Beyond the Basics glossary Frequency — the receving signal location (expressed in MHz). To find active frequencies, you can use frequency guides available from your local RadioShack store, frequency listings posted on the Internet, or the built-in search function. Channels — programmable memory locations for the frequencies you want to monitor. Each time the scanner finds an active frequency, it stops and monitors the radio traffic on that channel until the transmission ends, then resumes scanning.
Beyond the Basics FAQs (Frequently Asked Questions) The scanner is not working at all. What’s wrong? The AC or DC adapter might not be connected. Be sure the adapter’s barrel plug is fully inserted into the PWR DC 9V jack. The center tip of the adapter’s barrel plug must be set to positive. The batteries might be dead or need to be recharged. Recharge the rechargeable batteries or replace the standard batteries. The scanner does not receive any stations or reception is poor.
This product is warranted by RadioShack against manufacturing defects in material and workmanship under normal use for one (1) year from the date of purchase from RadioShack company-owned stores and authorized RadioShack franchisees and dealers. For complete warranty details and exclusions, check with your local RadioShack store. RadioShack Customer Relations 200 Taylor Street, 6th Floor, Fort Worth, TX 76102 04/04 Printed in Hong Kong GE-04D-2310 12A04 ©2004. RadioShack Corporation. All rights reserved.