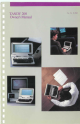
TANDY 200 Owner's Manual Cat. No.
The FCC Wants You to Know . . . This equipment has been certified to comply with the limits for a Class B computing device, pursuant to Subpart J of Part 15 of FCC Rules. Only peripherals (computer input/output devices, terminals, printers, etc.) that are certified to comply with the Class B limits may be attached to this computer. Operation with non-certified peripherals is likely to result in interference to radio and TV reception.
TERMS AND CONDITIONS OF SALE AND LICENSE OF TANDY COMPUTER EQUIPMENT AND SOFTWARE PURCHASED FROM RADIO SHACK COMPANY-OWNED COMPUTER CENTERS, RETAIL STORES AND RADIO SHACK FRANCHISEES OR DEALERS AT THEIR AUTHORIZED LOCATIONS LIMITED WARRANTY I. CUSTOMER OBLIGATIONS A.
To Our Customers Congratulations on purchasing the Tandy 200—a truly revolutionary portable computer! This manual shows how to immediately start using all 6 of the Tandy 200 built-in programs, how to relate these programs with each other, and how to do many of today's most exciting and practical applications. The best way to use this manual is to start at the beginning and try all the examples. If you are in a hurry, though, to do one application, take 5 or 10 minutes to read Chapter 1 first.
Please feel at ease with the Tandy 200. Pressing the wrong key or typing the wrong information does no damage to a computer. You can usually correct a mistake simply by typing the information again correctly. If this does not work, turn to "Help" in the back of this manual.
Contents 11 Starting Up Turn on the Tandy 200 and start programs. Use the clock, calendar, and calculator. Connect and use the printer 21 Writing Notes and Letters (TEXT) Enter and display text conveniently— wherever you are. Then print the text or save it on tape SI Cutting, Pasting, and Finding Text (TEXT) Find, cut, paste and copy text without having to retype it. 13 41 Finding Schedules and Addresses (SCHEDL and ADDRSS) Select and list today's appointments and addresses.
5/ Planning (PLAN) Use a spreadsheet to plan finances and schedules 23 6/ Dialing Telephone Numbers (TELCOM) Store and automatically dial telephone numbers.
Chapter II Starting Up This chapter shows how to start the Tandy 200 and enter programs. You will need the Tandy 200 power adapter (Cat. No. 26-3804) or 4 Size AA alkaline batteries.
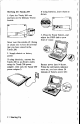
Starting the Tandy 200 1. Open the Tandy 200 case and turn on the Memory Power Switch: If using batteries, insert them as shown: •o c• 1 a [.o c 3. Press the Power Switch, and adjust the DISP dial to your field of vision: Never turn this switch off. Doing so causes you to lose all information you have stored in the Tandy 200. 2. Supply electric or battery power: If using electricity, connect the Tandy 200 to an electric outlet, using the Tandy 200 power adapter.
banks, press (F1 ) or (TAB) to move to Bank #2 and Bank #3. Note: You can get a Radio Shack Computer Center to modify the Tandy 200 so that you can use rechargeable batteries. Using the Main Menu On your screen is a menu similar (but not identical) to this: 1 2 J / a n 1 5 . 1 9 8 4 S a t 1 0 : 3 2 : 1 8 l l # 11 ( C ) M i c r o s o f t BJHIM TEXT TELCOMp AODRSS SCHEDL MSPLAN 4 3 5 Note: If you do not see this menu, press (F8), the spacebar, or(SHIFT)and(BREAK) at the same time to "return" to it.
"Exit" BASIC by pressing CED (at the top of the keyboard). Move to, enter, and exit 2 other files—TEXT and T E L C O M using the same keys: the arrow keys, (ENTER], and CED. Note: If you accidentally enter SCHEDL, ADDRSS, or MSPLAN, you will need to exit these programs somewhat differently. SCHEDL and ADDRSS initially ask you to exit by pressing the spacebar. MSPLAN requires that you exit by pressing fSHlFT) and (BREAKl at the same time. Setting the Clock and Calendar Enter BASIC.
26 X 38 4- 127 in the following manner.
Using a Printer Note: If you do not have a printer, skip to the next chapter. You can use any Radio Shack "parallel" printer with the Tandy 200. To connect it, you need to purchase the Tandy 200 printer cable (Cat. No. 26-1409). Unpack your printer. Refer to your printer's owner's manual for instructions on: 9 Inserting a ribbon 9 Inserting paper • Turning on the printer's power • Turning the printer online Turn all equipment off.
Chapter 21 Writing Notes and Letters (TEXT) In this chapter, you will create a "text" file. You will learn how to store notes, letters, sales orders, or any information in this file and, if you have a printer, how to print the information as a formatted document.
Creating a Text File Assume you want to create a text file to store seminar notes. To create the file, enter the TEXT program. TEXT asks: File to edit? Note how TEXT adjusts the words that wrap to the next line. You see this on your screen: ''Use of P o r t a b l e C o m p u t e r s at C u s t o m e r Locations,'' Computer Seminar, June 15, 1984:« >. E n t e r o r d e r s - * 2. T r a n s m i t o r d e r s to main c o m p u t e r - * 3 .
To delete text: Move the cursor on top of the character you want deleted; then press (SHIFT) (DELI. For example, move to the " 1 " in "June 15" and delete it by pressing (SHIFT) and then (DELI at the same time. ((DEL) is actually a shifted (BKSPl key.) " R e p s Use of P o r t a b l e C o m p u t e r s at Customer Locations,11 Computer Seminar, J u n e 5, 1984:-* 1. E n t e r orders-* I. T r a n s m i t o r d e r s to m a i n c o m p u t e r - * 3.
You can change any of these numbers by using the arrow keys to position the cursor, then typing a new number. Use numbers within these ranges: Width: 10 to 132 Left Margin: 0 to 121 Page size: 0 to 99 Line / Page: 0 to 99 Top margin: 0 to (page size— line/page) Once satisfied with the settings, press (ENTER). TEXT asks: We recommend you use Radio Shack's CCR-81 or CCR-82 computer recorder (Cat. No. 26-1208 or 26-1209), which includes a recorder-to-computer cable (Cat. No. 26-1207).
Enter a filename using 6 or fewer characters; for example, type SEMINR [ENTER). The recorder turns on, records, and then stops automatically. We recommend you store 2 or 3 copies of the file. To protect a file: Once you have recorded a file on tape, you may want to write-protect the tape. To do so, remove the 2 notches on top of the tape: With the notches removed, you can load information from the tape, but you cannot record anything on it.
The Copy function can be used only by customers with multiple banks. If you have only one bank, you can use the (PASTE) key to copy a text file, as instructed in the next chapter. To rename a file: Enter BASIC and, at the Ok prompt, enter the NAME command using this format: NAME "oldname" AS "newname" (ENTER). Enter the full filename, including its extension, for example, NAME "SEMINR.DO" AS "MEMO.
Chapter SI Cutting, Pasting, and Finding Text (TEXT) Information on paper is static and cumbersome to change. In contrast, the information you store in a Tandy 200 text file is flexible and simple to change. This chapter shows the easy way to "edit" text without retyping it.
Sample File iQDMoves to the top of the display |QD Moves to the bottom of the display Moves to the top of the file Moves to the bottom of the file As an example of editing text, suppose you are a sales representative and want to update orders from customers' stores. Create a text file named ORDERS.
You see TEXT quickly jump to the first occurrence of "maple tables": ELM FURNITURE-* pine t a b l e s pine chairs g a p Ie t a b l e s TEXT shows what you have just selected in reverse characters. If this is not the text you want, press (SHIFT) (BREAK) to cancel the operation and try it again: 15-* 5-* 18-* JONES F U R N I T U R E 4 maple t a b l e s pine cabinet redwood s h e l v e s 3. Select text using any of the cursor movement keys. In this case, press (SHIFTIF7! 3 times.
Pasting Text When you cut text, it is actually transferred to an area of memory called the "paste buffer." With the (PASTE] key (at the top), you can "paste" this text anywhere you want. Paste the text into Jones Furniture's order. Move to the "r" in "redwood." Then paste the text in place by pressing ELM FURNITURE-* pine chairs maple t a b l e s -* JONES FURNITURE-* maple t a b l e s pine cabinet pine tables redwood s h e l v e s 5-* 18-* HANDY JOE-* ' . . ••••-•• .
long as both files are in the same RAM bank. For example, assume you want to move some text from ORDERS.DO to SEMINR.DO: 1. Select a block of text from ORDERS.DO and cut (CBD) or copy (fFD) it into the paste buffer. 2. Enter SEMINR.DO and, at the position where you want the text inserted, press (PASTE). Clearing the Paste Buffer Just like text files, the contents of the paste buffer consume memory. After cutting and pasting or copying and pasting a large block of text, less memory is available.
Chapter 41 Finding Schedules and Addresses (SCHEDL and ADDRSS) This chapter shows how to use the Tandy 200 SCHEDL and ADDRSS programs—as well as a LIST program from which both SCHEDL and ADDRSS are variations—to select information from a file. You will also learn how to store alarms in a schedule file.
Using SCHEDL with NOTE.DO The SCHEDL program selects "records" from a file named NOTE.DO. So before using SCHEDL, you need to create NOTE.DO. Use TEXT, as you have done in previous chapters, to create NOTE.DO; then insert these records: To select records, press the Find key (CUD) and tell SCHEDL which records you want to find. For example, press (F1); then type due (ENTER!: Schd: Find due (ENTER) SCHEDL selects all the records in NOTE.
Using ADDRSS with ADRS.DO ADDRSS selects records from a file named ADRS.DO, rather than NOTE.DO. Other than that, ADDRSS and SCHEDL work the same. For example, using TEXT, create a file named ADRS.DO with these records: Rick S c h e l 1 : 2 1 4 / 9 2 5 - 7 9 9 3 : 453 Red River, Dallas, TX, 75229-« Ellen Dunlap:312/374-4822: 916 Orunmond, Chicago, IL, 65219-* JoeShmou :2H/876-2222: 815 Maple, Dallas, TX, 75219-* Glenda Elliott : 8 1 7 / 8 2 4 - 3 3 8 5 : 7 1 6 A p e x , Ft.
For example, in NOTE.DO, you may want to use an asterisk (*) to tag each critical date and a number sign (#) to tag each each personal date: dd/dd/dd is a date; it must include all 6 digits (even the year) separated by slashes. tV.tf.tt is a time; it must include all 6 digits (even the seconds) separated by colons. A is an "alarm flag." message is any message you want displayed. 10/03/85, 11:45, lunch with Jones # 10/10/85, reviews due 10/18/85, announcement due * Or, in ADRS.
Chapter 5/ Using Spreadsheets (PLAN) Often executives need to analyze how various "what ifs" will affect company plans. What if the cost of labor rises by 10%? What if materials' costs are cut? To help with this kind of analysis, Tandy 200 comes with a spreadsheet program called MSPLAN, a subset of the popular Multiplan program.
Designing a Simple Spreadsheet As a simple example of how to use a spreadsheet, assume you need to analyze how varying costs will affect January's total production costs: 1%cttvujjds TttaJL At the Main Menu, enter MSPLAN. MSPLAN asks: File to use? Enter a file name. For this example, type COSTS (ENTER]. Multiplan then displays a blank spreadsheet with 4 columns across and 15 rows down: 24 / Using Spreadsheets The cursor is at Row 1, Column 1 (R1C1). Move to the next column (R1C2) by pressing £D.
Assume you make a mistake and want to "blank out" January. Position the cursor at January. Press CE2D, the Blank function key, and then (ENTER). 1 ! 2 January Labor Materials 3 2000 Total (As with other Tandy 200 programs: You can see the meaning of all Multiplan's function keys by using the [LABEL] key.
Multiplan prints the result of this formula—8000—in the total position. I January Labor Materials 4 2000 6000 Total Now enter different numbers for labor and materials costs. Multiplan instantly adjusts the total. Note: If Multiplan does not print the total, perhaps you omitted the equal sign (=) when entering the formula. Blank out your mistake and enter the formula again. If it still does not enter the correct result, perhaps 2000 and 6000 are in the wrong row/column positions.
HcuJL Cerate, idtaJL Costs Figure 1. Spreadsheet Chapter 5 Summary To blank a value: Move the MSPLAN To move the cursor: Use the ar- cursor to the value you want blanked; then press (F2). row keys. To enter a value: Move the cursor to where you want the value; then type it and press CENTER). To enter a formula: Move the cursor to where you want the formula, type = followed by the formula; then press CENTER).
6/ Dialing Telephone Numbers (TELCOM) This chapter shows how to autodial telephone numbers and switch between tone and pulse dialing. To use any of the features described in this chapter, you need a modem cable (Cat. No. 26-1410).
Connecting to the Telephone Open the packet containing the modem cable. Save the instructions for use later in this manual. Connect the Tandy 200 to the telephone in either of these ways. (It makes no difference which way you use.) Enter TELCOM. TELCOM's bottom line gives the meaning of its function keys. As with the other programs, you can use (LABEL) to turn on and off this display. Find Call Stat Term Menu Setting TELCOM Parameters TELCOM's top line gives its currently-set parameters.
Be sure to include all digits required to dial the number. (For example, a " 1 " or " 9 " may be required, or perhaps the "*" or "#" symbols are required.) TELCOM ignores extra symbols, such as the hyphen (-) and the slash (/). As with other programs, you can use (BKSP) to correct mistakes. Before pressing (ENTER), pick up the telephone receiver. Press (ENTER] and you hear TELCOM dial the number. Finding and Autodialing Numbers You can find and autodial a telephone number stored in ADRS.
Tone Dialing Many long distance services require that you send it tones, produced by tone dialing. To get TELCOM to tone dial, change 10 pps to T: M7I1ENN,O,T (ENTER) Your local telephone system may not be able to use tone dialing. If not, you can still send tones to a long distance service as follows: 1. Set TELCOM for tone dialing. 2. Using manual dialing, call the long distance service. (By dialing manually, you are using pulse dialing, which your local telephone system requires.) 3.
Disconnecting from the Telephone For convenience, you can disconnect the Tandy 200 from the modem cable, but still leave the modem cable connected to the telephone. If you do this, you need to complete the circuit that normally goes to the Tandy 200 by connecting it to it to the modem cable's "shorting" plug: Chapter 6 Summary TELCOM To find and autodial a number: Press (FT), enter any part of a record in ADRS.DO, and press ( F2 ) to call. To enter and autodial a number: Press CED and enter the number.
Chapter 71 Communicating with Another Computer (TELCOM) This chapter shows how to communicate with CompuServe Information Service, a large multi-purpose computer service, and access its many data bases. You can access CompuServe from anywhere in the United States and Canada.
What You Need To communicate with CompuServe, you need a way of connecting to an ordinary telephone—You can use either: • The Tandy 200 modem cable that you used in the last chapter—This is the most reliable because it connects the Tandy 200 directly to the telephone wire. or • An acoustic coupler (Cat. No. 26-3805)—Use this when you cannot directly connect to a telephone (for example, when using a pay phone).
3. Call the CompuServe network. Dial any of CompuServe's access numbers. If using the modem cable, you can dial any way you want—manually or automatically. If using the acoustic coupler, you can dial only 1 way—manually. 4. Establish a terminal connection. When you hear CompuServe's computer tone, press the term key (LE4J). If using the acoustic coupler, you should now place the phone in the coupler: Prev Down Up Full BRK Bye If these functions do not appear, hang up the telephone and try again.
Your First Session CompuServe Note: Although your session with CompuServe should closely resemble the one described in this chapter, do not expect it to be identical. CompuServe often revises or improves its menus and prompts. CompuServe normally starts up with a "top menu." For your first session, though, CompuServe may ask preliminary questions. After each question CompuServe typically shows a selection of responses and prompts you for your choice.
1. Home Services 2. Business & Financial 3. Personal Computing 4. Services for Professionals 5. The Electronic Mali1"1 6. User Information 7. Index Enter your selection number, or H for more information ! This menu leads you to a series of submenus. After each menu, you see the " ! " sign, which is CompuServe's menu prompt. In response to the "!" prompt, you can enter your menu selection (for example, 1 (ENTER!) or a CompuServe command such as: • P (ENTER)—to see the previous menu.
Subscribing to CompuServe Each time you log on during your free hour, CompuServe asks if you want to read and agree to its service terms. By agreeing to these terms, you will be able to sign up, while online, for continued CompuServe service. CompuServe then will ask for billing information. Be prepared to give either your: (1) Master charge number, (2) Visa charge number, or (3) bank address and checking account number.
Chapter 81 Running BASIC Programs (BASIC) This chapter shows how to type and run simple programs, using the BASIC programming language.
Entering BASIC Enter BASIC from the Main Menu in the same way you entered the other programs (by moving to BASIC and pressing (ENTER]). You see BASIC'S prompt: Ok Press the (LABEL) key and you see the meaning of BASIC'S function keys on the bottom of the screen. Typing and Running a BASIC Program Before typing a program, erase anything you may have accidentally stored in BASIC'S memory.
~~~ You can run HELLO anytime you want by moving to HELLO.BA's position on the Main Menu and pressing [ENTER]. Loading a BASIC Program — __ You might want to load a program back into BASIC so that you can revise and edit it. To do so, enter BASIC and press the Load function key (CUD). BASIC displays: LOAD " — ____ _ —- Type HELLO (ENTER). Press the List key (CUD) and you see that HELLO.BA is loaded into BASIC.
Chapter 91 Expanding the Tandy 200 This chapter shows how you expand the Tandy 200 with add-on equipment and programs, and also gives sources for additional information on the Tandy 200.
Tandy 200 Equipment The Tandy 200 lets you connect any of the following equipment: • A printer. You can get a hardcopy of information as shown in this manual by using any Tandy or Centronicscompatible parallel printer. • A cassette recorder. You can increase your storage capacity as shown in this manual by using any cassette recorder— we recommend the CCR-81 recorder (Cat. No. 26-1208) which comes with the required cable (Cat. No. 26-1207). • Extra RAM.
Tandy 200 Programs You can purchase many additional Tandy 200 programs that enhance the capabilities of the Tandy 200 built-in programs or let you do additional functions: • Tandy-supported software. These programs are supported and supplied by Tandy. You can get a list of available programs at any Radio Shack Computer Center. • Tandy express order software. These programs are supplied by Tandy, but supported by the vendors that developed the programs.
(T 1.
References A. B. C. D. E.
Reference A! Help This reference helps with problems you may encounter while going through this manual. For additional help, see the TELCOM, Multiplan, and BASIC manuals. General Red battery light on. When the light first comes on, you have 20 minutes of battery power left. Immediately turn the power off, and insert new batteries or use the AC power cord. Screen and keyboard freezes. This could be caused by several factors: (1) The calculator may be on.
Memory full error. Select a smaller block of text. See "Reference C, Memory Required by the TEXT Paste Buffer." 2. The ACP/DIR setting: If using the modem cable, this switch must be set to DIR; if using the acoustic coupler, it must be ACP. ADRS.DO or NOTE.DO not found. You do not have a file named NOTE.DO or ADRS.DO in the specific RAM bank you are using. 3. The communication parameters: Make sure they are set to M7E1ENN, O. #VALUE! error.
The characters you type appear differently on your display. Com puServe is echoing the characters it is receiving from you, and thej are different from the characters you are typing. This is probably caused by a bad telephone connection. Hang up and try again. BASIC TM Error. Type the command again exactly as shown in the manual. You have probably omitted quotation marks or a dollar sign. SN Error. Type the command again. You have made a typographical error. FF Error.
(SEDq % (BRPfflw (BRPffib (BJEffln % (SRFff). t (SBEDo • — — fGRPff). (SRPffil (ffiHDk (BRPff)2 0 (BBPH13
T W e N (HDET TEXT I @BBd By pressing [CTRL) and one of these keys, you can do the same cursor movement and editing functions as the keys described in Chapters 2 and 3.
Reference Cl Memory Required by the TEXT Paste Buffer This reference explains the memory that the TEXT program's paste buffer needs to use to cut and paste or copy and paste text. Whenever you cut or copy text, TEXT puts a copy of that text in the paste buffer, and the text remains in the paste buffer until you replace it with something else. This requires additional memory—more than you might at first think is necessary. For example, assume you want to cut and paste 5,000 bytes (characters) of text.
Reference Dl BASIC Programs This reference provides some simple BASIC programs you might want to enter and save. When entering a BASIC program, you must type it exactly as shown. A misspelled word or misplaced parenthesis could cause the program not to run. LOAN.BA This program computes a full amortization table of a loan.
You can rename SORT.DO with the NAME command described in Chapter 2. 10 CLEAR 1000:DIM N$(100) 20 CLS:I=1 30 OPEN "ADRS.DO" FOR INPUT AS 1 40 IF EOF(l) THEN 80 50 LINE INPUT #1, N$(I) 60 1 = 1 + 1 70 GOTO 40 80 CLOSE #1 90 OPEN "SORT.
Reference El Tandy 200 Technical Information This reference contains information on how to change the Tandy 200 default power up conditions, how to restore it to its original memory condition, and also gives technical information on all the Tandy 200 device interfaces. Auto Power-Off Settings If inactive for 10 minutes, the Tandy 200 turns itself off. You can change this 10-minute time interval or completely cancel the power-off function.
RS-232-C Interface Cassette Interface Cassette Interface RS-232C Interface Pin No. 1 2 3 4 5 6 7 8 9 10 11 12 13 14 15 16 17 18 19 20 21 22 23 24 25 Symbol GND TXR RXR RTS CTS DSR GND N C N C N C N C N C N C N C N C N C N C N C N C DTR N N N N N Description Transmit Data Receive Data Request to send Clear to send Data set ready Pin No.
Parallel Printer Interface Parallel Printer Interface (Centronics) Parallel Printer Interface (Centronics) Pin No. Symbol Description 1 STROBE Strobe pulse from the Computer to printer. 2 GND Ground 3 PDO Bit 0 (lsb) of output data byte 4 GND Ground 5 PD1 Bit 1 of output data byte 6 GND Ground 7 PD2 Bit 2 of output data byte GND 8 Ground 9 Bit 3 of output PD3 data byte 10 GND Ground 11 PD4 Bit 4 of output data byte 12 GND Ground 13 PD5 Bit 5 of output data byte Pin No.
Modem Interface Bar Code Reader Interface Bar Code Reader Modem Interface Pin No. Symbol 1 TL 2 3 4 5 6 7 8 Description Conventional Telephone Unit GND Logic GND R x MD Direct Connection to Tel Line (RING) R x MC Acoustic Coupler Connection (MIC) T x M C Acoustic Coupler Connection (Speaker) VDD RD for answering telephone T x MD Direct Connection to Tel Line (TIP) RP Ringing Pulse Pin No.
40 Pin External Bus Signal Interface 4() Pin External Bus Signal Pin No. Signal Pin No. Signal 1 2 3 4 5 6 7 8 9 10 11 12 13 14 15 VDD GND ADO AD2 AD4 AD6 A8 A10 A12 A14 GND RD IO/M ALE CLK 40 39 38 37 36 35 34 33 32 31 30 29 28 27 26 16 RD +WF. 25 17 INTR 18 GND 19 RAM RESET 20 N C 20 24 23 22 VDD GND ADI AD3 AD5 AD7 A9 All A13 A15 GND WR SO SI CE for I/O Cont.
Index {BREAK) 10 (CODE) 53 f fnWD See Calculator and TEXT • ( . f I f ( [ 11 1 1 [ 1 1 I I I.
TELCOM Autodialing numbers 30 Connecting to CompuServe 36-40 Connecting to telephone 30 Disconnecting from telephone 33 Finding numbers 30 Help 51 Modem interface 61 RS-232 Interface 59 Seeing previous screen 39 Setting parameters 30 Storing pauses in sequences 32 Terminal connection 37 Using autodial sequences 30 Using pulse dialing 31 Using tone dialing 32 Telephone See Autodialing TEXT Correcting mistakes 8 Creating a file 8 Cursor Movement Keys 14 Cutting text 15 Deleting text 9 Entering text 8 Finding
SERVICE POLICY Radio Shack's nationwide network of service facilities provides quick, convenie- -"• and reliable repair services for all of its computer products, in most i n s t a n c ^ = Warranty service will be performed in accordance with Radio Shack's Limit - = Warranty. Non-warranty service will be provided at reasonable parts and l a t r : costs.
RADIO SHACK A Division of Tandy Corporation U.S.A.: Fort Worth, Tfexas 76102 CANADA: Barrie, Ontario L4M 4W5 TANDY CORPORATION AUSTRALIA 91 Kurrajong Road Mount Druitt, N.S.W. 2770 BELGIUM Pare Industriel De Naninne. 5140 Naninne U.K.