43-1204.fm Page 1 Wednesday, August 18, 1999 8:45 AM OWNER’S MANUAL TFX-1032 Fax Machine with Automatic Cutter Please read before using this equipment. Cat. No.
43-1204.fm Page 2 Wednesday, August 18, 1999 8:45 AM READ THIS BEFORE INSTALLATION We have designed your fax machine to conform to federal regulations, and you can connect it to most telephone lines. However, each device that you connect to the phone line draws power from the phone line. We refer to this power draw as the device’s Ringer Equivalence Number, or REN (the REN is shown on the back of your fax machine). If you are using more than one phone or other device on the line, add up all the RENs.
43-1204.fm Page 3 Wednesday, August 18, 1999 8:45 AM FEATURES Your Radio Shack TFX-1032 Fax Machine with Automatic Cutter is perfect for your home or office. Because it is compliant with international standards, you can send and receive faxes virtually anywhere in the world. 16-Character Digital Display— shows various messages for easy operation. Built-In Telephone Handset—lets you use your TFX-1032 as a regular telephone.
3-1204.fm Page 4 Wednesday, August 18, 1999 8:45 AM FCC STATEMENT Your fax machine complies with Part 68 of FCC Rules. You must, upon request, provide the FCC registration number and the REN to your phone company. Both numbers are shown on the bottom of your fax machine.
43-1204.fm Page 5 Wednesday, August 18, 1999 8:45 AM CONTENTS Unpacking the Fax Machine . . . . . . . . . . . . . . . . . . . . . . . . . . . . . . . . . . . . . . . . . . . . 6 Installation . . . . . . . . . . . . . . . . . . . . . . . . . . . . . . . . . . . . . . . . . . . . . . . . . . . . . . . . . . 7 Choosing a Location . . . . . . . . . . . . . . . . . . . . . . . . . . . . . . . . . . . . . . . . . . . . . . . 7 Connecting to the Phone Line . . . . . . . . . . . . . . . . . . . . . . . . . . . . .
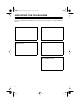
43-1204.fm Page 6 Wednesday, August 18, 1999 8:45 AM UNPACKING THE FAX MACHINE Be sure to unpack the following accessories before you dispose of the packing material.
43-1204.fm Page 7 Wednesday, August 18, 1999 8:45 AM INSTALLATION CHOOSING A LOCATION Select a location for your fax machine that: • Is not in direct sunlight. • Is near an AC power outlet and modular phone line jack. CONNECTING TO THE PHONE LINE Plug one end of the supplied modular cord into the LINE jack on the back of the fax machine. Plug the cord’s other end into a modular telephone line jack. • Is at least 4 inches from other objects. • Is not near heating or air conditioner units.
43-1204.fm Page 8 Wednesday, August 18, 1999 8:45 AM CONNECTING TO POWER Plug the power cord into a standard grounded three-pin AC outlet. CONNECTING AN EXTENSION PHONE OR ANSWERING MACHINE To connect an extension telephone or answering machine to your fax machine, plug one end of a modular cord into the EXT. TEL jack on the left side of the fax machine. Then plug the cord’s other end into the telephone you want to use as an extension or into an answering machine.
43-1204.fm Page 9 Wednesday, August 18, 1999 8:45 AM SETTING UP THE FAX MACHINE INSTALLING THE PAPER 4. Insert the paper end into the paper exit slot. Follow these steps to install the paper roll. 5. Pull out the end of the roll from the exit slot until it extends about 4 inches. Note: Use only Radio Shack Cat. No. 43-1260 or 43-1264 Thermal Fax Paper in your fax machine. 1. Open the operation panel. 6. Close the cover by firmly pressing both left and right corners on the back of the cover.
43-1204.fm Page 10 Wednesday, August 18, 1999 8:45 AM • Avoid applying tape to image areas on copies. The chemicals in some transparent tape adhesives could fade the image. • Avoid storing two copies with the images together. The printed image can transfer from one copy to the other. • Do not touch the thermal paper with sweaty or dirty hands. SETTING THE DIALING MODE The TFX-1032 is factory-set to the tone dialing mode. If your telephone line uses pulse dialing, you must change the dialing mode setting.
43-1204.fm Page 11 Wednesday, August 18, 1999 8:45 AM SETTING THE RINGER VOLUME Set on the fax machine’s left side to OFF, M (medium), or H (high) to control the ringer volume. to OFF, the Note: When you set ringer does not sound. However, the fax machine still answers calls and receives faxes. SETTING THE SPEAKER VOLUME 2. Press SET, then press MENU twice. The fax machine displays: 3:FEATURE SW. ? 3. Press SET, then enter 1 7. The fax machine displays: (17)KEY SOUND 4. Press SET.
43-1204.fm Page 12 Wednesday, August 18, 1999 8:45 AM ENTERING BASIC INFORMATION • Setting the Date and Time If you make a mistake, press or to position the cursor in the appropriate place, then enter the correct number. 5. Press SET. Set the date and time so they appear in the top margin of all transmitted faxes. Note: To cancel the date and time setting procedure, press STOP/CLEAR any time before you press SET in Step 5. 1. Press MENU four times. The fax machine displays: 4:SET MODE ? 6.
43-1204.fm Page 13 Wednesday, August 18, 1999 8:45 AM 1. Press MENU four times. The fax machine displays: 4:SET MODE ? 2. Press SET. Then press MENU once. The fax machine displays: 2:STATION CODE ? 3. Press SET. The fax machine displays the first 10 characters of the name (or nothing if no name is set) and the letters A-E. :ABCDE The blinking block in the left of the display indicates where the next letter enters. The underscore indicates the selected letter. 4.
43-1204.fm Page 14 Wednesday, August 18, 1999 8:45 AM 4. Press . This enters the M. 5. Press 5 once. 6. Press 2 twice. 7. Press 4 once. 8. Press . This enters the y. 9. Press 0. This enters the space. 10. Press 5 twice. SETTING THE RECEIVE MODE The fax machine has three receive modes: automatic, manual, and answer. Reception Mode AUTO Indicator ANS. Indicator 11. Press 6 twice. Automatic On Off 12. Press Manual Off Off Answering Machine Off On . This enters the C. 13. Press 5 once. 14.
43-1204.fm Page 15 Wednesday, August 18, 1999 8:45 AM Automatic Reception In this mode, when a call comes in, your fax machine automatically answers. Note: You use feature switch 07 (see “Setting the Feature Switches” on Page 27) to set how many rings occur before the fax machine answers. After the fax machine answers: • If the fax machine detects fax tones, it receives the document. • If the call is a voice call, the caller continues to hear several simulated ring signals.
43-1204.fm Page 16 Wednesday, August 18, 1999 8:45 AM TELEPHONE OPERATION MAKING CALLS Note: You must connect the power cord to an AC outlet to make calls from the fax machine. 1. Press DIAL, or lift the handset. 2. Dial the number you want to call. 3. If you pressed DIAL in Step 1, lift the handset and talk when the call is answered. ANSWERING A CALL When the telephone rings, lift the handset and talk. Note: If you hear a fax tone, someone is trying to send you a fax.
43-1204.fm Page 17 Wednesday, August 18, 1999 8:45 AM ONE-TOUCH DIALING You can store up to eight telephone numbers in the one-touch memories. You can then dial a stored number at the touch of a single button. Storing a Number in a OneTouch Memory 1. Press MENU three times. The fax machine displays: 3:O.T & S.D SET? 2. Press SET. The fax machine displays: O.T No. = 1 ? 3. Press the one-touch key (1–8) you want to store the number in. 4. Press SET.
43-1204.fm Page 18 Wednesday, August 18, 1999 8:45 AM When storing or making test calls to emergency numbers: 4. Press SET. If the memory is empty, the fax machine displays: • Remain on the line and briefly explain to the dispatcher the reason for the call. • Perform such activities in the offpeak hours, such as early morning or late evening. SPEED DIALING You can store up to 20 telephone numbers in memory then dial a stored number by entering a two-digit memorylocation code.
43-1204.fm Page 19 Wednesday, August 18, 1999 8:45 AM 9. Repeat Steps 3–8 to program other numbers. Otherwise, press STOP/CLEAR . Dialing a Speed-Dial Memory Number 1. Press DIAL or lift the handset. Listen for a dial tone. 2. Press SPEED DIAL, then enter the two-digit speed-dial memory number (01-20) you want to call. PRINTING A MEMORY NUMBER LIST Follow these steps to print a list of the one-touch and speed-dial numbers stored in the fax machine. 1. Press MENU three times.
43-1204.fm Page 20 Wednesday, August 18, 1999 8:45 AM FAX OPERATION PREPARING A DOCUMENT The quality of the copy at the receiving fax machine depends on the quality of the original document you send.
43-1204.fm Page 21 Wednesday, August 18, 1999 8:45 AM SENDING A FAX 1. Place the original document (up to 10 pages) face down in the paper tray. The fax machine automatically draws in the first page. SETTING THE CONTRAST / RESOLUTION Set the contrast and resolution for the document you want to send. Note: A document must be in the paper tray before you can change these settings. Setting the Contrast Repeatedly press CONTRAST to select: 2. Select a contrast/resolution mode if necessary.
43-1204.fm Page 22 Wednesday, August 18, 1999 8:45 AM Notes: • Superfine only works with fax machines that have the ITU-T standard superfine feature. If the receiving fax machine does not have this feature, the fax is sent using fine resolution. • You can set the fax machine to remain in the selected modes or to return to the default modes after each fax. See “Setting the Feature Switches” on Page 27.
43-1204.fm Page 23 Wednesday, August 18, 1999 8:45 AM RECEIVING FAXES USING AN EXTENSION TELEPHONE This feature lets you receive a fax after answering a telephone call on an extension telephone, either connected to the fax machine or to a jack that uses the same line as the fax machine. Connected to the Fax Machine Before you use this feature, you must: • Confirm feature switch 08 is set to something other than 00 (OFF). The number you select is also the number you dial to receive a fax.
43-1204.fm Page 24 Wednesday, August 18, 1999 8:45 AM VOICE CONTACT Requesting a Voice Contact After you receive or send a document, you might want to talk to the person at the transmitting/receiving fax machine. To do so, simply lift the handset while the fax machine is sending or receiving the document. When sending or receiving is complete, the other fax machine rings or sounds tones. When the other party comes on the line, begin your conversation.
43-1204.fm Page 25 Wednesday, August 18, 1999 8:45 AM LIMITING FAX RECEPTION ACTIVITY REPORTS You can set the fax machine to check the other party’s fax number and only receive a fax if the number exactly matches one stored in your fax machine’s one-touch or speed dialing memories. Note: Even a stored number cannot be received if the other fax machine does not have a fax identification feature or if the fax number has not been programmed into their fax machine.
43-1204.fm Page 26 Wednesday, August 18, 1999 8:45 AM Error Codes The following error codes print on the activity and transmission reports to help you troubleshoot problems. ERROR CODE DESCRIPTION OK • No error encountered. E-10 • Other fax machine did not respond. Contact the other party and confirm you are dialing the correct fax number. • Be sure you connected the telephone line to the fax machine’s LINE jack. E-20 • You pressed STOP/CLEAR. E-21 • The original document jammed.
43-1204.fm Page 27 Wednesday, August 18, 1999 8:45 AM SETTING THE FEATURE SWITCHES Your fax machine has several features you turn on and off using the built-in feature switches. The following table lists the feature switches, available settings, default settings, and the page where the feature is discussed.
43-1204.
43-1204.fm Page 29 Wednesday, August 18, 1999 8:45 AM Follow these steps to change feature switch settings. Repeat Steps 5-8 to make additional changes. 1. Press MENU four times. The fax machine displays: 9. Press STOP/CLEAR twice when you finish. Notes: 4: SET MODE ? 2. Press SET. The fax machine displays: 1: TIME SET ? 3. Press MENU twice. machine displays: The • To print a feature switch setting list, press COPY after Step 3. • To stop the feature switch setting procedure, press STOP/CLEAR twice.
43-1204.fm Page 30 Wednesday, August 18, 1999 8:45 AM PROBLEM SOLVING If problems occur during operation, check below before taking the fax machine for service. If the problem still exists, contact your local Radio Shack store for help. Symptoms Possible Cause/Solution Fax machine does not operate. The fax machine displays PAPER ROLL. CHECK AC plug not connected. Paper not properly installed. See “Clearing a Paper Jam” on Page 32 General The recording paper has run out.
43-1204.fm Page 31 Wednesday, August 18, 1999 8:45 AM Extension phone Phone calls Error Light Symptoms Possible Cause/Solution Error indicator lights. Press STOP/CLEAR to turn off the error light. Print an activity report and check the error code. No dial tone. The telephone line is not properly connected. Sound from speaker is too low. Monitor volume switch is set to L. Cannot hear rings. Ringer volume is set to OFF. Fax/phone calls do not go through. Dialing mode is not set correctly.
43-1204.fm Page 32 Wednesday, August 18, 1999 8:45 AM CLEARING A DOCUMENT JAM CLEARING A PAPER JAM The fax machine beeps and displays ORIGINAL JAM if the document you are sending jams. If the ERROR indicator lights, press STOP/CLEAR first. Then follow these steps to clear the jam. The fax machine beeps and displays CHECK PAPER ROLL when the paper jams. Follow these steps to clear the jam. 1. Lift the cover. 1. Open the cover. 2. Raise the document release lever. 2.
43-1204.fm Page 33 Wednesday, August 18, 1999 8:45 AM CLEANING DOCUMENT FEED ROLLER ONE CLEANING DOCUMENT FEED ROLLER TWO If document jams frequently occur or if the fax machine feeds more than one sheet at a time, clean document feed roller one with a cotton swab dampened with a small amount of a detergent. If a streak or dirty pattern appears on a copy or a fax you have sent, clean document feed roller two with a soft, clean, slightly damp cloth. 1. Open the cover. 1.
43-1204.fm Page 34 Wednesday, August 18, 1999 8:45 AM CARE AND MAINTENANCE Your Radio Shack TFX-1032 Fax Machine with Automatic Cutter is an example of superior design and craftsmanship. The following suggestions will help you care for your fax machine so you can enjoy it for years. Keep the fax machine dry. If it gets wet, wipe it dry. Liquids might contain minerals that can corrode electronic circuits. If a liquid enters the fax machine, immediately unplug the AC power cord.
43-1204.fm Page 35 Wednesday, August 18, 1999 8:45 AM SPECIFICATIONS Paper Size . . . . . . . . . . . . . . . . . . . . . . . . . . . . . . . . . . . . . . . . 8 1/2 inches × 98 feet 216 mm × 30 meters Effective Scanning Width . . . . . . . . . . . . . . . . . . . . . . . . . . . . 81/3 Inches (212 mm) Effective Recording Width . . . . . . . . . . . . . . . . . . . . . . . . . . . 81/3 Inches (212 mm) Transmission Speed . . . . . . . . . . . . . . . . . . . . . . . . . .
43-1204.fm Page 36 Wednesday, August 18, 1999 8:45 AM RADIO SHACK LIMITED WARRANTY This telephone product is warranted against manufacturing defects in material and workmanship for 90 days from the date of purchase from Radio Shack company owned stores and authorized Radio Shack franchisees and dealers. Within this period Radio Shack will repair the telephone product without charge for parts and labor. Simply bring your Radio Shack sales slip as proof-of-purchase date to any Radio Shack store.