
Specifications


Section 1 - Introduction
Page 17
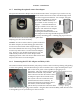
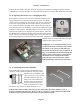
1.1.14. Regenerating the Desiccant Plug
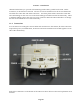
The CCD is housed in a sealed chamber located inside the front of the main body. The chamber is
separate from the large front and rear cover plates, so that opening the front or rear cover plates to
gain access the filter wheel or to attach/remove
the camera handles will not expose the CCD
chamber to the environment. The CCD
chamber has a desiccant plug located on one
side to help remove moisture from the air
inside the chamber. If it should become
necessary to recharge the desiccant due to
excess moisture or frosting in the chamber, it is
a simple matter to remove the desiccant plug,
bake it in a conventional oven at 350 degrees F
(175 degrees C) for 4 hours and replace the
plug in the camera. To gain access to the
desiccant plug, remove the front cover per the
instructions for accessing the filter wheel. Note
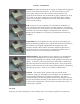
the location of the desiccant plug in the picture. If the shutter is in the way when you open the
camera, gently rotate it out of the way by nudging one edge until you have easy access to the
desiccant plug. The shutter is thin and flat. Care should be taken not to press directly down on it
or bend it in any way. Remove the plug by unscrewing it from the chamber. You should be able to
unscrew it using your fingers. If time and temperature have made it too tight, use soft grip pliers
to remove it. Be sure to take off the o-ring from around the threads before baking the plug. You
may wish to place a small piece of electrical tape over the hole in the side of the CCD chamber
while you are baking the desiccant plug to keep unwanted dust and moisture out of the chamber.
When you replace the desiccant plug after baking it, do not over-tighten it when you screw it back
into the chamber. It should be tightened as much as you can with your fingers only. Don’t forget
to replace the o-ring on the plug before re-installing it after baking.
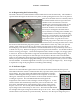
1.1.15. Indicator Lights
There are five LED indicator lights located on the side of the main camera body that provide
information about the camera’s communication link, exposure status, internal temperature and
input voltage. The green status LED labeled STAT will flicker when the
camera is initializing after being connected to the computer. It will then
either glow continuously when the camera is idle or blink when the camera
is taking an exposure. The red LED labeled HOT will light if the
temperature of the camera’s heat exchanger exceeds 50 degrees C. In this
case the camera will automatically reduce the power to the TE cooler. The
first yellow LED labeled 11V will light if the input voltage at the camera
drops to 11V or less. The second yellow LED labeled 10V will light if the
input voltage at the camera drops to 10V or less. The final red LED labeled
9V will light if the input voltage at the camera drops to 9V or less. If the voltage drops to 11V or
10V the camera will continue to operate normally. However, once the input voltage drops to 9