2-2017.fm Page 1 Tuesday, May 9, 2000 10:02 AM Please read before using this equipment.
12-2017.fm Page 2 Tuesday, May 9, 2000 10:02 AM ˆ Contents Features .................................................................................................................................. 3 Preparation ............................................................................................................................. Supplied Hardware ............................................................................................................ Choosing a Mounting Location ................
12-2017.fm Page 3 Tuesday, May 9, 2000 10:02 AM ˆ Features Your RadioShack High Power 4/3/2-Channel Bridgeable Amplifier produces a total of 260 watts to give added punch and power to your vehicle’s existing auto sound system. The amplifier produces up to 130 watts per channel (if bridged) of clean, powerful sound at all audio frequencies with minimum distortion. You can connect your auto sound system’s low-level or speaker-level outputs to this amplifier.
12-2017.fm Page 4 Tuesday, May 9, 2000 10:02 AM ˆ Preparation SUPPLIED HARDWARE Your amplifier comes with the following items. Be sure you locate everything shown before you store or dispose of the packing materials.
12-2017.fm Page 5 Tuesday, May 9, 2000 10:02 AM Warning: The amplifier gets very hot while it is on. Do not touch the amplifier or place flammable objects near it. Preparing the Mounting Area Before you mount the amplifier, make sure you have these materials. • an adapter harness Then test the connections. When you verify that everything works as expected, disconnect the amplifier, mount it in your vehicle, and reconnect it.
12-2017.fm Page 6 Tuesday, May 9, 2000 10:02 AM Cautions: • For added safety and to protect your amplifier and auto sound system, disconnect the cable from your vehicle’s negative (–) battery terminal before you begin.
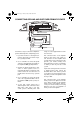
12-2017.fm Page 7 Tuesday, May 9, 2000 10:02 AM CONNECTING GROUND AND SWITCHED/PRIMARY POWER Black Fuse Holder Red Blue/White AMP Remote Turn On Vehicle’s Battery Chassis Ground Switched Power Lead Auto Sound System Follow these steps to connect the amplifier to ground, switched power, and primary power. using one of the supplied twist-on terminal connectors. 1. If you have not done so already, disconnect the cable from your vehicle’s negative (–) battery terminal.
12-2017.fm Page 8 Tuesday, May 9, 2000 10:02 AM Caution: Due to the amplifier’s high current requirement, you must connect the red power cable’s fused end directly to the vehicle’s positive (+) battery terminal or damage to your vehicle’s wiring could result. 6. Use a screwdriver to connect the spade end of the supplied red power cable (with in-line fuse holder) to the amplifier’s + 12V terminal. 7. Connect the other end of the red power cable to your vehicle’s positive (+) battery terminal as shown.
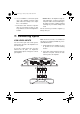
12-2017.fm Page 9 Tuesday, May 9, 2000 10:02 AM CH 2 CH 1 CH 4 CH 3 If your auto sound system has two line out jacks (left and right), connect the auto sound system to the amplifier. Left Right Auto Sound System Note: For the best results, use shielded audio Y-adapters (not supplied) available at your local RadioShack store. HIGH-LEVEL (SPEAKER WIRE) INPUTS using either a floating or common ground connection.
Auto Sound System Connecting Inputs White Gray/Black Left Front + Speaker Left Front – Speaker White Gray Green Violet Gray/Black Left Front + Speaker Green/Black Right Front– Speaker Right Front + Speaker Left Rear + Speaker Left Rear – Speaker Right Rear– Speaker Right Rear + Speaker Green/Black Common Gray Violet/Black Right Front + Speaker Green Violet Violet/Black Left Rear + Speaker Common Right Rear + Speaker 12-2017.
12-2017.
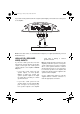
-2017.fm Page 12 Tuesday, May 9, 2000 10:02 AM CONNECTING SPEAKERS You can connect four speakers, two speakers and a subwoofer, or just two speakers to the amplifier and your auto sound system. 3. Strip the insulation from the ends of each conductor to expose 1/4 inch of wire. Twist the ends to secure loose strands. Important: Before you make the connections, make sure both BRG/ST switches (on the left and right sides of the amplifier) are set to ST.
12-2017.fm Page 13 Tuesday, May 9, 2000 10:02 AM Connecting Four Speakers CH1 Front Left Speaker CH2 Front Right Speaker CH3 Rear Left Speaker 1. Use a screwdriver to connect the front left speaker’s positive (+) wire to the amplifier’s CH1 (+) terminal. 2. Use a screwdriver to connect the front left speaker’s negative (–) wire to the amplifier’s CH1 (–) terminal. CH4 Rear Right Speaker (–) wires to the amplifier’s CH2 (+) and CH2 (–) terminals. 4.
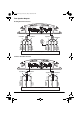
12-2017.fm Page 14 Tuesday, May 9, 2000 10:02 AM Connecting Two Speakers (Bridged Connection) Right Speaker Left Speaker Caution: This connection produces 130 watts per channel. Use this connection only if you have high-power speakers that can handle a power output of 130 watts. Note: CH2 (+) and CH4 (+) are used as negative (–) terminals for a bridged connection. 1. Use a screwdriver to connect the left speaker’s positive (+) wire to the amplifier’s CH1 (+) terminal. 2.
12-2017.fm Page 15 Tuesday, May 9, 2000 10:02 AM 3. Repeat Steps 1–2 to connect the front right speaker’s positive (+) and negative (–) wires to the amplifier’s CH2 (+) and CH2 (–) terminals. 4. Use a screwdriver to connect the subwoofer’s positive (+) wire to the amplifier’s CH3 (+) or CH4 (+) terminal. 5. Repeat Step 4 to connect the subwoofer’s negative (–) wire to the amplifier’s negative (–) terminal for the same channel you connected in Step 4.
12-2017.fm Page 16 Tuesday, May 9, 2000 10:02 AM ˆ Completing the Installation TESTING THE CONNECTIONS and auto sound system operate properly. The amplifier turns on after a few seconds. Before you continue, make sure you have securely made all connections. Then reconnect the cable to the vehicle’s negative (–) battery terminal.
12-2017.fm Page 17 Tuesday, May 9, 2000 10:02 AM 5. Secure the amplifier to the mounting surface using the supplied sheet metal screws and washers. 6. Reconnect the wiring. 7. Reconnect the cable to the vehicle battery’s negative (–) terminal. 8. Reset your vehicle’s clock, your auto sound system’s tuner memory, and other timer/memory devices.
12-2017.fm Page 18 Tuesday, May 9, 2000 10:02 AM ˆ Operation TURNING ON THE AMPLIFIER 1. Use a screwdriver to turn LEVEL (MIN/ MAX) on the left and right sides of the amplifier fully counterclockwise to MIN. The amplifier automatically turns on a few seconds after you turn your vehicle’s ignition switch to ACC or ON or turn on your auto sound system, depending on how you wired the system. The POWER indicator on the side of the amplifier lights when the amplifier is on. 2.
12-2017.fm Page 19 Tuesday, May 9, 2000 10:02 AM ADJUSTING FREQUENCY CROSSOVER If you installed a subwoofer using the steps in “Connecting Two Speakers and One Subwoofer (Unbridged Connection)” on Page 14 or “Connecting Two Unbridged Speakers and One Bridged Subwoofer” on Page 15, set X-OVER FREQ ON/OFF to ON, then adjust X-OVER FREQ for your particular vehicle’s acoustics. The amplifier passes through all frequencies at or below that setting (45−400 Hz).
12-2017.fm Page 20 Tuesday, May 9, 2000 10:02 AM ˆ Troubleshooting We do not expect you to have any problems with your RadioShack High Power 4/3/2-Channel Bridgeable Amplifier, but if you do have a problem, this chart might help. If not, take the amplifier to your local RadioShack store for assistance. Symptom No power — the amplifier’s POWER indicator does not light after the vehicle’s auto sound system is turned on No sound Possible Cause Suggestion Power problem.
12-2017.fm Page 21 Tuesday, May 9, 2000 10:02 AM Symptom Distorted sound (continued) The amplifier’s PROTECTION indicator lights Possible Cause Suggestion The amplifier might have shut down. Turn your auto sound system off and let the amplifier cool. Make sure the amplifier is properly ventilated. Then turn your auto sound system back on. The amplifier turns itself back on when it is cooled. An output channel might have shorted. Take the amplifier to your local RadioShack store.
12-2017.fm Page 22 Tuesday, May 9, 2000 10:02 AM CARE To enjoy your amplifier for a long time: • Keep the amplifier dry. If it gets wet, wipe it dry immediately. 2. Push together and twist the fuse holder’s parts on the red power cable until they spring apart. Then remove the fuse. • Use and store the amplifier only in normal temperature environments. • Handle the amplifier gently and carefully. Do not drop it. • Keep the amplifier away from dust and dirt.
12-2017.fm Page 23 Tuesday, May 9, 2000 10:02 AM ˆ Specifications Output Power: Stereo ....................................................................... 45 Watts × 4 @ 4 Ohms, 20–20 kHz, 0.5% THD 65 Watts × 4 @ 4 Ohms, 20–20 kHz, 10% THD 60 Watts × 4 @ 2 Ohms, 20–20 kHz, 1% THD Bridged .................................................................................. 130 Watts @ 4 Ohms, 1 kHz, 10% THD Frequency Response .................................................................................
12-2017.fm Page 24 Tuesday, May 9, 2000 10:02 AM Limited One-Year Warranty This product is warranted by RadioShack against manufacturing defects in material and workmanship under normal use for one (1) year from the date of purchase from RadioShack company-owned stores and authorized RadioShack franchisees and dealers.