
User's Manual


5
Important: To ensure your pet does not receive an unintended correction, make sure your pet is not
wearingthe Computer Collar
®
unit when turning ON or adjusting the Indoor Micro Shields
®
transmitter.
1.Charging
• To charge the battery, plug one end of the AC adaptor (RAC00-13701) into a standard wall outlet and the other
end into the power jack located on the edge of the Indoor Micro Shields
®
transmitter.
• Allow the unit to charge a full 4 hours before first use. A charge time of 2 hours is required after the first charge.
• Fully charge the Indoor Micro Shields
®
transmitter for 4 hours after storage.
• Battery life of approximately 30 days can be expected from a fully charged battery.
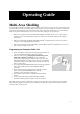
2.Adjustsignalfieldrange
• Determine the desired location and the signalfield range required (10 in/5
cm minimumradius up to 2ft /.61 m maximum radius).
• With the unit ON, press the RANGE UP(+) or the RANGE DOWN (-)
buttons toincrease or decrease the signal field range.The first segment of
the range indicator equals10 in / 25 cm radius of signal field. Each
additional segment represents approximately 3 in /8 cm radius of range.
• Once the range is set, place the Indoor Micro Shields
®
transmitter in the
desired area.
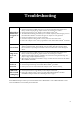
3.Verifysignalfieldrange
• Turn the Indoor Micro Shields
®
transmitter ON.
• Holding the Computer Collar
®
unit, start outside the range and move
slowly towards the Indoor Micro Shields
®
transmitter. Do not touch the
correction posts at this time.
• The Computer Collar
®
unit will beep as it approaches the outer range of
the signal field width set in Step 2. Thebeeping will be followed by a
correction.
• If the Computer Collar
®
unit fails to beep, see the troubleshooting chart
found on page 9.
• Adjust range and/or relocate the Indoor Micro Shields
®
transmitter until
desired area is protected.
Operating Guide