
Use and Care Manual


PG 14
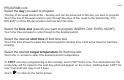
Communicating Thermostat
The CT32 has two USNAP slots to accommodate
home automation radios from various systems.
Please refer to radio documentation for network
for specic installation instructions. The USNAP
ports allow you to connect your CT32 to a wireless
network. This can give you access to your home’s
HVAC system even when you are away. It can also
give you access to web-based efcient energy
management sites that can help you save money
and protect the environment.
To Insert a USNAP radio module:
Caution: DO NOT INSERT or REMOVE USNAP radio modules if power is ON. This can
damage the thermostat or radio modules. Only one USNAP radio can be used at a time.
1. Power off the CT32.
2. Remove the slot cover and insert radio module in either slot on the back of the CT32. Take care
to ensure that the radio mates well with the connection pins on the thermostat.
3. Power up CT32.
TO CONNECT to a network follow the instructions that came with the USNAP module.
Simple HOME Screen - To make this the default
HOME screen for your CT32:
1. Switch the MODE to OFF.
2. Press MENU.
3. Touch and hold the PROGRAM icon for 15 seconds.
This Simple home screen gives you limited access to
the CT32’s on screen display and no programming
capability. It makes the CT32 behave like a simple one
setting thermostat. When in SIMPLE SCREEN, the time,
day of the week and program are no longer displayed or
available.
The simple screen is useful for people who do not want a complex schedule changing their target
temperatures each day.
To return to the HOME screen:
1. Go to OFF MODE.
2. Press MENU.
3. Touch and hold the PROGRAM icon for 15 seconds.
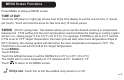
AUTO
COOL
F
TARGET TEMP
Thermostat
Temperature
Controls
Mode
Current Room
Temperature
Fan
Status
Target
Temperature