DRILLTRACK USER MANUAL Revision 1 05.
Foreword It is important that you read this user guide before operating your Radiodetection DrillTrack G2 system. This manual and all its contents are subject to change. Radiodetection products are under continuous development and are subject to change. Radiodetection Limited reserves the right to modify the product without notice. Some product changes may have taken place after this user guide was published.
Note: Appropriate parts of this equipment have been tested and found to comply with the limits for a Class B digital device, pursuant to part 15 of the FCC Rules. These limits are designed to provide reasonable protection in a residential installation. This equipment generates, uses, and can radiate radio frequency energy and, if not installed and used in accordance with the instruction manual, may cause harmful interference to radio communications.
Table of Contents (1) (2) (3) (4) (5) (6) (7) Foreword I Warnings and Safety Precautions III DrillTrack G2 System Overview Introduction Features of DrillTrack G2 Receiver and DataView 1-1 1-2 DataSonde The Radiodetection DataSondes Powersave Modes Overheat Warning DataSonde Magnetic Field Dual Frequency DataSonde change method 2-1 2-3 2-3 2-4 2-4 DrillTrack G2 Accessories DrillTrack G2 Tripod Calibration Jig Hard carry case Soft carry bag 3-1 3-1 3-2 3-2 DrillTrack G2 Function keys Receive
Warnings and Safety Precautions It is very important that Directional drilling operators note the operating procedures and safety precautions before operating the Radiodetection DrillTrack G2 system. - Priority must be given to local and national safety requirements all times. All other safety procedures should be followed. - All underground utilities MUST be located before starting the drilling operation. Contact your local Radiodetection dealer for pipe and cable locating equipment.
Warnings and Safety Precautions Interference can cause inaccuracies in depth readings, loss of tilt angle and/or roll position and inaccurate location and heading of the rill head. - Sources of interference could be power lines, cable TV, traffic signal loops, telecom lines, pipelines, metal structures, invisible dog fences, radio frequencies, transmission towers and cathodic protection systems.
Dear Customer: We would like to congratulate you with the purchase of your Radiodetection DrillTrack G2 system, the fastest and most accurate guiding system in the world for guiding directional drilling machines. Please take the time to read this user guide and fill out this page for your own records. When contacting your Radiodetection dealer, it is important to quote the equipment serial numbers.
DrillTrack G2 System Overview Introduction. The Radiodetection DrillTrack G2 system is designed to provide guidance information for horizontal directional drilling machines.
DrillTrack G2 System Overview Features of DrillTrack G2 Receiver and DataView. The DrillTrack G2 Receiver has been developed with the needs of the operator as the main priority. Providing essential information automatically makes the equipment very easy to use and allows the operator to work with confidence. Once drilling has started the operation is fully automatic and the large LCD shows the operator information about the drillhead.
DrillTrack G2 System Overview The DrillTrack G2 DataView has been developed with the needs of the Drilling machine operator as the main priority. With its magnetic base the portable DrillTrack G2 DataView provides essential information that allows the Drilling machine operator to work with confidence.
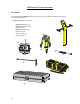
DataSonde The Radiodetection DataSondes. The DataSonde is installed in the drillhead/DataSonde housing. To ensure optimum DataSonde performance and protection, the DataSonde should be securely fitted in the drillhead/DataSonde housing. DataSondes may need minor modifications to ensure a secure fit. O-rings or electrical tape are an acceptable means. All Radiodetection DataSondes are constructed in three main sections.
DataSonde Short Range DataSonde (SDS) Approximate Signal range Battery life Size 4m (12 ft) 10 hrs 25,4 x 203 mm (1 x 8 in) Medium Range DataSonde (MDS Black) Approximate Signal range Battery life Size Long Range DataSonde Approximate Signal range Battery life Size 10m (33 ft) 20 hrs 32 x 380 mm (1.3 x 15 in) (LDS Red) 15m (50 ft) 12 hrs 32 x 380 mm (1.3 x 15 in) Medium Range Dual Frequency DataSonde (MDF Yellow) Approximate Signal range Battery life Size 10m (33 ft) 20 hrs 32 x 380 mm (1.
Datasonde Powersave Modes. All Radiodetection DataSondes have two powersave modes for reducing battery consumption while the DataSonde is not operating. Standby Mode A DataSonde will enter in the Standby Mode during drilling operation when there is no rotation for ten minutes. In the Standby Mode the DataSonde will send a pulse signal every ten seconds. Starting rotation will make the DataSonde to return to full operation and exit the Standby Mode.
DataSonde Dual Frequency DataSonde Change Method. The DrillTrack G2 Dual Frequency DataSondes will always operate in the low frequency operating mode when the batteries are fitted. In most cases the low frequency is the most reliable frequency to use. It will give a more precise locate position and a more accurate depth than other available operating frequencies. Though there might be cases when no low frequency signal can be received with the DrillTrack G2 Receiver, due to high interference levels.
DrillTrack G2 Accessories DrillTrack G2 Tripod For placing the DrillTrack G2 Receiver when using the remote steering feature Calibration Jig For calibrating the DrillTrack G2 Receiver on the job site 3-1
DrillTrack G2 Accessories Hard Carry Case For protecting the DrillTrack G2 equipment when not in use Soft Carry Bag For carrying the DrillTrack equipment 3-2
DrillTrack G2 Function keys Receiver. On/Off Key Press to switch the DrillTrack G2 Receiver On or Off Depth Key Press to transfer the current DataSonde depth to the DrillTrack G2 DataView. An audio beep will confirm the depth transfer to the DataView. Manual Depth When in the “Four Arrows Locate” screen, within a radius of about 50 cm (20 in) of the actual locate point, press to get a depth indication readout on the screen. Borelogger Operation Press and hold to enter the BORELOGGER Mode.
DrillTrack G2 Function keys Information key Press to display the information screen. The information screen displays: - Selected DataSonde operating frequency; - DataSonde battery status; - DataSonde operating temperature; - Receiver software version; - Receiver battery status; - User selected Locate Orientation (F or B). Setup Mode While the Receiver is turned off press and hold the Information key then press the On / Off key to switch the unit on and enter into the SETUP Mode.
DrillTrack G2 Operating Instructions Before starting Fit new alkaline batteries in the DataSonde observing the correct polarity. The DrillTrack G2 Receiver must be fitted with 6 x 1.5V’C’ size alkaline (LR14) or 3 x 65/ND2161 Rechargeable Battery Packs. For the correct battery type refer to the section on Radiodetection DataSondes in this user guide or the relevant Technical specification.
DrillTrack G2 Operating Instructions While the Receiver is turned off, press and hold the then press the key to switch the unit on and enter the Setup Mode. To change settings use the and then the key key, key To confirm setings press the key.
DrillTrack G2 Operating Instructions Resolution of Tilt measurement High Low DataSonde Temperature Measurement Fahrenheit Celsius 5-3
DrillTrack G2 Operating Instructions Signal strength Active Deactive Frequency and type of DataSonde DataSonde Dual Frequency DataSonde G2 Dual Frequency DataSonde Locate orientation Forward 5-4 Backward
DrillTrack G2 Operating Instructions Borelogger Active Deactive 5-5
DrillTrack G2 Operating Instructions Calibration of the DrillTrack G2 Receiver Fit new alkaline batteries in the DataSonde, observing the correct polarity. Fit the DataSonde securely in the drillhead/Datasonde housing. To ensure a tight fit, electrical tape or O-rings could be used. Press and hold the key, and turn the Receiver on, by pressing the key. Release the key when “CAL” appears on the Receiver display.
DrillTrack G2 Operating Instructions Tilt angle Compensation Locate position and depth measurement with a conventional guiding system.
DrillTrack G2 BoreLogger Instructions 1. Enter set-up Mode and set the BORELOG option to ON. 2. To enter Borelog Mode press and hold the key. A list of functions for the logging will appear: GO, DEL, END, UPL Scroll through using the or key, press key to confirm selection. 3. To start a log, set the log to GO. 4. When in the “Four-Arrows Locate” screen with depth displayed. Press the key to transmit the depth to the Data View.
DrillTrack G2 Operating Instructions Locating Locate the Drillhead/DataSonde housing by moving the Receiver in the direction indicated by the four arrows on the LCD. When all four arrows appear on the screen, you are directly above the Drillhead/DataSonde housing and the depth will be displayed automatically. To toggle between the “Two Arrows Steering” screen and the “Four Arrows Locate” screen, press the Manual key.
DrillTrack G2 Operating Instructions 5-10
DrillTrack G2 Operating Instructions 5-11
DrillTrack G2 Operating Instructions Steering 5-12
DrillTrack G2 Operating Instructions 5-13
DrillTrack G2 Operating Instructions High Temperature Alarm The DrillTrack G2 Receiver will automatically indicate any DataSonde high temperature alarm conditions. When the temperature of the DataSonde reaches 40°C (104F), the Receiver beeps and will display the information screen for 15 seconds. This is repeated each time the DataSonde temperature reading increases by 5°C.
DrillTrack G2 DataView DataView information. The DrillTrack G2 DataView is mounted on the Drilling machine using its magnetic base. The DataView can be powered by either four C-size alkaline batteries or can be connected directly to the 12V power supply of the drilling machine. It should not be connected, either directly, or indirectly via adapters or battery eliminators to any mains supply.
DrillTrack G2 DataVew Radiodetection Radiodetection Radiodetection Trenchless Products Trenchless Products Trenchless Products P 6-2 P P
DrillTrack G2 DataView Radiodetection Radiodetection Radiodetection Trenchless Products Trenchless Products Trenchless Products P P P 6-3
Tips and Tricks Troubleshooting Guide. When reporting any problem to your Radiodetection dealer it is important to quote the following: - Unit Serial Number. - Software Revision Number. Software Revision Number of the DrillTrack G2 Receiver is displayed on the LCD during switch-on or by pressing the Information key. Software Revision Number of the DataView is displayed on the LCD during switch-on. Problem 1: The Receiver or DataView will not power on.
Tips and Tricks Problem 4: Incorrect Depth readings. 1- Calibrate the Receiver to the DataSonde (while in the drillhead/DataSonde housing). 2- Check the DataSonde operation in the drillhead/Datasonde housing before going underground. 3- Check the slotting arrangements in the drillhead/Datasonde housing. The slots should be approximately 150% of the length of the DataSonde antenna section, and line up longitudinally along the drillhead/DataSonde housing, directly above the DataSonde.
Tips and Tricks Angle conversion table Inclination 7-3 cm/m ft/10ft o 2.9 5% 5 0.5 5.7o 10% 10 1.0 8.5o 15% 15 1.5 11.3o 20% 20 2.0 14.0o 25% 25 2.5 16.7o 30% 30 3.0 19.3o 35% 35 3.5 21.8o 40% 40 4.0 24.2o 45% 45 4.5 26.6o 50% 50 5.0 28.8o 55% 55 5.5 31.0o 60% 60 6.0 33.0o 65% 65 6.5 35.0o 70% 70 7.0 36.9o 75% 75 7.5 38.7o 80% 80 8.0 40.4o 85% 85 8.5 42.0o 90% 90 9.0 43.5o 95% 95 9.5 45.0o 100% 100 10.
Warranty Subject to the conditions set out below Radiodetection Limited warrants to the original purchaser, that the Radiodetection equipment will correspond with their specification at the time of delivery and will be free from defects in material and workmanship for the periods specified below as from the date of delivery. Description of warranty rights.
Registration Card With this registration card you can register your DrillTrack G2 system at Radiodetection Ltd. Registration entitles you to free software updates and product information. Company Name: .......................................................................................... Address: .......................................................................................... .......................................................................................... .........................