
User manual


76 | Chapter 6. Advanced Settings
N150 Wireless ADSL2+ Modem Router DGN1000 User Manual
• RIP-2. This version carries more information. Both RIP-2B and RIP-2M send the
routing data in RIP-2 format.
• RIP-2B. This version uses subnet broadcasting.
• RIP-2M. This version uses multicasting.
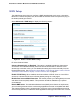
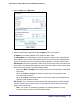
Access Router Interface on Additional Port
When NAT is disabled, the wireless modem router’s management interface may be accessed
at the wireless modem router’s LAN address using the port number you enter. This feature is
not available when NAT is enabled.
Use Router as DHCP Server
By default, the wireless modem router functions as a Dynamic Host Configuration Protocol
(DHCP) server, allowing it to assign IP, DNS server, and default gateway addresses to all
computers connected to the wireless modem router’s LAN. The assigned default gateway
address is the LAN address of the router. IP addresses are assigned to the attached PCs
from a pool of addresses specified in this screen. Each pool address is tested before it is
assigned to avoid duplicate addresses on the LAN.
For most applications, the default DHCP and TCP/IP settings of the router are satisfactory.
Click the link to the online document
TCP/IP Networking Basics on page 98 for an
explanation of DHCP and information about how to assign IP addresses for your network.
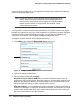
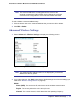
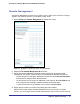
Reserved IP Addresses Setup
When you specify a reserved IP address for a computer on the LAN, that computer always
receives the same IP address each time it accesses the router’s DHCP server. Reserved IP
addresses should be assigned to servers that require permanent IP settings.
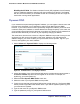
To reserve an IP address:
1. Select Advanced > LAN Setup and click the Add button.
2. In the IP Address field, type the IP address to assign to the computer or server. Choose an
IP
address from the router’s LAN subnet, such as 192.168.0.x.
3. Type the MAC address of the computer or server.
Tip: If the computer is already present on your network, copy its MAC
address from the Attached Devices screen and paste it here.
4. Click Apply to enter the reserved address into the table.