
Manual


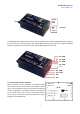
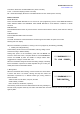

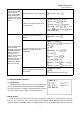
Table Of Contents
- 1.1.2 Transmitter
- 1.1.3 Compatible Receivers
- 1.1.4 Connection with TBS Crossfire TX
- ① Power on the transmitter- Long press the Mode key
- Note There are totally three signal output SBUS/PP
- ② Connect the TBS Crossfire transmitter to the AT9S
- The detailed steps please refer to the video tutor
- Note The compatibility function with TBS Crossfire
- 1.1.5 RSSI testing
- Into the parameter setup menu by press MODE one se
- The RSSI is 0 to 30dBm is normal when the transmi
- 1.2 RADIO INSTALLATION
- PART 2. BASIC FUNCTION OF AIRPLANE

Radiolink Electronic Ltd
www.radiolink.com
5
Into the parameter setup menu by press MODE one second, you can check the RSSI in RECEIVE.
The RSSI is 0 to 30dBm is normal when the transmitter is apart about 30 centimeters from the receiver, the
signal is more better the RSSI data is more close to 0.
1.2 RADIO INSTALLATION
1.2.1 Guidelines to mount the servos, receiver and battery
• Make certain the alignment tab on the battery, switch and servo connectors is orient correctly and ‘key’ into
the corresponding notch in the receiver or connectors before plugging them in .When unplugging connectors,
never pull on the wires. Always pull on the plastic connector instead.
• Receiver’s Antenna: In generally receiver’s antenna is longer than remote control, don’t break or retract it,
otherwise shorten the control distance. The antenna must be kept away from conductive materials, such as
metal. Please make distance test before flying.
• If your aileron servos are too far away to plug into the receiver, use an aileron extension cord to extend the
length. Avoid plugging multiple extensions together to obtain your desired length. If the distance is greater
than 50cm or high current draw servos are being used, use heavy servo extensions.
• Receiver Vibration and Waterproofing: the receiver contains precision electronic part. Be sure to avoid
vibration, shock, and temperature extremes. For protection, wrap the receiver in foam rubber or other
vibration-absorbing materials. It is also a good idea to waterproof the receiver by placing it in a plastic bag and
securing the open end of the bag with a rubber band before wrapping it with foam rubber. If you accidentally
get moisture or fuel inside the receiver, you may experience intermittent operation or a crash. If in doubt,
please contact Radiolink aftercares or distributors for service.
• Always mount the servos with the supplied rubber grommets. Don’t over tighten the screws. No part of the
servo casing should contact the mounting rails, servo tray or any part of structure. Otherwise vibration will be
transmitted to the servo causing damage of servo. Note the small numbers (1, 2, 3, and 4) molded into each
arm on the servo arms. The number indicate how many degrees each arm is ‘off’ from 90 degrees to correct
for minute manufacturing deviations from servo to servo.