
User's Manual


6
Once the link is made, the ID code is stored in the receiver and no further linking is necessary
unless the receiver is to be used with another transmitter. When you purchase another R8EH,
this procedure is necessary; otherwise the receiver will not work.
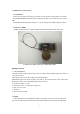
1) Place the transmitter and the receiver close to each other within 1 meter.
2) Connect CH3(R8EH) to ESC.
3) Press and hold ID SET switch of the receiver one second, now the indicator LED will
starting blinking. It will automatically find the nearest transmitter to bind.
4) Test with servo to make sure the binding is finished.
1.2.4 S-BUS, PPM and PPM signal change
Short press the ID SET switch two times within 1 second, the signal is changed from normal
PWM to S-BUS or PPM. The green LED indicates the normal PWM and red&green LED
indicates S-BUS or PPM signal.
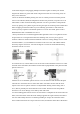
1.2.5 Transmitter calibration:
1. Press rudder trimmer left and turn on transmitter at the same time, red and green LED
flashing.
1) End point calibration:
Push two sticks from the highest position to the lowest position, and then put sticks to the
center position. (P1)
(P1)
2) Center position calibration:
Put stick to the center position, press rudder trimmer right, and then red and green LED always on
means sticks calibrate successful.
1.3 Guidelines to mount the servos, receiver and battery
• Make certain the alignment tab on the battery, switch and servo connectors is orient
correctly and ‘key’ into the corresponding notch in the receiver or connectors before plugging
them in.When unplugging connectors, never pull on the wires. Always pull on the plastic
connector instead.
• Receiver’s Antenna: In generally receiver’s antenna is longer than remote control,don’t
break or retract it,otherwise shorten the control distance.The antenna must be kept away from
conductive materials,such as metal. Please make distance test before flying.
•If your aileron servos are too far away to plug into the receiver,use an aileron extension cord