Radiolink Electronic Ltd www.radiolink.com BYME-A Flight Controller of Fixed-Wing Instruction Manual Radiolink Electronic Ltd www.radiolink.
Radiolink Electronic Ltd www.radiolink.com Thanks for purchasing Radiolink flight controller Byme-A . To fully enjoy the benefits of this product and ensure safety, please read the introduction carefully and set up the device as described below: If any problems found during the operation process, please kindly refer to the manual first. Then pilots could contact our distributors to find solution or follow our Facebook homepage https://www.facebook.
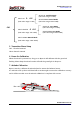
Radiolink Electronic Ltd www.radiolink.com 1. Introduction Byme-A is a flight controller applicable to various straight wing aircraft including 3D fixed wing(F3P) and 4-channel trainer and scale model aircraft and is SBUS and PPM signal supported. With the three-axis gyroscope and three-axis acceleration sensor and the full attitude algorithm, control algorithm and digital filter, Byme-A makes the flight much easier.
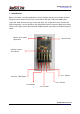
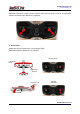
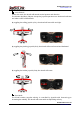
Radiolink Electronic Ltd www.radiolink.com 2. Parameters Input Voltage:6-12V Pin:2.54mm * 3 pin * 5 Weight: 4.5g (with wires) Dimension: 35.5*15.5*10.5mm 3. Installation Make sure the arrow on Byme-A points to the aircraft head. The flight controller can be installed either face up or down with 3M glue on the aircraft body (better around the center) and the wires connect to the corresponding pins. Aileron 副翼 升降舵 Elevator Rudder 方向舵 4.
Radiolink Electronic Ltd www.radiolink.com Switch UP + CH7 (CH5 value range: 0~700) CH5 Switch CENTER + CH7 (CH5 value range: 701~1300) Switch UP : Stabilize Mode (CH7 value range: 0~1300) Switch DOWN: Vertical Mode (CH7 value range: 1301~2048) Switch UP : Gyro Mode (CH7 value range: 0~1300) Switch DOWN: Acro Mode (CH7 value range: 1301~2048) Switch DOWN: Manual Mode (CH5 value range: 1301~2048) 5. Transmitter Phase Setup CH3 - Throttle: Reversed Other channels: Normal 6.
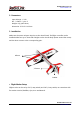
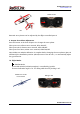
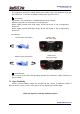
Radiolink Electronic Ltd www.radiolink.com Pull both joysticks to outside corners as below and hold more than 3 seconds. The green led flashes once means the calibration completed. 8. Servo Phase Make sure the servo phases are correct before flight. Take Manual Mode and Mode 2 as example. Pitching to left Left aileron lifted Right aileron pressed Horizontal tail lifted Pitching downward Radiolink Electronic Ltd www.radiolink.
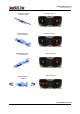
Radiolink Electronic Ltd www.radiolink.com Rudder to left Vertical tail to left Reversed servo phases can be adjusted by the flight controller Byme-A. 9. Output Servo Phase Adjustment Press the button at the front of Byme-A to change the servo phase: Short press once, aileron servo reversed, LED1 ON/OFF. Short press twice, elevator servo reversed, LED2 ON/OFF. Short press four times, rudder servo reversed, LED4 ON/OFF. Note: Make sure attitude calibration is complete before changing the servo phases.
Radiolink Electronic Ltd www.radiolink.com Model leans to right (move to right) Rolling to right Model head lifts (move backward) Pitching downward Model head pressed (move forward) Pitching upward Model directions changed Rudder left/right Radiolink Electronic Ltd www.radiolink.
Radiolink Electronic Ltd www.radiolink.com Vertical Mode Under this mode, the aircraft will remain vertical posture and direction. The altitude algorithm of Byme-A maps the joystick operation onto horizontal ordinates and takes control of full altitude. 2 By toggling the rolling joystick (CH1), the aircraft will move left and right. By toggling the pitching joystick (CH2), the aircraft will move forward and backward. By toggling the rudder joystick (CH4), the aircraft will rotate.
Radiolink Electronic Ltd www.radiolink.com by toggling the joysticks of rolling, pitching and rudder. This is the advanced mode and the model won’t level but and keeps rotating when joystick is loose . Acro Mode This mode is the combination of Stabilize Mode and Gyro Mode. When the joystick is at center point, aircraft will level. When toggle joysticks with small range, aircraft will move to the corresponding directions.