
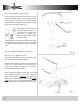
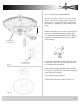
Instructions / Assembly


11
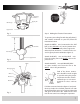
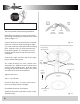
Figure 16 illustrates the wiring used to control
the fan with a wall switch plus an optional light
fixture controlled at the fixture.
Figure 17 illustrates the wiring used to control
fan with the pull chain on the electrical switch
housing plus an optional light fixture with a wall
switch.
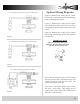
Figure 18 illustrates the wiring used to control
the fan and optional light fixture with separate
wall switches.
Optional Wiring Diagrams
Fan controlled at fan with Light controlled at wall switch
Fan controlled with wall switch and Light controlled at fan
Fan & Lights controlled by wall switch or switches
Fig. 16
Fig. 17
Fig. 18
If you elect to control the motor of your ceiling
fan from a wall switch, remember that the wall
switch will only turn your fan ON or OFF. The
speed can be adjust at the fan.
If you elect to control the speeds of your ceiling
fan from a wall switch, YOU MUST set the
speed switch on the ceiling fan to HIGH speed
and leave it in that setting.
IMPORT
ANT NOTE:
ONLY USE AN OPTIONAL WALL
SWITCH THAT HAS BEEN DESIGNED
FOR USE WITH CEILING FANS