5-1995.fm Page 1 Thursday, March 2, 2000 7:40 AM Please read before using this equipment.
15-1995.fm Page 2 Thursday, March 2, 2000 7:40 AM INTRODUCTION Your RadioShack 7-in-One IR/RF Remote Control can replace up to seven infrared remote controls. You can use it to control your TV, VCR, cable converter, satellite receiver, CD player, tuner, phonograph, video accessory, digital audio tape, cassette, laser disc player, or DVD player.
15-1995.fm Page 3 Thursday, March 2, 2000 7:40 AM CONTENTS Preparation ..................................................... Installing Batteries ..................................... Setting the Clock ....................................... Quick Setup ............................................... 5 5 6 7 A Look at Your Remote ................................. 9 Setting Up the 7-in-One ............................... To Operate Your TV ................................. To Operate Your VCR ............
15-1995.fm Page 4 Thursday, March 2, 2000 7:40 AM TV/VCR Combinations ............................. 64 VCRs......................................................... 65 Video Accessories ................................... 72 Troubleshooting ........................................... 73 Care ............................................................... 75 Specifications ...............................................
15-1995.fm Page 5 Thursday, March 2, 2000 7:40 AM PREPARATION INSTALLING BATTERIES Your RadioShack 7-in-One requires four AAA batteries (not supplied), available at your local RadioShack store. Cautions: • Use only fresh batteries of the required size and recommended type. • Do not mix old and new batteries, different types of batteries (standard, alkaline, or rechargeable), or rechargeable batteries of different capacities. To install the batteries: 1.
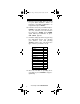
15-1995.fm Page 6 Thursday, March 2, 2000 7:40 AM Notes: • After you install batteries, the remote performs a test of the display for 10 seconds or until you press a key. • To extend battery life, the display turns off after 10 seconds of keypad inactivity and turns on again when you press any key. • Device codes you have programmed into the 7-in-One remain stored in memory while you replace the batteries. However, you must reset the clock.
15-1995.fm Page 7 Thursday, March 2, 2000 7:40 AM QUICK SETUP The steps in this section tell you how to quickly set up the 7-in-One to operate all of your devices. To set up devices individually, or add a device after you have set up the 7-in-One, see the appropriate section under “Setting Up the 7-in-One” on Page 14. Note: For the best operation, you should be within 15 feet of the device you want to control. Follow these steps for quick setup: 1. Turn on all of the devices you are setting up. 2.
15-1995.fm Page 8 Thursday, March 2, 2000 7:40 AM 9. Enter the first four-digit VCR code listed for your VCR’s brand in “VCRs” on Page 65 or “TV/VCR Combinations” on Page 64 then press SELECT. 10. Point the remote at your VCR and press POWER. Your VCR should turn off. If it does not, enter the next code from the list and press SELECT then POWER again. When your VCR turns off, press CBL. CABLE appears. 11.
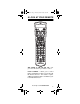
15-1995.fm Page 9 Thursday, March 2, 2000 7:40 AM A LOOK AT YOUR REMOTE AMP, TUNER, TV, CBL, CD, VCR, SAT — lets you select the device you want to control. PLUG ’N POWER — allows you to control lamps and appliances with your 7-in-One IR/ RF Remote Control. This feature requires additional equipment that is available at your local RadioShack store.
15-1995.fm Page 10 Thursday, March 2, 2000 7:40 AM HOME THEATER — lets you operate all of the most commonly used home theater functions in one mode. POWER — turns the remote on and off, and controls All Lights On in the PLUG ‘N POW- ER mode. MENU — works like the Menu or OSD (on- screen display) key on your original remote. Use , , , and (Menu Up, Down, Right, and Left) to navigate your on-screen menus. If your original remote had a Select key to select menu options, use SELECT in its place.
15-1995.
15-1995.fm Page 12 Thursday, March 2, 2000 7:40 AM SLEEP (SHIFT + MUTE) — controls the Sleep Timer in TV, CABLE, SAT, and AMP or TUN modes for devices which have this feature. If your device does not have a Sleep Timer, SLEEP activates the remote’s built-in sleep timer. CH + (Channel Up) and CH – (Channel Down) — work like the Channel Up and Down keys on your original remote. CH + and CH – also control preset Up/Preset Down in AMP or TUNER mode and ON/OFF in the PLUG ‘N POWER mode.
15-1995.fm Page 13 Thursday, March 2, 2000 7:40 AM REW (Rewind), PLAY, FFWD (Fast Forward), REC (Record), STOP, and PAUSE — work like the transport keys on your original VCR or Laser Disc player remotes. To guard against accidental recording, you must press REC twice before recording. PIP — controls your TV or VCR’s Picture-in- Picture feature. Works like the VIEW key on your Satellite receiver’s remote. FREEZE (SHIFT + PIP) — freezes your Picture-in-Picture window.
15-1995.fm Page 14 Thursday, March 2, 2000 7:40 AM SETTING UP THE 7-IN-ONE Note: For the best operation, you should be within 15 feet of the device you want to operate. TO OPERATE YOUR TV Locate the codes for your TV in “Televisions” on Page 52 and write them down on the supplied label. Note: Some manufacturers have several codes listed. Try each until you find the right one. The brands are listed in alphabetical order, with the most popular codes listed first.
-1995.fm Page 15 Thursday, March 2, 2000 7:40 AM TO OPERATE YOUR VCR Locate the codes for your VCR in “VCRs” on Page 65 and write them down on the supplied label. Note: Some manufacturers have several codes listed. Try each until you find the right one. The brands are listed in alphabetical order, with the most popular codes listed first. Then follow these steps to program the 7-inOne to operate your VCR. 1. Turn on your VCR and insert a tape. 2. Press VCR then hold down P until TIMED SEQ appears. 3.
15-1995.fm Page 16 Thursday, March 2, 2000 7:40 AM TO OPERATE YOUR TV/VCR COMBINATION Locate the codes for your TV/VCR Combination in “TV/VCR Combinations” on Page 64 and write them down on the supplied label. Notes: • Some manufacturers have several codes listed. Try each until you find the right one. The brands are listed in alphabetical order, with the most popular codes listed first. • Some TV/VCR combinations require a second code to control volume.
15-1995.fm Page 17 Thursday, March 2, 2000 7:40 AM 6. Point the 7-in-One at your TV/VCR Combo and press POWER or PLAY. Your TV/VCR Combo should turn off or start to play. If it does not, enter the next code from the list and press SELECT then POWER or PLAY again. When your TV/VCR Combo turns off or plays, press ESCAPE to stop programming. TO OPERATE YOUR CABLE CONVERTER Locate the codes for your cable converter in “Cable Converters” on Page 40 and write them down on the supplied label.
15-1995.fm Page 18 Thursday, March 2, 2000 7:40 AM 6. Point the 7-in-One at your cable converter and press POWER. Your cable converter should turn off. If it does not, enter the next code from the list and press SELECT then POWER again. When your cable converter turns off, press ESCAPE to stop programming. Note: If your original cable converter remote does not have an ON key, press CH+ on the 7-in-One to turn on your cable converter.
15-1995.fm Page 19 Thursday, March 2, 2000 7:40 AM Note: If the 4-digit code begins with zero, only the last 3-digits will appear on the display. 6. Point the 7-in-One at your satellite receiver and press POWER. Your satellite receiver should turn off. If it does not, enter the next code from the list and press SELECT then POWER again. When your satellite receiver turns off, press ESCAPE to stop programming.
15-1995.fm Page 20 Thursday, March 2, 2000 7:40 AM Note: If the 4-digit code begins with zero, only the last 3-digits appear. 6. Point the 7-in-One at your CD Player and press PLAY. Your CD player should start to play. If it does not, enter the next code from the list and press SELECT then PLAY again. When your CD starts to play, press ESCAPE to stop programming.
15-1995.fm Page 21 Thursday, March 2, 2000 7:40 AM 6. Point the 7-in-One at your Tuner/ Receiver and press POWER. Your Tuner/Receiver should turn off. If it does not, enter the next code from the list and press SELECT then POWER again. When your Tuner/Receiver turns off, press ESCAPE to stop programming. TO OPERATE YOUR AMPLIFIER Locate the codes for your Amplifier in “Amplifiers” on Page 39 and write them down on the supplied label. Note: Some manufacturers have several codes listed.
15-1995.fm Page 22 Thursday, March 2, 2000 7:40 AM 6. Point the 7-in-One at your amplifier and press POWER. Your amplifier should turn off. If it does not, enter the next code from the list and press SELECT then POWER again. When your amplifier turns off, press ESCAPE to stop programming.
15-1995.fm Page 23 Thursday, March 2, 2000 7:40 AM 2. Press VCR then hold down P until TIMED SEQ appears. 3. Press . CODE SETUP appears. 4. Repeatedly press SELECT until VCR appears. 5. Press or to toggle between VCR, LDP, TAPE, and DAT. 6. When LDP appears, enter the first fourdigit code listed for your laser disc player’s brand in “Laser Disc Players” on Page 49, then press SELECT. Note: If the 4-digit code begins with zero, only the last 3-digits will appear on the display. 7.
15-1995.fm Page 24 Thursday, March 2, 2000 7:40 AM SPECIAL FEATURES SEARCHING FOR A CODE Before Setup If you have tried all the codes from the list and your device still will not respond to the 7in-One (or if your brand is not listed), try searching for your code. For example, to find the code for your TV: 1. Turn on your TV, then press TV. 2. Hold down P until TIMED SEQ appears. 3. Press . CODE SETUP appears. 4. Press SELECT. DEV SET UP appears. 5. Press . DEV SEARCH appears. 6. Press SELECT.
15-1995.fm Page 25 Thursday, March 2, 2000 7:40 AM After Setup After you have set up your devices, you might need to find out which code is operating one of them. For example, to find out what four-digit code is operating your TV: 1. Press TV. 2. Hold down P until TIMED SEQ appears. 3. Press . CODE SETUP appears. 4. Press SELECT. DEV SET UP appears. 5. Press twice. DEV NUMBER appears. 6. Press SELECT. TV and the code for that device appear.
15-1995.fm Page 26 Thursday, March 2, 2000 7:40 AM 1. Press the device key for the device you want to scan (TV, CBL, SAT). 2. Hold down P until TIMED SEQ appears. 3. Press twice. CONFIGURE appears. 4. Press SELECT. THEATR SEL appears. 5. Press until FAVCH SCAN appears. 6. Press SELECT. CH appears. 7. Enter the first channel number you want to include in your favorite channel list, then press P. Notes: • Precede a single-digit number with a 0. For example, 0 1, 02, and so on.
15-1995.fm Page 27 Thursday, March 2, 2000 7:40 AM Note: If you do not program a favorite channel list, SCAN acts as a “channel surf” key. Each time you press SCAN, the 7-in-One repeatedly performs cycles through the channels, stopping on each for about 3 seconds. CLEARING FAVORITE CHANNEL SCAN To change your favorite channel list, you must first clear the existing list. Repeat Steps 1–6 above, then press ESCAPE. Your favorite channel list is cleared.
15-1995.fm Page 28 Thursday, March 2, 2000 7:40 AM 2. Press to add time to the sleep timer. Each press will add 15 minutes up to a total of 60 minutes. 3. Press SELECT after the desired time is displayed. If you would like to use the 7-in-One’s built in sleep timer on all of your devices, you can lock the sleep mode. 1. Hold down P until TIMED SEQ appears. 2. Press twice. CONFIGURE appears. 3. Press SELECT. THEATR SEL appears. 4. Press twice. SLEEP LOCK appears. 5. Press SELECT. DISABLE appears. 6.
15-1995.fm Page 29 Thursday, March 2, 2000 7:40 AM CONVERTING DEVICE KEYS You can use the 7-in-One to operate a second TV or VCR, or any combination of up to six devices. To do this, you must first convert an unused device key (AMP, TUNER, TV, CD, CBL, VCR, or SAT) to operate the second device. For example, to convert CBL to operate a second TV: 1. Hold down P until TIMED SEQ appears. 2. Press twice. CONFIGURE appears. 3. Press SELECT. THEATR SEL appears. 4. Press appears. three times. MODE MAP 5.
15-1995.fm Page 30 Thursday, March 2, 2000 7:40 AM For example, to set-up the 7-in-One so your receiver always controls the volume: 1. Hold down P until TIMED SEQ appears. 2. Press twice. CONFIGURE appears. 3. Press SELECT. THEATR SEL appears. 4. Press twice. VOL LOCK appears. 5. Press SELECT. UNLOCK appears. 6. Press . LOCK appears. 7. Press SELECT then the key for the device that you want to control the sound volume (AMP, TUNER, TV, CD, CBL, VCR, or SAT), then press SELECT.
15-1995.fm Page 31 Thursday, March 2, 2000 7:40 AM 6. Press . UNLOCK appears. 7. Press SELECT. Each device now controls its own volume when you use the volume keys on your 7-in-One. USING THE MACRO KEYS The 7-in-One has two dedicated macro keys, AUDIO and VIDEO. Each lets you play back a series of up to 15 keystrokes at any time with a single keypress, in any mode. You can also program almost any other key on the 7in-One as a macro key.
15-1995.fm Page 32 Thursday, March 2, 2000 7:40 AM 7. Enter the sequence of up to 15 keystrokes that you want the 7-in-One to memorize, then press ESCAPE. For example: TV POWER 04 TV/VIDEO SAT POWER In our example, whenever you press VIDEO, the TV turns on, tunes to channel 4, and changes the input to VIDEO 1, then the satellite turns on.
15-1995.fm Page 33 Thursday, March 2, 2000 7:40 AM 3. If necessary, press to toggle between AM and PM, then press SELECT. ONCE appears. 4. Press and to toggle between ONCE, DAILY, and WEEKLY. When the desired frequency appears, press SELECT. The day of the week appears. 5. Press and to toggle through the days of the week until the day when you want the sequence to start running appears. 6. Press SELECT. ENTER SEQ appears. 7.
15-1995.fm Page 34 Thursday, March 2, 2000 7:40 AM SETTING UP THE HOME THEATER KEY The 7-in-One lets you operate all of the most commonly used home theater functions in one mode. When setting up the Home Theater mode, you choose which devices will control volume, channel changing, playback, picture-in-picture, and menu functions. 1. Press HOME THEATER. 2. Hold down P until TIMED SEQ appears. 3. Press twice. CONFIGURE appears. 4. Press SELECT twice. AUDIO appears. 5.
15-1995.fm Page 35 Thursday, March 2, 2000 7:40 AM 11. Press SELECT. MENU appears. 12. Press SELECT then the appropriate key to select the device you want to control the menu features in Home Theater mode. Then press SELECT again to stop programming. Setting Up a Power Key Macro After you set up the Home Theater mode, you can create a macro sequence that lets you use POWER to turn on and off all of your Home Theater devices. 1. Press HOME THEATER, then hold down P until TIMED SEQ appears. 2. Press twice.
15-1995.fm Page 36 Thursday, March 2, 2000 7:40 AM CLEAR ALL Use the Clear All feature to reset all advanced functions of the 7-in-One. Clear All erases macro sequences, timed macro sequences, and Volume Punch-Through from the 7-in-One’s memory. It does not erase the set-up codes you programmed. To reset the 7-in-One using the Clear All feature: 1. Hold down P until TIMED SEQ appears. 2. Press twice. CONFIGURE appears. 3. Press SELECT. THEATR SEL appears. 4. Press . CLEAR ALL appears. 5. Press SELECT.
15-1995.fm Page 37 Thursday, March 2, 2000 7:40 AM • Do not position the Command Center near metal objects (such as heating ducts) that can absorb RF signals. • Keep fresh batteries in the 7-in-One. Weak batteries reduce the 7-in-One’s range. After you have set up the 7-in-One to control your devices (see “Quick Setup” on Page 7 or “Setting Up the 7-in-One” on Page 14), follow these steps to set up the Command Center: 1. Choose a location about 8 feet in front of the components you want to control.
15-1995.fm Page 38 Thursday, March 2, 2000 7:40 AM 1. Plug the IR signal extension cord into the jack (shown here) on the back of the Command Center. 2. Route the IR extender signal extension cord to the device. 3. Use the supplied double-sided tape to attach the IR signal extension cord to the device, with its LED on or next to the device’s IR sensor. 4. Be sure the remote is not pointing toward your equipment, then test the Command Center by pressing POWER.
15-1995.fm Page 39 Thursday, March 2, 2000 7:40 AM MANUFACTURER CODES Manufacturer Code(s) RadioShack Cat. No.
15-1995.fm Page 40 Thursday, March 2, 2000 7:40 AM Manufacturer Code(s) RadioShack Cat. No.
15-1995.
15-1995.
15-1995.fm Page 43 Thursday, March 2, 2000 7:40 AM Manufacturer Code(s) Carver 0029, 0261 Denon 0076 Fisher 0074, 0261 Garrard 0300, 0308, 0309, 0439 JVC 0244, 0273, 0274, 0303 Kenwood 0070, 0071, 0092, 0233, 0234 Kyocera 0171 MGA 0313 Magnavox 0029 RadioShack Cat. No.
15-1995.fm Page 44 Thursday, March 2, 2000 7:40 AM Manufacturer Pioneer Code(s) RadioShack Cat. No.
15-1995.fm Page 45 Thursday, March 2, 2000 7:40 AM Manufacturer Code(s) DAK 0245 DKK 0000 Denon 0003, 0873 Emerson 0305, 0155, 0164, 0469 Fisher 0179, 0088, 0174, 0342 GE 0009 Garrard 0420, 0393, 0245, 0280, 0425 Genexxa GoldStar RadioShack Cat. No.
15-1995.fm Page 46 Thursday, March 2, 2000 7:40 AM Manufacturer NEC Code(s) RadioShack Cat. No.
15-1995.fm Page 47 Thursday, March 2, 2000 7:40 AM Manufacturer Code(s) Quasar 0029 RCA 0179, 0305, 0053, 0009, 0155 Realistic 0179 RadioShack Cat. No.
15-1995.fm Page 48 Thursday, March 2, 2000 7:40 AM Manufacturer Code(s) Toshiba 0019, 0299 Vector Research 0033, 0194, 0417 Victor 0072 Wards 0157, 0053, 0108 Yamaha 0036, 0170, 0187 Yorx 0461 RadioShack Cat. No.
15-1995.fm Page 49 Thursday, March 2, 2000 7:40 AM Manufacturer Code(s) One For All 0167 RadioShack 0240 Sanyo 0336 Security System 0167 Universal X10 0167 X10 0167 RadioShack Cat. No.
15-1995.fm Page 50 Thursday, March 2, 2000 7:40 AM Manufacturer Code(s) Sony 0533, 0193, 0201, 0270 Technics 0490, 0204 Theta Digital 0194 Toshiba 0503 Yamaha 0490, 0217, 0545 Zenith 0503 RadioShack Cat. No.
15-1995.fm Page 51 Thursday, March 2, 2000 7:40 AM Manufacturer Code(s) RadioShack Cat. No.
15-1995.fm Page 52 Thursday, March 2, 2000 7:40 AM Manufacturer Code(s) Memorex 0724 Next Level 0869 0269 Norsat 0004 Panasonic 0701, 0152 Pansat 0647 Philips 0724, 0200 Pico 0075 Primestar 0627, 0361 Prosat 0158 RCA 0566 RadioShack 0554 RadioShack Cat. No.
15-1995.fm Page 53 Thursday, March 2, 2000 7:40 AM Manufacturer Admiral Code(s) RadioShack Cat. No.
15-1995.fm Page 54 Thursday, March 2, 2000 7:40 AM Manufacturer Curtis Mathes Code(s) RadioShack Cat. No.
15-1995.fm Page 55 Thursday, March 2, 2000 7:40 AM Manufacturer Code(s) GoldStar 0030, 0019, 0056, 0001, 0002, 0032, 0106, 0409 Gradiente 0053, 0056 Grunpy 0180, 0179 0178 Hallmark 0178 Harley Davidson 0179 RadioShack Cat. No.
15-1995.fm Page 56 Thursday, March 2, 2000 7:40 AM Manufacturer Code(s) MGA 0150, 0030, 0178, 0019, 0155 MTC 0060, 0030, 0019, 0056, 0091, 0185 Magnavox 0054, 0030, 0179, 0020, 0024, 0028, 0036, 0096, 0186, 0187, 0386 Majestic 0016 Marantz 0054, 0030 Matsushita 0250 Megatron 0178, 0145, 0003 Memorex 0154, 0250, 0150, 0056, 0016, 0106 Midland RadioShack Cat. No.
15-1995.fm Page 57 Thursday, March 2, 2000 7:40 AM Manufacturer Optimus Code(s) RadioShack Cat. No.
15-1995.fm Page 58 Thursday, March 2, 2000 7:40 AM Manufacturer Code(s) RCA 0047, 0051, 0093, 0019, 0018, 0038, 0090, 0278, 1047, 1147, 1247, 1347 RadioShack 0047, 0154, 0019, 0039, 0409 Realistic RadioShack Cat. No.
15-1995.
15-1995.fm Page 60 Thursday, March 2, 2000 7:40 AM Manufacturer Teknika Code(s) RadioShack Cat. No.
15-1995.fm Page 61 Thursday, March 2, 2000 7:40 AM Manufacturer Code(s) Capetronic 0531 Carver 0189, 0008, 0042, 0360, 0412 Casio 0195, 0201 Clarinette 0195 Curtis Mathes 0080, 0201 Denon 0004, 0273, 0771 Emerson 0424 Fisher 0042, 0219, 0360 Garrard 0463, 0281, 0286, 0424, 0440, 0744 RadioShack Cat. No.
15-1995.fm Page 62 Thursday, March 2, 2000 7:40 AM Manufacturer NTDE Geniesom Code(s) 0744 Nakamichi 0347 Onkyo 0135, 0100, 0119, 0380 Optimus RadioShack Cat. No.
15-1995.fm Page 63 Thursday, March 2, 2000 7:40 AM Manufacturer Pioneer Code(s) RadioShack Cat. No.
15-1995.fm Page 64 Thursday, March 2, 2000 7:40 AM Manufacturer Code(s) Yamaha 0176, 0186, 0082 Yorx 0195 Zenith 0281, 0622, 0744 RadioShack Cat. No.
15-1995.fm Page 65 Thursday, March 2, 2000 7:40 AM Manufacturer Optimus Code(s) RadioShack Cat. No.
15-1995.fm Page 66 Thursday, March 2, 2000 7:40 AM Manufacturer American High Code(s) RadioShack Cat. No.
15-1995.fm Page 67 Thursday, March 2, 2000 7:40 AM Manufacturer Code(s) Fisher 0047, 0104, 0054, 0066 Fuji 0035, 0033 Funai 0000 GE 0060, 0035, 0048, 0240, 0202 Garrard 0000 Go Video 0232, 0279, 0432 GoldStar 0037, 0038 Gradiente 0000, 0008 HI-Q 0047 Harley Davidson 0000 RadioShack Cat. No.
15-1995.fm Page 68 Thursday, March 2, 2000 7:40 AM Manufacturer Code(s) Magnavox 0035, 0039, 0081, 0000, 0149, 0110 Magnin 0240 Marantz 0035, 0081 RadioShack Cat. No. Marta 0037 Matsushita 0035, 0162, 0454 Memorex 0035 16-705 0037 16-413, 16-414, 16524, 16-534, 16-706, 10-34004 0039, 0162 Memorex (continued) 0047 10-34002, 10-34006, 10-34008, 10-34010, 10-34012 0000 16-406, 16-410, 16411, 16-517, 1034065 0048 16-531, 16-618.
15-1995.fm Page 69 Thursday, March 2, 2000 7:40 AM Manufacturer Optimus Code(s) RadioShack Cat. No.
15-1995.fm Page 70 Thursday, March 2, 2000 7:40 AM Manufacturer Code(s) Pulsar 0039, 0051 Quarter 0046 Quartz 0046 Quasar 0035, 0162, 0454, 1162 RCA 0060, 0035, 0048, 0240, 0042, 0149, 0105, 0106, 0202 RadioShack 0000 RadioShack Cat. No.
15-1995.fm Page 71 Thursday, March 2, 2000 7:40 AM Manufacturer Code(s) Sansui 0000, 0067, 0041, 0271, 0479 Sanyo 0047, 0240, 0104, 0046 Scott 0184, 0045, 0121, 0043, 0210, 0211, 0212 Sears 0035, 0037, 0047, 0000, 0042, 0104, 0046, 0054, 0066, 0105 Semp 0045 Sharp 0048, 0062 Shintom 0072 Shogun 0240, 0051 Singer 0072 Sony 0035, 0032, 0000, 0033, 0034 Sylvania 0035, 0081, 0000, 0043, 0110 RadioShack Cat. No.
15-1995.fm Page 72 Thursday, March 2, 2000 7:40 AM Manufacturer Code(s) Unitech 0240 Vector 0045 Vector Research 0038, 0040 RadioShack Cat. No.
15-1995.fm Page 73 Thursday, March 2, 2000 7:40 AM TROUBLESHOOTING Problem Solution Replace the batteries with Display begins to fade, does not appear, or the red four fresh AAA alkaline light blinks five times when batteries. you press a key. The 7-in-One does not operate your device. Try all of the codes listed for your brand of device in the “Setup Codes” section. If this does not work, try searching for your code (see “Searching for a Code” on Page 24).
15-1995.fm Page 74 Thursday, March 2, 2000 7:40 AM Problem Solution Problems changing channels. If your original remote required an ENTER keystroke when changing channels, press the ENTER key on the 7-inOne after you enter the channel number. The red light blinks when you press a key but you receive no response from your device. Press the appropriate device key (CD, CBL, VCR, TV, TUNER, AMP, SAT, PLUG ’N POWER) for the device you are trying to operate.
15-1995.fm Page 75 Thursday, March 2, 2000 7:40 AM CARE To enjoy your RadioShack 7-in-One IR/RF Remote Control for a long time: • Keep the 7-in-One dry. If it gets wet, wipe it dry immediately. • Use and store the 7-in-One only in normal temperature environments. • Handle the 7-in-One gently and carefully. Don’t drop it. • Keep the 7-in-One away from dust and dirt. • Wipe the 7-in-One with a damp cloth occasionally to keep it looking new.
15-1995.fm Page 76 Thursday, March 2, 2000 7:40 AM SPECIFICATIONS Power ....................................... 4 AAA Batteries IR Control Range ............................... 26 ft ±30× Dimensions (HWD) ........ 93/8 × 21/2 × 15/8 Inches (234 × 64 × 34 mm) Weight (Without Batteries) ........ 6 oz. (170 gm) Specifications are typical; individual units might vary. Specifications are subject to change and improvement without notice.