Instruction Manual Read this instruction manual through carefully first. • Keep it handy for future reference. Abuse or improper operation of the unit will void the warranty. RADIX Electronic Vertriebs-GmbH • D-61381 Friedrichsdorf • F.R.
Introduction 1 Introduction Congratulations on your decision to purchase a RADIX digital satellite receiver. All of our manufacturing facilities have been certified under the stringent ISO 9002 quality standard. If the unit must be sent in for repair, repack it and all of its associated accessory items in their original packagings, which should be kept on hand for this purpose.
Contents 2 Contents Section Title 1 Introduction 2 2 Contents 3 3 Safety Precautions 5 4 4.1 4.2 The Receiver and Its Operation The Remote Control The Receiver Unit 6 6 9 5 5.1 5.2 5.2.1 5.2.2 Installing the Receiver Prerequisites and Ambient Conditions Connecting the Receiver to the Satellite Antenna and Other Equipment Single-Antenna Operation Dual-Antennae Operation 10 10 10 11 11 6 6.1 6.2 6.3 6.
Contents 8 8.1 8.2 8.3 8.3.1 8.3.2 8.3.3 8.4 8.5 8.6 8.7 8.
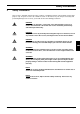
Safety Precautions 3 Safety Precautions This receiver is intended exclusively for the reception of satellite broadcasts, and should be used for that purpose only. Keep the receiver out of children’s reach. In the interest of your own personal safety and preventing damage to the receiver, you should observe the following precautions: DANGER: Do not open its housing’s cover panel, since that will expose sources of electric-shock hazards.
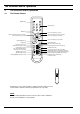
The Receiver and Its Operation 4 The Receiver and Its Operation 4.
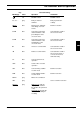
The Receiver and Its Operation Key Marking(s) Color Function During: Operation Installation red ON/OFF-switch ON/OFF-switch 0,1,2,3, ...
The Receiver and Its Operation Marking(s) Page 8 Key Color Function During: Operation Installation Deletes an entry or effects a return to the preceding menu Saves the settings made EXIT(STO) REV gray Digital mode: STOP, exit the current menu Analog mode: N/A BACK tt gray Analog mode: Selects blue screen VCR: Fast rewind AUD(#) u gray Digital mode: Selects audio mode VCR: Play LAST(T A/B) uu gray Digital mode: Selects the last channel viewed VCR: Fast forward RADIO(W) II gray Digital mode
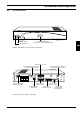
The Receiver and Its Operation 4.2 The Receiver Unit ON/OFF-Switch Channel-Selector Four-Digit LED-Display (indicates the current channel number) GB Controls and displays on the receiver’s front panel Scart Jack for a TV-Set Analog-Signal IF-Input Connector for a Coaxial Antenna Cable IF INPUT +13V/+18V 400mA MAX. WARNING: IF INPUT +13V/+18V 400mA MAX.
Installing the Receiver 5 Installing the Receiver 5.1 Prerequisites and Ambient Conditions NOTE: Keep the receiver well away from sources of heat and locations where it might be subjected to bright sunlight. Route all cabling such that it will not become damaged by, e.g., sharp edges. Connect the receiver to a 230 VAC (± 10%), 50 Hz, electrical outlet. The antenna assembly should have been installed and aligned in accordance with its manufacturer’s instructions.
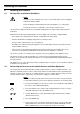
Installing the Receiver 5.2.1 Single-Antenna Operation Antenna TV RF INPUT +13V/+18V 400mA MAX. WARNING: ~ WARNUNG: AC95~265V 50Hz MAX30W AVERTISSEMENT: RF INPUT +13V/+18V 400mA MAX. VIDEO TV ANALOG L RS 232 AUDIO CAUTION RF OUTPUT R AVIS: VORSICHT: DIGITAL VCR DECODER GB Hi-Fi System 5.2.2 Video Recorder Analog Decoder Dual-Antennae Operation Antenna Antenna TV RF INPUT +13V/+18V 400mA MAX.
Programming and Operating the Analog-Receiver Section 6 Programming and Operating the Analog-Receiver Section • • Switch the receiver on by pressing the ON/OFF-key. Press the A/D-key on the remote control in order to switch from using the receiver’s digital section to using its analog section. NOTE: You may suppress the picture for the current channel and obtain a blue screen by pressing the BACK-key, if desired. The system menu will be displayed onscreen even in the absence of an input signal. • 6.
Programming and Operating the Analog-Receiver Section 6.2 Preselecting Channels from the Main Menu (Display Page 1) • Press the MENU-key on the remote control while the receiver is switched on. The following menu will then be displayed onscreen: MAIN MENU > CHANNEL BAND FREQ. POLARITY 22KHZ DECODER CONTRAST P. LOCK • • • : : : : : : : : 400 KU-09.75GHZ 12150.00MHZ HORZ. OFF NO 5 OFF Either use the t and u keys to select a channel/broadcaster, or GB enter a 3-digit channel number.
Programming and Operating the Analog-Receiver Section 6.3 Preselecting Channels from the Main Menu (Display Page 2) • Press the q key to exit Display Page1 and call up Display Page 2. MAIN MENU > AUDIO L R DE-EMPH B/W L/R DIST. AUDIO RADIO • : : : : : : : 7.02MHZ 7.20MHZ STEREO/ADAPT 150KHZ 180KHZ INTERNAL OFF Use the t and u keys or numerical keys to adjust/reset the left-channel audio-subcarrier frequency.
Programming and Operating the Analog-Receiver Section 6.4 Preselecting Channels from the Main Menu (Display Page 3) The settings of Display Page 3 should be altered by a trained specialist only. • Press the q key while the cursor is in the bottom display line to transit from Display Page 2 to Display Page 3: MAIN MENU > TONE BURST : A SWITCH INPUT : 1 • • Version 1.0 Reset DiSEqC to A or B.
Setting Up and Programming the Digital Receiver 7 Setting Up and Programming the Digital Receiver 7.1 Switching On the Receiver • Actuate the ON/OFF switch on the receiver. The display will indicate “ON” to indicate that the receiver is on, and the following display page will appear onscreen: Press MENU key to setup • Press the MENU-key on the remote control.
Setting Up and Programming the Digital Receiver 7.2 Language Selection • Use the p and q keys to highlight the “Language” field, as shown below: Main Menu 1-1 Language Time Setting Installation Decoder Status Language English MENU/EXIT • • • 7.3 Press the MENU-key on the remote control. Use the CHp and CHq keys to bring the desired choice of language (Deutsch/English/Français/Italiano) into the field at the bottom of the screen.
Setting Up and Programming the Digital Receiver 7.4 Setting Decoder Status Selecting the TV Aspect Ratio: • Use the p and q keys to highlight the “Decoder Status” field. • Press the MENU-key. • Use the p and q keys to highlight the “TV Aspect Ratio” field. • Press the MENU-key. Decoder Status 1-4-1 TV Aspect Ratio DiSEqC Change All Channel Clear System Information Setup Value 4:3 16 : 9 MENU/EXIT • • Use the t and u keys to select the aspect ratio, 4:3 or 16:9, for your television set.
Setting Up and Programming the Digital Receiver • Press the MENU-key. • Use the p and q keys to highlight the “OLD” DiSEqC-setting. • Use the t and u keys to transit to the “NEW” field. • Use the p and q keys to select the new DiSEqC-setting. • Press the MENU-key to confirm your selection. • Press the EXIT-key. Clearing the Receiver’s Memory: CAUTION: If this procedure is performed, all saved settings will be deleted and the receiver will have to be reprogrammed.
Setting Up and Programming the Digital Receiver The displayed data concerns the revision of the decoder firmware current at the time the receiver was manufactured, which might be of value if the receiver should ever require servicing. • Press the EXIT-key to exit the “Decoder Status“ menu. 7.5 Automatic Channel Preselection 7.5.1 Selecting the Satellite to be Used NOTE: Four satellites have been factory preprogrammed.
Setting Up and Programming the Digital Receiver 7.5.2 Adjusting the DiSEqC-Controller and/or the 22-kHz Control Signal NOTE: This adjustment is used for selecting the correct segment of the frequency bands. The DiSEqC-controller, which may be used only if the satellite system in use is equipped with a DiSEqC-switch, incorporates the correct settings for all of the various parameters involved: upper/lower band, horizontal/vertical polarization, and the type of satellite system involved.
Setting Up and Programming the Digital Receiver 7.5.3 Entering the Low-Noise Block (LNB) Converter’s Local-Oscillator Frequency Commercially available satellite systems employ so-called “general-purpose” LNB’s that employ a localoscillator frequency of 10,600 MHz for their upper band. In the event that your LNB uses some other local-oscillator frequency, you may set up your receiver to accommodate it as follows: • Use the p and q keys to highlight the “LNB Local Freq“ field: • Press the MENU-key.
Setting Up and Programming the Digital Receiver • Cautiously realign the antenna until the triangular figure reaches maximum size. You will then have the best-possible reception of the broadcast signal. If the legend “[UNLOCK]” should appear following “[STATUS],” check the cabling interconnecting the antenna and the receiver and the parameter settings covered in the preceding sections. • 7.5.5 Press the EXIT-key to exit this menu. Automatic Channel Search Once the settings covered under Sections 7.5.
Setting Up and Programming the Digital Receiver 7.6 Manual Channel Preselection 7.6.1 Entering the Downlink Frequency Once the settings of Sections 7.5.1 through 7.5.4, above, have been concluded, you may manually preselect any of the channels falling within the various preset downlink frequency bands, as follows: • While in the “Installation“ menu, use the p and q keys to highlight the “Manual Search” field. • Press the MENU-key.
Setting Up and Programming the Digital Receiver 7.6.2 Entering the Symbol Rate • Use the p and q keys to highlight the “Symbol Rate“ field and then press the MENU-key to confirm your selection. Manual Search 1-3-6-2 Down Frequency Symbol Rate LNB Polarity Start Search Setup Value 28.100 MHz MENU/EXIT • 7.6.3 Use the numerical keys to enter the desired symbol rate (SR) (refer to satellite-television magazines for lists of symbol rates). • Pressing the EXIT-key will delete the entire entry.
Setting Up and Programming the Digital Receiver 7.6.4 Conducting a Manual Search Once the settings of Sections 7.6.1 through 7.6.3, above, have been concluded, you may initiate a manual search. • Use the p and q keys to highlight the “Start Search“ field. Manual Search 1-3-6-4 Down Frequency Symbol Rate LNB Polarity Start Search Setup Value Search OK DF:4000 SR:28.125 New:18 EXIT • Press the MENU-key to start the search.
Operating the Digital Receiver 8 Operating the Digital Receiver Once all of the above settings have been made, your receiver will be ready for use. NOTE: Digital television broadcasting involves the transmission and processing of large quantities of data. Switching from one channel to another thus takes a bit longer than in the case of analog television broadcasting. An hourglass or the text message “Please wait” will appear onscreen during this waiting period. 8.
Operating the Digital Receiver 8.3 Using Channel Directories Due to the large number of digital television channels, channel directories are used for selecting channels and arranging them in preferred orders. 8.3.
Operating the Digital Receiver Moving Channels: Favorite Video – Edit P001 GDTV TV (PIG) P002 Hunan SRTV P003 DW-tv P004 MCM Information P005 RAI internation Networkname Frequency Symbol Rate MOVE DELETE • Use the t and u to highlight the “Move” field. • Press the MENU-key to confirm your selection. • • Either use the p and q keys to select the channel to be moved or enter its channel number using the numerical keys. Press the MENU-key to highlight the channel to be moved.
Operating the Digital Receiver Favorite Video – Edit P001 GDTV TV (PIG) P002 Hunan SRTV P003 DW-tv P004 MCM Information P005 RAI internation Networkname Frequency Symbol Rate MOVE DELETE • Use the p and q keys to highlight the channel to be deleted. • Press the MENU-key. The channel involved will be displayed in blue. • Press the “1“-key to delete the channel, or press the “0”-key to abort the deletion procedure.
Operating the Digital Receiver 8.4 Adjusting the Volume of the Sound Track/Muting • Press the MUTE-key to mute the sound track. MUTE • • Either press the MUTE-key a second time or press the volume-control key (u) to cancel muting and restore the sound track. Use the t and u keys to adjust the volume. VOL. 15 The volume setting will be displayed in terms of a range (MIN, 1 - 30, MAX). The display will disappear from the screen if no volume adjustments have been made for several seconds. 8.
Operating the Digital Receiver • • Use p and q keys to select the language desired. • Use the p and q keys to select one of the following options: Press one of the t or u keys to highlight the right-hand field. Stereo (L+R) Mono1 (L+L) Mono2 (R+R) Swap (R+L) • 8.7 – – – – Left and right stereo channels Left stereo channel only Right stereo channel only Left and right stereo channel interchanged Press the AUDIO-key a second time to confirm your selection.
Operating the Digital Receiver This information largely consists of programming schedules, along with additional information provided by broadcasters, such as: Version 1.
Programming the Remote Control 9 Programming the Remote Control The remote control may be programmed using two different methods, either by entering a three-digit manufacturer’s code (manufacturer’s ID) taken from the addendum or by means of a systematic search. Method 1: Entering the Manufacturer’s Code: Step 1: Press the SET-Taste and hold it depressed for about 3 seconds until the red LED illuminates.
Troubleshooting Tips Step 4: Press the SET-key to save the setting. The red LED will blink three times and then be extinguished. If nothing happens, repeat Steps 1 through 4. When programming of the remote control has been concluded: • • 10 The red LED will briefly illuminate. You may then use the remote control for controlling the device, as specified in the table of Section 4.1, above, for the particular type of device involved.