Users Guide GB Read these instructions carefully before using this appliance. • Retain for future reference. RADIX shall not be liable for damages resulting from improper use of this appliance. RADIX Electronic Vertriebs-GmbH • D-61381 Friedrichsdorf • F.R. Germany Version 1.
Introduction 1 Introduction Thank you for purchasing your RADIX E P S I L O N 1 FTA digital satellite receiver. In doing so you have chosen an appliance built for the future, allowing you to take advantage of numerous programmes and additional services such as electronic programme guides which will eventually replace conventional analogue transmissions. All RADIX products are manufactured to the highest standards at our ISO 9002 accredted manufacturing plants.
Contents 2 Table of Contents Section Content 1 2 3 4 4.1 4.2 5 5.1 5.2 6 6.1 6.2 6.3 6.4 6.4.1 6.4.2 6.4.3 6.4.4 6.5 6.5.1 6.5.2 6.5.
Important Safety Notes 3 Important Safety Notes This appliance is designed exclusively for receiving satellite signals. It must not be used for any other purpose. Keep the appliance out of reach of children. To avoid injury and to avoid damaging your receiver, please note the following: DANGER: Do not remove cover - risk of electric shock! All repairs must be carried out by authorised service personnel.
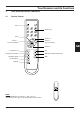
Your Receiver and its Functions 4 Your Receiver and its Functions 4.1 Remote Control Power Number Keys Menu Channel “+“ Volume “–“ Selector (backward) Volume “+“ Selector (forward) GB Channel “–“ Programme List Programme Information Programme Guide Exit Audio-Mode (Channel Allocation) Mute Last Programme TV/Radio NOTE: When fitting batteries, match the + and - signs on the batteries to the signs on the inside of the remote control Version 1.
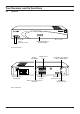
Your Receiver and its Functions 4.2 Receiver Power Programme Select 4-Digit LED Programme Number Display Front of Receiver Auxiliary Video Output SCART Socket for TV RF INPUT +13V/+18V 400mA MAX.
Installing Your Receiver 5 Installing Your Receiver 5.1 Before You Start CAUTION: Do not place the receiver near any heat sources or in strong sunlight. Protect all cables from damage caused, for example, by sharp edges. This appliance must only be used with a mains voltage of 230 V (± 10%), 50 Hz. Install the antenna in accordance with the manufacturers instructions.
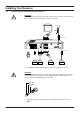
Installing Your Receiver 5.2 Connecting the Antenna and Other Devices CAUTION: Do not connect the receiver to the mains until you have correctly connected your VCR, TV and any other analogue receiver you may have. Antenna TV F-Type Connector WARNUNG: AC95~265V 50Hz MAX30W AVERTISSEMENT: RF INPUT +13V/+18V 400mA MAX.
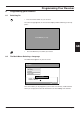
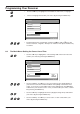
Programming Your Receiver 6 Programming your Receiver 6.1 Switching On • Press the Power button on your receiver. The ON message appears on the receivers display and the following screen appears: Press MENU key to setup GB • 6.2 Press the Menu key to confirm your choice.
Programming Your Receiver • Use the CH -key to highlight the first field of the main menu, "Language." • Choose a language and confirm your choice by pressing the MENU-key. Main Menu 1-1 Language Time Setting Installation Decoder Status Language English MENU/EXIT • Scroll through the list of languages using the CH -key and CH -keys and choose ”Deutsch”, ”English”, ”Français” or ”Italiano”. Now press the Menu key to confirm. 6.
Programming Your Receiver 6.4 The Main Menu: Setting Decoder Status • Use the CH -key to highlight the "Decoder Status" field of the main menu and confirm your choice by pressing the MENU-key. 6.4.1 Selecting a TV Aspect Ratio • Use the -key or -key to highlight the "TV Aspect Ratio" field of the main menu and confirm your choice by pressing the MENU-key.
Programming Your Receiver 6.4.3 Clearing the Receiver's Memory CAUTION: Clearing the receiver's memory will delete all settings that have been made and the receiver will have to be reprogrammed. • Highlight the "All Channel Clear" field and confirm your choice by pressing the MENU-key.
Programming Your Receiver 6.5 The Main Menu: Installation - Automatically Installing Television Channels Before the receiver will be able to receive any digital television channels, they will have to be loaded into its memory. To make searching for television channels as simple as possible, the most common reception mode (ASTRA, General-Purpose LNB, DiSEqC A) has been preselected.
Programming Your Receiver Installation 1-3-2 Satellite Signal Stength LNB Lokal-Freq Auto Search DiSEqC/22KHz Manual Search Setup Value UNIVERSAL MHz MENU/EXIT … • Use the -key or -key to highlight one of the preset frequencies or enter your LNB-converter's local-oscillator frequency using the numerical keys. • Confirm your choice/entry by pressing the MENU-key. 6.5.
Programming Your Receiver Installation 1-3-3 Satellite Signal Stength LNB Lokal-Freq Auto Search DiSEqC/22KHz Manual Search Setup Value 22KHz A DiSEqC AUTO MENU/EXIT • Use the -key or -key to switch the "22 kHz" option on or off or to select the desired DiSEqC-controller and confirm your choice by pressing the MENU-key. • In order to be able to receive the largest number of channels, you will have to repeat the automatic channel-search procedure (cf. Section 6.5.
Programming Your Receiver When the search has been concluded, the clock will disappear from the screen and the message "Search OK" should appear onscreen. If instead of this message the message "Search fail” should appear onscreen, then the settings made above will have to be checked, one after the other, in the order in which they were made and corrected wherever necessary until the search is successful. • Press the EXIT-key to exit this menu and view a list of those channels that were found. EXIT 6.
Programming Your Receiver 6.6.2 Entering the Symbol Rate • Use the and -keys to highlight the "Symbol Rate" field and then press the MENU-key to confirm your selection. Manual Search 1-3-6-2 Down Frequency Video PID auto Symbol Rate Audio PID auto LNB Polarity Start Search Setup Value 28.100 MHz MENU/EXIT … • Use the numerical keys to enter the desired symbol rate (SR) (refer to satellitetelevision magazines for lists of symbol rates). • Pressing the EXIT-key will delete the entire entry.
Programming Your Receiver 6.6.3 Selecting the Polarization NOTE: If a DiSEqC-controller is in use, this setting will be preset by the controller and thus need not be repeated. • Use the and -keys to highlight the "LNB Polarity" field. • Press the MENU-key.
Programming Your Receiver 6.6.5 Setting Audio PID-Codes • Use the -key or -key to highlight the "Audio PID" field. … • Enter the desired PID-code using the numerical keys and confirm your entry by pressing the MENU-key. Manual Search 1-3-6-5 Down Frequency Video PID auto Symbol Rate Audio PID auto LNB Polarity Start Search Setup Value 0 EXIT GB 6.6.
Programming Your Receiver The message "Search concluded" will appear onscreen when the clock disappears. However, if either of the messages "Out of search range." or "Search failed." should appear onscreen, check the settings you have made one after the other, correct them, and continue correcting them until the search is successful. • Press the EXIT-key to exit this menu item. EXIT 6.6.
Programming Your Receiver Installation 1-3 Satellite Signal Strength LNB Lokal-Freq Auto Search DiSEqC/22KHz Manual Search Setup Value Satellite ASTRA LNB Lokal UNIVERSAL DiSEqC A AUTO MENU/EXIT INFO … • Press the Info-key on your remote control unit and then enter the password, 9-8-1-5, using the numerical keys. • Confirm your entry by pressing the MENU-key.
Programming Your Receiver 6.7.2 Adding Another Transponder • In the "Transponderdate – Edit" menu, highlight a satellite and confirm your selection by pressing the MENU-key. Transponderdate - Edit 01 ASTRA \ TP H/V SR 02 EUTELSAT 49 12582 V 22.000 03 ASIASAT2 50 12670 V 22.000 04 PANAMSAT2 51 - - 05 PANAMSAT4 06 INTEL602 07 INTEL604 08 INTEL703 MENU/EXIT • Press the -key to enter the table on the right and then highlight its last line by pressing the MENU-key.
Programming Your Receiver 6.7.3 Adding Another Satellite If you would like to add another satellite to those that have been factory-installed, then you will have to perform the following procedures before undertaking the procedures stated under 6.7.2 above: • In the "Transponderdate – Edit" menu, highlight the line immediately beneath the last satellite listed and confirm your selection by pressing the MENU-key.
Using your Receiver 6.7.5 Deleting a Transponder NOTE: Deleting all data for a satellite will delete the satellite. • In the "Transponderdate – Edit" menu, highlight a satellite and confirm your selection by pressing the MENU-key. • Highlight a field in the table. Transponderdate - Edit 01 ASTRA \ TP H/V SR 02 EUTELSAT 49 12582 V 22.000 03 ASIASAT2 50 12670 V 22.000 04 PANAMSAT2 51 12260 H 22.000 05 PANAMSAT4 52 12222 V 27.
Using your Receiver 7.2 Selecting Channels … • Use the number keys to select the channel of your choice (see also ”Programme Lists” in Section 8). NOTE: Although channel numbers have three digits, e.g., 001, you may enter either single-digit, double-digit, or triple-digit channel numbers, e.g., 1, 13, or 135, and the receiver will adjust to your entry after three seconds have elapsed. • Use CH -key to move to the next highest channel. Use the CH -key to move to the next lowest channel.
Programme Lists and Information 7.5 Selecting the Audio Mode Several broadcasters transmit their TV programmes in different languages and audio formats. AUDIO • Press the Audio key and select the field on the left using the volume keys or to choose one of the available languages: Audio Modus Stereo (L+R) BL 1: • Use the channel keys or to change the language setting. • Use the volume keys or to select the field on the right.
Programme Lists and Information You can use the following functions: • Use the volume keys or to scroll or to place a programme. • Use the channel select keys or to select or to place a programme. • Press the FAV key to create or change your list of favourites (see Section 8.2). FAV • Press the Radio key to switch to radio mode. RADIO • Press the INFO key to see programme information. INFO • Press the Menu key to store your programme list. … • Use the number keys to select a programme directly.
Programme Lists and Information 8.2 Editing your Programme Lists (List of Favourites) The following steps apply to both TV and Radio modes. At the bottom of the screen, you can see a list of function keys for this screen: Change (arrow or number keys), Confirm (Menu key), Close menu (Exit key). 8.2.
Programme Lists and Information Favorite Video – Edit P001 GDTV TV (PIG) P002 Hunan SRTV P003 DW-tv P004 MCM Information P005 RAI internation Networkname Frequency Symbol Rate MOVE DELETE • Confirm the deletion by pressing the MENU-key. Continue, following the procedures stated under Section 8.2.1, above. 8.3 Programme Information GB Digital television allows broadcasters to transmit an electronic TV guide and other additional information along with the signal.
Trouble Shooting EBU Information: Teletext Subtitles Teletext Subtitles Subtitles (4:3) Subtitles (16:9) Subtitles (2.21:1) Suitability: Over 7 years of age Press the Exit key to stop the programme operation. EXIT • Use the channel select and volume keys , , or to select the appropriate options and display the additional information. • Press the Exit key to exit the programme overview.
+12 -12 -11 -10 -9 -8 -7 -6 -5 -4 -3 -2 -1 GMT +1 +2 +3 +4 +5 +6 +7 +8 +9 +10 Zeitzonen -3 -4 -10 +7 -9 -7 +10 +9 11.1 Time table Version 1.0 +11 +11 +5 +1 +3 -8 +4 -10 -6 +1 -3.30 -5 +8 +2 +6 +3.30 +4.30 +8 +5.30 +6.30 +1 +4 +7 +3 -5 -4 +2 -3 +8 +9.
Appendix 11.2 Technical specification TUNER IF Input frequency IF Loop through output IF Bandwidth Input impedance Input signal level LNB Polarization swiching voltage Band switching I/Q Output FRONT-END DEMODULATOR Demodulation capacity Symbol rate Viterbi decoding rate Reed solomon decoding TRANSPORT DEMULTIPLEXER Demultiplex max. input stream PID Handling capability SI Filtering 920...2150 MHz 920...2150 MHz 36 MHz 75 ohms - 65 dbm...