Installation manual E2R SYSTEM Program Manual number: ITKI-15-02-03-14-PL MANUFACTURER OF ELECTRONIC WEIGHING EQUIPMENT RADWAG, 26 – 600 Radom, 28 Bracka Street POLAND phone +48 48 38 48 800, phone/fax. +48 48 385 00 10 Sales Department +48 48 366 80 06 www.radwag.
Contents 1. SOFTWARE INSTALLATION .............................................................................. 3 1.1. Database....................................................................................................... 3 1.2. System requirements .................................................................................... 4 1.3. Installation..................................................................................................... 5 1.4. Updating................................
1. SOFTWARE INSTALLATION 1.1. Database The installed database motor is MS SQL Express 2008 R2. E2R SYSTEM database on a new computer is always created on a system disc. NOTE! Constraints of a free version MS SQL Express 2008 R2 : • Service of one multi-core processor, • Max 1 GB of operational RAM, • Max 10 GB for every database.
NOTE! Max number of records depends also on other tables size in a database, therefore, the real records number might vary from the determined number. 1.2.
NOTE! 1. It is not recommended to install other programs on the computer. 2.
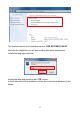
The manual features the installation version „E2R SYSTEM 13.08.28”. After the file installation you will see a dialog box which enables the installation language selection: Accept the language selection with ‘OK’ button. In the further part of the installation, follow the instructions displayed in the boxes.
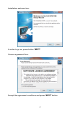
Installation welcome box: In order to go on, press button ‘NEXT’. Licence agreement box: Accept the agreement conditions and press ‘NEXT’ button.
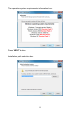
The operation system requirements information box: Press ‘NEXT’ button.
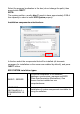
Select the program localization in the box (do not change the path), then press button ‘NEXT’. NOTE: The system partition, usually disc-C needs to have approximately 3GB of free capacity in order to install E2R System properly. Installation components selection box: In the box select the components that will be installed (all elements necessary for installation on the server are enabled by default), and press ‘NEXT’ button. E2R SYSTEM installation types: BASIC / SERVER - WINDOWS INSTALLER 4.
The Software installation version with the online monitoring, intended for installation on additional computers in the network CLIENT / ONLY E2R SYSTEM - ONLY DATABASE - Installation of MS SQL Express 2008 R2 databases motor ONLY E2R SYNCHRONIZER - Only Synchronizer and Manager installation. In ER2 System one Synchronizer and Manager can work at the same time. ONLY DATA SYNCHRONIZING MODULE - Installation of database synchronization module for the data exchange with external programs.
Menu Start folder selection box: Press ‘NEXT’ button. Additional tasks box during installation: Select additional tasks to do during the module installation in the box. If E2R SYSTEM has already been installed, it is not necessary to install Database Files. When the tasks are selected, press ‘NEXT.
Box ready for installation: Press ‘INSTALL’ to start the installation process. Program installation finish box: When the installation is complete, it is necessary to restart the computer and this option is selected by default. Press ‘FINISH’ to stop.
During the software installation the following elements are also installed: • E2R_System (SQL base) database, • E2R Synchronizer, • E2R Manager, • Moisture analyzer on-line monitoring, • MSD. 1.4. Updating When the program installator is activated, E2R synchronizer service is automatically stopped and uninstalled. When the actualization process is over, the service startup is activated automatically. During the update follow the program installation instruction.
2. PROGRAM CONFIGURATION Another operation inevitable for the proper operation of E2R SYSTEM is, among others, the scale configuration in the system. It can be carried out in two ways: in a simple way, using E2R MANAGER or E2R SYNCHRONIZER ADMIN. It is recommended to configure the scale by means of E2R MANAGER available in the software (online preview option) after logging in or in the start menu directly. 2.1.
The main program box: In the top bar of the application there is information about the program versions included in RADWAG Synchronizer. The following boxes are displayed: Install service Before RADWAG Synchronizer service activation, it should be installed in the MS Windows system.
Uninstall service Uninstalling RADWAG Synchronizer service from the MS Windows system. Run server RADWAG Synchronizer service server activation Stop server Stopping the server responsible for communication with scales. Language Language selection box, the following languages are available: Polish, English, Spanish and Russian. After changing the language it is necessary to restart the program. Save The selected language saving. Note: the language is changed only after the program restart.
• On the server activation, you will see the Stop Server button, which means it was successfully activated. 2.1.1.2. Restart E2R Synchronizer service • Press Stop Server button. • After 5 seconds press Run Server button. • On activating the server, you will see Stop Server button, which means it was successfully activated.
2.1.1.3. Uninstalling E2R Synchronizer service. • Press Stop Server button. • Press Uninstall service button. • On the uninstalling service completion, you will see Install service button. 2.1.2. E2R SYNCHRONIZER server parametres In Parametres bookmark set up parametres of the MSSQL server with which the scales are connected. On the program installation move to Parametres bookmark.
Connect with the database to configure the scales, press Connect button. Parametres bookmark: Server Access path to SQL server. Local server by default: 127.0.0.1\BAZARADWAG2008R2 Database Database name, by default: E2R_SYSTEM Login The database user name; by default: sa Password User password, by default: Radwag99 Workgroup Scales workgroup used for complex systems. By default: Synchronizer.
File Scale messages language selection. TCP Port TCP port used by E2R Manager. By default: 4004. Login The E2R Manager program user name. By default: blank, no safety lock. Password The E2R Manager program user password. By default: blank, no safety lock. Caution: If the SQL database is installed on another computer, insert this computer IP in the Server box, e.g.: 192.168.1.1\BAZARADWAG2008R2 On doing all the changes in the Parametres bookmark, press Save button.
2.1.3. Adding new scales In order to configure the scales, connect with the database pressing Connect button. After connecting with the database, it is possible to add new scales to Synchronizer in Scales bookmark. Press Add button to add a scale.
On pressing the button the scale edition box which should be filled in following the below screenshot. Adding a new scale is shown on the example of HTY scale. Other scales that should be synchronized with E2R System are added in the same way. The scale settings: Name Type Config Edition Ident.
Type Serial Nr. Adres Numer platformy Type of connection with the scale: • Radwag.Devices.PUE7.PUE7Encoder – Connection of industrial scales WLY, WPY and HTY series with the standard program, • Radwag.Devices.PUE7.PUE7KtpEncoder – Connection of industrial scales WLY, WPY and HTY series in the CPG mode, • Radwag.Devices. PUE7.
Using Edit button, activate the box in which you can set up the communication interface parametres with the scale.
Caution: All the above settings should be checked with the scale settings and communication port from MS Windows System. If during a scale adding (on pressing Save in the scale adding box) the below message is displayed, it means that the inserted ID already exists in the database. In this case you need to change the scale ID and press Save again. 2.1.4.
On pressing Remove you will see a request: The repeated request minimizes the risk of accidental removing the scale from the Synchronizer. On pressing Yes the scale will be removed from the Synchronizer list. Edit button opens the selected scale box (the same like by adding a new scale) and allows to change the selected scale settings in the Synchronizer. 2.1.5. Global settings and Scale settings CAUTION: Some parametres are intended for service and were described in the service manual.
0 Setting value 1 will send to PUE_C41 scale ID from the database as the scale code; • The name of product on the scale = the name of product from the computer • The code of product on the scale = ID name of product from the computer It is used when the operator’s code is longer than 6 characters; the operator’s code for the scale cannot be longer than 6 characters.
Synch_LososTara 0 pue41_licznik_reset 0 Pue5OrderPermit 1 Pue5Transaction Permint 1 Setting the parametre on value 1 will turn on the function of product tare restoring from the database after the WPW scale clearing. Setting the parametre on value 1 will reset the statistics on WPW scales.
Control lamp progi_z_reki 0 0 Setting the parametre on value 1 will set up PUE4-L scale working mode as a controlling scale Setting the parametre on value 1 will use the thresholds set manually on the scale and not the thresholds from the product. On introducing all the changes (adding scales and parametres changes), restart the server following issue 2.1.1.2. of the user manual. After saving the changes, move to Windows Service bookmark and check if RADWAG Synchronizer Server works properly.
All messages are only informative, which makes it impossible to save or print them out. This user manual features only the button options regarding configuration; the further information is described in the user manual of every program module. After installing E2R SYSTEM, in the start bar the shortcut to the program will be created. Besides, on pressing option Scale Preview, the program is available in E2R SYSTEM.
2.2.1. Settings of connection with E2R SYNCHRONIZER Box of settings activated from option File, Software Settings. In the box set up the address and the computer communication port where the service of communication with scales (server) was activated. Server IP address Computer IP address where Synchronizer is activated Server port Computer TCP port where Synchronizer is activated Language E2R Manager program language Ping IP Checking the connection with the selected IP address.
If E2R SYNCHRONIZER is installed on the same computer as E2R MANAGER, do not change the default IP address 127.0.0.1. Change the default port of server 4004 only when it was earlier changed in E2R SYNCHRONIZER, according to the below screenshot. It is also possible to change the language, in option Language. The following languages are available: PL EN DE ES RU Polish English German Spanish Russian On introducing the changes, save them pressing the button Save and turn off the program.
2.2.2. Scales configuration 2.2.2.1. Scales Configuration of scales is carried out on selecting option Scale in the menu Scales configuration. A list of scales working in the system is displayed in the box Scales configurations (Synchronizer). On the below list mark the scale you would like to edit or remove. Functions of buttons in the box of scales configuration. Edition of the scale selected from the list. Adding the scale to the system. Removing the scale from the list.
2.2.2.1.1 Adding the scale In the configuration box press the button all required blanks.
Order address Address set up on the scale, by default 1. Scale symbol The scale symbol on the scale overlay, required among others in the CPG system. Serial number The scale serial number. Parametres descriptions The box for the scale parametres: Max, Min, d, e. Required among others in the CPG system. Connection name A name of communication interface. Connection type Selection of interface type connected with the scale: Serial – scale connected by RS232, Ethernet – scale connected by Ethernet.
Save the changes pressing the changes pressing 2.2.2.1.3 button, or exit the box without saving button. Scale removing In the configuration box select the scale you would like to remove and press button. Confirm the message pressing YES. CAUTION! After removing the scale information about the scale is also removed from the weighing reports, so be careful which scale you remove. 2.2.2.1.
Turning the option on and off using the buttons: Option on, Option off. • Public Public options are available by default and their setup does not influence the system work. Carry out the full update of products Forcing the complete update of products on the selected scale The update of products on the scales is carried out systematically and using this parametre is not necessary. • Service Service options are available on pressing Service button.
Activating the update of tare, thresholds, mass from the selected scale to the system, Enable updating from scale Enable tare updating from scale Enable limits updating from scale Enable nominal mass updating from scale The product tare update from the selected scale to the system, Update of the product thresholds from the selected scale to the system, Update of the product nominal mass from the selected scale to the system, Use limits from scale instead of system ones Option allowing to work with the
Version No ...
2.2.2.2. Global options System configuration can be carried out on selecting Global options in menu Scales configuration. In the box Server global options you will see a list of available parametres. On activating the global options, three groups of options among others Public, Service and Development are available in the left bottom corner of the box. Turning the option on and off using the buttons.
Option on, Option off. • Public Public options are available by default and their setup does not influence the system work. . Forcing the connection restart with scales to update the databases Carry out connection restart with scales • Service Servic options are available on pressing Service.
Enable nominal mass updating from scale Option that enables the update of tare, limits, mass from the scale to the system Option that updates the product tare from the scale to the system Option that updates the product nominal mass from the scale to the system Option that updates the product tare from the scale to the system Restoring tare after zeroing (WPW) Option that restores the product tare value after zeroing Synchronization of transactions on scale PUE5 Default option of transaction synchroniz
CAUTION! On WPW scale the field limitation does not allow to create codes longer than 6 characters. • Developer Developer (program) options are available on pressing Developer. Options are informative and should not be modified. Version no of database ... No of database version from the system, on the basis of this number databases are synchronized on scales. 2.2.3.
2.2.3.1. Restart local synchronizer Option available on computer on which E2R SYNCHRONIZER is activated. It enables to reload the server configuration and update files on the scales. In Server menu select Restart local synchronizer. Next confirm the message with a request. Confirm the below message. 2.2.3.2. Send messages to scales. It is possible to send one message to all scales working in the system. In menu Server select option Send messages to scales.
Time of displaying messages can be set up from 3 to 3600 seconds. To send the message press Or close the box pressing button, button. On all scales in the system you will see the following message. 2.2.4. Symbol and status of scales in E2R Manager. Status informing about starting computer - scale communication: Communication with scale initiated, Proper settings on scale, Proper scale settings in E2R Synchronizer.
When the system is in operation you can restart the scale by double-click on a selected scale symbol in E2R Manager. After several seconds the scale is reconnected to the system and all scale files are updated. 3. E2R SYSTEM The manual was created on the basis of E2R SYSTEM in 13.8.28. version and might slightly differ from the scale you have. 3.1. Program startup The program can be activated from a shortcut on the desktop or from the menu: START/PROGRAMY/RADWAG/E2R SYSTEM/E2R SYSTEM 3.1.1.
Select the module from the list and press Set the Selected Module. If you have a licence it is recommended in the beginning to activate the selected module and set this module later. 3.1.2. DEMO box E2R SYSTEM after installation is a demo program with all modules available for 30 days of trial period. In the startup box pressing RUN DEMO button, you can run a demo version or select the module selection window where you can activate the licence pressing WINDOW SELECTION MODULE button.
3.1.3. Module activation Every module activation is done only once and until the program another activation it will not be repeated. In case of a multi-stand version, activation must be carried out on every computer individually. Select the module from the list, in the box Enter Key insert the key manually. Next, using Assign a key to the Module button, activate the selected module. Another, simpler way to activate the program is indicating the licence file with *.button extension.
The licence will be displayed in box Enter Key. Select the proper module and press Assign a key to the Module button.
If you assign an improper module to your key, the following message will be displayed. The successfully completed activation process will generate the following message. Finally, the program full version will be assigned to our module on the module list. Before closing, select the module and press Set the Selected Module.
3.2. Program settings Activate the settings pressing button in the top bar. 3.2.1. Database In order to activate database settings, click module Settings. button in Database settings feature the following functions: • • • Check Connection, Configure Connection, Save and Recreate Database. In the top bar of the box you can see the status of connection with the button to stop. database.
3.2.1.1. Configure connection in the databases settings box, you will see On pressing database settings connection with the database. It features the following fields: Server (IP) Base User Password IP or server name on which SQL server is activated (if the database has the determined instance, insert it as well).
On closing the database settings, you will see the information about the program restart, which should be confirmed by pressing OK. 3.2.1.1.1 Database copy The full copy of SQL database can be formed on the computer on which the SQL database motor is activated. In the box Database Settings press Perform Database Backup. In the navigation window select the destination of the database copy backup.
Next the following message will be displayed. 3.2.1.1.2 Restore the latest copy of the database. Restoring the full SQL database can be done on the computer on which the SQL database motor is activated, like in case of a copy. To do that, in the box Database Settings press Restore the latest copy of the database button. Pressing YES, confirm the message with a request. In the navigation window, select the destination of the database copy where the database will be restored.
Depending on the database size, the operation takes several seconds, and the successful completion is confirmed with the below message. CAUTION! During the database restoring, all the data in the existing database will be deleted, and the restored data will be exactly the same as the data in the moment of making the copy.
MANUFACTURER OF ELECTRONIC WEIGHING INSTRUMENTS RADWAG Balances & Scales 26 – 600 Radom Bracka 28 POLAND phone. +48 48 38 48 800 fax. + 48 48 385 00 10 Sales Department + 48 48 366 80 06 www.radwag.