
User manual

- 84 -
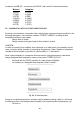
On enabling the printout editing mode select a number of a non-standard printout (1-4) and
the place for the beginning of text in a printout (text strings from 1 to 80). Then, go to option
Edit to design a printout template or Erase all to erase all designed printout templates.
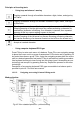
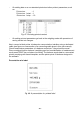
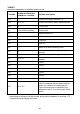
Fig. 63. Printout editing – selecting printout components
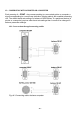
Use navigating arrow keys (up and down) to move the cursor between the following
fields. Press RIGHT ARROW KEY to add a selected component to a printout template.
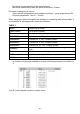
On completing editing of a printout template press ENTER/PRINT key. The display shows
a message asking whether to create a printout template – once again press ENTER/PRINT
key to confirm.
18.2.3. Activating non-standard printouts
If an active printout template is set to STANDARD, then a printout comprises data on
measured mass and variables declared in the GLP menu (see point 18.1 Standard
printout – Fig. 60. Declaring variables for a printout – submenu GLP).
If a user wants to enable a non-standard printout template (1 to 4), then they need to select
a non-standard printout template and specify its beginning and end (the text strings of
printout start and stop).