
User's Manual
Table Of Contents
- 1. Standard Contents
- 2. General Information
- 3. User Interface
- 4. Wireless Control And Submenus
- 5. Battery
- 6. Turning The QRAE 3 On And Off
- 7. Modes Of Operation
- 8. Programming
- 8.
- 8.3.2.1. Multi Bump
- 8.3.2.2. Multi Zero
- 8.3.2.3. Multi Span
- 8.3.2.4. Single Bump
- 8.3.2.5. Single Zero
- 8.3.2.6. Single Span
- 8.3.2.7. Set LEL Cal. Gas
- 8.3.2.8. Set Span Value
- 8.3.3. Measurement
- 8.3.4. Datalog
- This operation erases all data stored in the datalog.
- Note: Once the datalog is cleared, the data cannot be recovered.
- Data Selection allows you to select which types of data are stored and made available when you download your datalog to a computer via ProRAE Studio II (version 1.7.0 or higher) software.
- You can choose any or all of four types of data (you must choose at least one):
- Minimum
- Average
- Maximum
- Real Time
- The instrument offers two options for starting the datalogging process:
- Auto Automatically collects datalog information every time the instrument is sampling until the datalog memory is full.
- Manual Datalogging occurs only when you manually initiate it (see below for details).
- When the instrument is set to Manual Datalog, you can turn datalogging on and off by repeatedly pressing [MODE] and stepping through the screens from the main display until you reach the screen that says “Start Datalog?”
- When you reach the screen that says “Start Datalog?” press [Y/+] to start it. You see “Datalog Started,” confirming that datalogging is now on.
- If datalogging is running, it says, “Stop Datalog?” Press [Y/+] to stop datalogging. Otherwise, press [MODE] to advance to the next screen.
- Date Month (MM) and Day (DD) have two digits each, while the year (YYYY) uses four digits.
- The display’s contrast can be increased or decreased from its default setting. You may not need to ever change the default setting, but sometimes you can optimize the display to suit extreme temperature and ambient brightness/darkness conditions.
- If the QRAE 3 is equipped with a pump, the pump can operate at two speeds, high and low. Running at low speed is quieter, extends pump lifespan, and conserves a small amount of power. There is almost no difference in sampling accuracy. Note: High spee...
- Choose and enter an 8-digit Site ID to uniquely identify the particular site where the instrument is to be used. The first four digits can be an alphabet letter or number, while the last four digits can only be numbers. This Site ID is included in the...
- Note: Advance through the alphabet and numbers (0 through 9) by one with each press of the [Y/+] key. To scroll quickly, hold down the [Y/+] key for as long as you want it to scroll rapidly. Save your changes by highlighting “OK” and pressing [Y/+].
- Enter an 8-digit alphanumeric User ID to uniquely identify a user. This User ID is included in the datalog report.
- Note: Advance through the alphabet and numbers (0 through 9) by one with each press of the [Y/+] key. To scroll quickly, hold down the [Y/+] key for as long as you want it to scroll rapidly. Save your changes by highlighting “OK” and pressing [Y/+].
- 9. Policy Enforcement
- 10. Calibration And Testing
- 10.1. Manual Alarms Test
- 10.2. Bump Testing And Calibration
- 10.3. Zero Calibration
- This operation sets the zero point of the sensor calibration curve for clean air. It should be performed before other calibrations.
- Note: If you use a zero air cylinder, you must use the QRAE 3 Calibration Adapter (and a T calibration tube if the instrument has a pump). Using a calibration adapter is not necessary for calibration in fresh air.
- 10.3.1. Zero Calibration
- 10.3.2. Single-Sensor Zero Calibration
- 10.4. Span Calibration
- 11. Datalog Transfer, Monitor Configuration, and Firmware Upgrades Via Computer
- 12. Maintenance
- 13. Alarms Overview
- In addition, the QRAE 3 alarms if one of the following conditions occurs: battery voltage low, pump blocked, etc.
- When the low battery alarm occurs, there may be approximately 10 minutes of operating time remaining. In this case, it is recommended that you promptly change or charge the battery in a non-hazardous location.
- Testing Alarms
- 14. Troubleshooting
- 15. Diagnostic Mode
- 16. Specifications
- 17. Controlled Part of the Manual for PGM-25XX/D
- Caution:
- Refer to RAE Systems Technical Note TN-114 for LEL sensor cross-sensitivities.
- Refer to RAE Systems Technical Note TN-144 for LEL sensor poisoning. Turning the PGM-25XX/D On
- Turning the PGM-25XX/D Off
- Alarm Signals
- The instrument is equipped with audible, visible, and vibration alarms. During its normal operation, the PGM-25XX/D compares gas concentrations to the programmed alarm limits for Low, High, TWA and STEL alarms. If the concentration exceeds any of the ...
- When a low-battery alarm occurs, there may be approximately 20 to 30 minutes of operating time remaining. However, it is recommended that you promptly change or charge the battery in a non-hazardous location.
- Testing Alarms
- Turning the PGM-25XX/D Off
- Programming Menu
- Zero Calibration
- Battery Replacement
- 18. Technical Support
- 19. RAE Systems Contacts
QRAE 3 User’s Guide
47
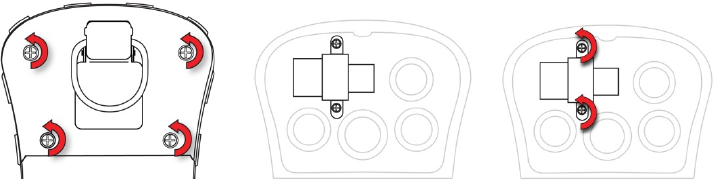
12.5. Replacing The Pump
If your QRAE 3 has a pump and it requires replacement, follow these steps. Make sure the
battery is removed before proceeding.
1. Remove the rear cover.
2. The pump is held in place by a metal bracket and two Philips screws. Remove the two
screws.
3. Lift off the metal bracket.
4. The pump has an inlet and outlet that fit tightly over two small pipes inside the pump cavity.
Pressing down on the instrument’s body with one hand, pull the pump straight out.
5. Press a new pump into place (a small amount of wiggling helps), making sure that both the
inlet and outlet from the pump fit snugly over the two pipes.
6. Place the metal bracket over the pump.
7. Insert and tighten the two screws that attach the bracket to the housing.
8. Replace the cover.
9. Turn on the instrument and check for proper pump operation.
13. Alarms Overview
The QRAE 3 provides an unmistakable five-way alarm notification system that combines local
alarms on the device with real-time remote wireless alarm notification to take worker safety to the
next level. Local alarms include audible buzzer alarm, visible alarm via bright LED lights,
vibration alarm, and an alarm notification on the display. These can be programmed or selectively
turned on or off.
13.1. Alarm Signals
During each measurement period, the gas concentration is compared with the programmed alarm
limits for Low, High, TWA and STEL alarm. If the concentration exceeds any of the preset
limits, the alarms are activated immediately to warn both the QRAE 3 user and a remote safety
officer (if wireless is enabled) of the alarm condition.
In addition, the QRAE 3 alarms if one of the following conditions occurs: battery voltage low,
pump blocked, etc.
When the low battery alarm occurs, there may be approximately 10 minutes of operating time
remaining. In this case, it is recommended that you promptly change or charge the battery in a non-
hazardous location.