SOHORAID Series SR3500 User’s Guide Date : Sep, 10, 2003 Version: 1.
STARDOM IDE RAID Solution Index Chapter 1:Introduction… … … … … … … … … … … … … … … … ..3 1-1. Functions and Features… .… … … … … … … … … … ..4 1-2. Product Specifications… … … … … … … … … … … … ..6 Chapter 2:Hardware Installation… … … … … … … … … … … … 7 2-1. Package Contents… … … … … … … … … … … … … … … ..7 2-2. System Requirements… … … … … … … … … … … .… … .8 2-3. Environment Requirements and Cautions… … .… .9 2-4. Installing HDD in the Carrier… … … … … … … … … … 10 2-5.
STARDOM IDE RAID Solution Chapter 1 Introduction SOHORAID (Redundant Arrays of Independent Drives) SR3500 provides disk mirror function (RAID Level 1) to secure data or RAID 0 to combine two drives’capacity for small offices or home offices. SR3500 provides you the most economic and reliable external IDE RAID subsystem connected with 1394a/1394b and USB2.0 interfaces to expand capacity or ensure the data security for enjoying digital IT network.
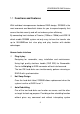
STARDOM IDE RAID Solution 1-1 Functions and Features With individual microprocessor hardware RAID design, SR3500 is the most economic and beneficial choice for you to expand capacity that assure the data security and will not reduce system efficiency. By connecting host interface of Firewire (1394a or 1394b) and USB 2.0 which enable SR3500 system not only easy to have the transfer rate up to 50~80MB/sec but also plug and play function with double advantages.
STARDOM IDE RAID Solution operation at RAID Level 1. ※ Duplication Hard Disk SR3500 can also use as hard disk duplication, fit on the usage of system duplicate and monitoring system offline data reserve at RAID 1. ※ Independent OS, Easy Installation Compatible with all systems which support firewire (1394a or 1394b) and USB2.0 operation system like Windows 98 SE, Windows Me, Windows XP, Windows 2000 and Mac 8.6 later.
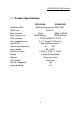
STARDOM IDE RAID Solution 1-2 Product Specifications Hardware RAID RAID level Host interface Host transfer rate HDD interface Hot swappable trays Cooling Fan Operating temperature Input voltage Dimension (mm) Weight Material LCD display HD Hot swappable Auto rebuilding SR3500-WA SR3500-WB 8032 microprocessor RAID ASIC RAID 0, 1 1394a 1394b+ USB2.0 50/56 MB/sec 80/56 MB/sec ATA133/UDMA133 E-IDE 2 x (1” height E-IDE drive) 6cm Ball Bearing Fan 0℃ ∼ 55℃ 90 – 240V 147(W) x 270(L) x 115(H) 4.
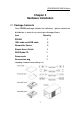
STARDOM IDE RAID Solution Chapter 2 Hardware Installation 2-1 Package Contents Your SR3500 package includes the following: please contact our distributors in case of any missing or damaged items.
STARDOM IDE RAID Solution 2-2 System Requirements ※ Hardware Requirements 1. Macintosh or PCs with FireWire IEEE-1394 Interface or USB 2.0 interface 2. ※ HDD with standard EIDE/IDE Interface O.S. Requirements 1394a: Mac OS 8.6 or higher Windows 98SE/ME/2000/XP USB2.0: Mac 10.2.6 or higher Window 98SE/ME/2000/XP 1394b : Mac 10.1.
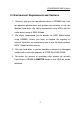
STARDOM IDE RAID Solution 2-3 Environment Requirements and Cautions 1. Certainly, you can use two different drives in SR3500, but it will get optimum performance and greatest convenience to use two identical hard disks. We highly recommend using HDDs with the same brand name at RAID 0 Mode. 2. We highly recommend you to decide the RAID Mode before using SR3500. Unless you want to expand the capacity of external hard disk, we recommend you to use the factory default RAID 1 Mode for data security. 3.
STARDOM IDE RAID Solution 2-4 Installing HDD in the Carrier Ÿ Set Master/Slave jumpers to MASTER (factory default). Ÿ Connect the power cord and the Removable Carrier’s EIDE/IDE interface cable to the HDD. Ÿ Inset the HDD into the Removable Carrier. Ÿ Fasten the HDD with the attached 6#-32 screws in their four locations. Place the power cord and the EIDE/IDE interface cable right than the surface of the HDD in order to avoid any hindrance when taking out the HDD.
STARDOM IDE RAID Solution 2-5. Connect SR3500 to Computer Ÿ Turn the SR3500 power off. Ÿ Connect power cord and 1394 interface cable to the host 1394 connector port or USB interface cable to the host USB connector port. Ÿ Turn the SR3500 power on. Ÿ Turn the host power on. Notice: Please make sure your system has installed the 1394 or USB2.0 interface and Driver.
STARDOM IDE RAID Solution Chapter 3 How to Use SR3500 3-1 RAID Level Setup SR3500 can be set for RAID 1 or RAID 0. It is unchangeable when it has been set, otherwise the data will be damaged. Therefore, before setting please consider your SR3500 system is going to be used to ensure the “data security” or “ expand storage capacity”.
STARDOM IDE RAID Solution will suppose that the SR3500 has a smaller capacity. Ÿ Installing an old HDD and a new one If installing an old HDD with a new one, please purchase the same brand and choose a disk capacity greater than or equal to the original one. SR3500 will automatically format a new HDD. The Auto-Rebuild Function will copy data to the new target HDD at RAID 1. 1. Install the original HDD into either the primary or the secondary bay of SR3500. 2.
STARDOM IDE RAID Solution Setup RAID 0 If replacing an old HDD with a new one, we recommend to purchase the same brand disk for the usage of RAID 0 Mode. Ÿ The capacity of the two drives is combined to become one logical drive. Ÿ The capacity of the logical drive is the double capacity of the minimum physical drive. Ÿ RAID 0 does not provide data redundancy. Ÿ RAID 0 Mode cannot be performed when SR3500 perform RAID 1 mode.
STARDOM IDE RAID Solution Notice: 1. Before you turn off the SR3500 or unplug the IEEE 1394 or USB cable, be sure to click the Stop or Eject device icon (located in the lower right corner on windows desktop) and stop the device first. 2. If there are other IEEE 1394 devices connected to SR3500 you need to keep SR3500 power-on so the signal may pass through the SR3500 to the other IEEE 1394 devices. 3.As using RAID 0, in case of one disk failed, all data in SR3500 will be lost.
STARDOM IDE RAID Solution 3-2 Windows PC Operation Once the SR3500 Hardware installation is complete, you can start connect the device to your PC. 1. Find the IEEE 1394 or USB2.0 port on the rear panel of your PC. 2. Connect the IEEE 1394 cable to the IEEE 1394 port of SR3500 or the USB2.0 cable to the USB2.0 port of SR3500. 3. Connected RS232 cable to your PC COM port and RS232 port on the rear panel of SR3500. 4. Attach the power cord to the SR3500. 5. Power on your PC. (if it is off) 6.
STARDOM IDE RAID Solution and click on Windows 98 Second Edition 1394 Storage Supplement item, then follow the instructions to download the update patch. Remember to select the appropriate language before start download. 10. The SR3500 is now ready to use. You can use disk management to partition or format SR3500 like a single hard disk.
STARDOM IDE RAID Solution 3-3 Macintosh Operation Once the SR3500 Hardware installation is complete, you can start connect the device to your Macintosh. 1. Locate the built-in the 1394 and USB2.0 port for your Mac G4, G3, iBook or iMac DV. Connect the 1394 cable to the 1394 port or connect the USB2.0 cable to the USB2.0 port. 2. Connect the other end of the 1394 cable to the 1394 port of SR3500. 3. Attach the power cord to the SR3500. 4. Power on the SR3500. 5. Power on your Macintosh (if it is off.) 6.
STARDOM IDE RAID Solution 3-4 HDD Status on LCD Ÿ Disk failed on the primary deck : Fail Disk ready on the secondary deck: OK Pri HDD:Fail Sec HDD:OK Ÿ Disk ready on the primary deck : OK Disk failed on the secondarydeck: Fail Pri HDD:OK Sec HDD:Fail Ÿ All Disk failed on SR3500 Pri HDD:Fail Sec HDD:Fail Ÿ Disk ready on the primary deck : OK Disk ready on the secondary deck : Pri HDD:OK Sec HDD:OK 19 OK
STARDOM IDE RAID Solution Ÿ Pri. Disk capacity > Sec. Disk capacity, wrong massage as SR3500 auto rebuild data from primary disk to secondary disk at RAID 1. Wrong Capacity PRI > SEC Ÿ Sec. Disk capacity > Pri. Disk capacity, wrong massage as SR3500 auto rebuild data from secondary disk to primary disk at RAID 1.
STARDOM IDE RAID Solution Ÿ SR3500 Overheat alarm The T character show on upper right corner of LCD. Pri HDD:OK T Sec HDD:OK Ÿ SR3500 FAN Failed alarm The F character show on lower right corner of LCD.
STARDOM IDE RAID Solution Chapter 4 System maintenance 4-1.Hot Swappable and Auto Rebuilding of RAID1 HD Hot Swappable function and Auto-Rebuilding only support RAID 1 without RAID 0 mode. Under the RAID 1 mode, you have two choices to use Hot Swappable function and Auto-rebuilding.
STARDOM IDE RAID Solution 1. First remove the damaged HDD, and then replace it with a new HDD. 2. Insert the Removable Carrier with the new HDD into the SR3500. 3. Wait for few minutes, the SR3500 will automatically perform rebuild function on the new HDD. 4. After the rebuild process is over, any data on the newly installed HDD will be overwritten. LCD display status as HD fail and Rebuilding. The Message on LCD While the HDD with data is on the primary deck of the SR3500, start the computer.
STARDOM IDE RAID Solution 1. Insert a new HDD correctly on the seconary deck of the SR3500. Screen will display and buzzer will sound in case of abnormal operation. If the HDD is properly set up, the LCD will show the following: 2. A few seconds later, the LCD will show: Pri HDD: OK Sec HDD: OK Rebuilding … Pri → Sec XXX% The data in the left deck’s HDD will be rebuilt in the right deck’s HDD. XXX%: Percentage completed, ranging from 0~100. 3.
STARDOM IDE RAID Solution Appendix A Questions & Answers Q1: What happens if power is shut down while the SR3500 is running auto rebuilding? A: In case of power failure during the Auto-Rebuild Function at RAID 1 Mode, controller will remember the rebuilding progress percentage and carry on the operations when the power is restored. Q2: When using the SR3500, the computer system is unable to read/write properly. A: 1.Check if the external cable connector is inserted properly. 2.
STARDOM IDE RAID Solution front panel. Q5: Why do the responses of the computer system slow down when SR3500 is under rebuilding at RAID 1 Mode? A: The performance of computer system is related to CPU, motherboard design and peripherals. SR3500 will slow down Computer performance. Q6: How is the HDD capacity configured when replacing with a new disk at RAID 1 Mode? A: 1. SR3500 is configured to the least capacity detected when SR3500 is installed for the first time. 2.
STARDOM IDE RAID Solution Q8 Why don’t my operation system connect with SR3500 external storage? A: 1. Please make sure your OS is Win98SE, Win ME, Win2000, WinXP or Mac9.0. upward version and support the 1394 or USB2.0 drivers program. 2. Please check the 1394 or USB2.0 cable is connected properly. 3. Please check if one hard disk displays OK on SR3500 LCD. Q9. How do I install Macintosh drive? A: Find the file Firewire sit. This is a Stuffit Expander file (Mac equivalent to Zip files).
STARDOM IDE RAID Solution device. The drive should now appear on your desktop and can be treated as an internal device. Q10. What is the status of 1394 support from Microsoft? A: Microsoft have provided generic SBP-2 support in their Windows 98 Second Edition, Windows 2000 and Windows XP Operating system. Support is also offered in Microsoft Millenium. There is no support for 1394 in Microsoft Windows 98 First Edition or Windows NT. The SBP-2 driver in Windows 98 SE works well for evaluation.
STARDOM IDE RAID Solution partitioning utility. 2). Select 【Y】on the first screen for enabling large disk support NOTE: If any 1394 hard drive has been unplugged during the current Windows session, Fdisk will often crash and exit at this point. If this happens, restarting Windows with the drive plugged in and trying again. 3). Select option 5 to choose which disk to format. – This should be one without a drive letter. Ensure the disk you chose becomes the active disk (number appears at top of screen). 4).
STARDOM IDE RAID Solution Windows 2000/ Windows XP 1). If it is not already installed, install the Windows 2000/ Windows XP recovery console. 2). Plug in the drive and start the PC in recovery console mode 3). Once logged in to the recovery console, type DISKPART at the command prompt (for additional help on using this utility see Windows 2000/ Windows XP online help) 4). The drive should be listed when the utility starts. Select the drive to be partitioned and press ENTER 5).
STARDOM IDE RAID Solution reason, partition of multiple drives should be done by attaching all drives prior to start the recovery console. (See final note in Window 98 section). How do I install the Windows 2000/ Windows XP Recovery Console? In order to partition a new drive with Windows 2000/ Windows XP, the recovery console must be installed. This is explained the following text (extracts from Windows 2000/ Windows XP online help).
STARDOM IDE RAID Solution 2000/ Windows XP. In addition, you must be an administrator to use the Recovery Console. You can install the Recovery Console on your computer to make it available in case you are unable to restart Windows 2000/ Windows XP. You can then select the Recovery Console option from the list of available operating systems.
STARDOM IDE RAID Solution simply be run for each unformatted drive connected). Note: the format for 1394 hard drives for the G3, G4 is different from the format used on internal hard drives (using the above drivers).