SR2611-2S-S2+ User Manual v3.
Index Check Package Contents and Accessories......................................................... 3 Hardware Introduction......................................................................................... 4 System Requirement & Environment Requirement and Notices......................... 4 Hardware Installation Procedure......................................................................... 5 Connecting SR2611 to your computer.................................................................
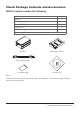
Check Package Contents and Accessories SR2611 system includes the following: Item Quantity SR2611 1 Removable Carrier 2 45cm SATA Cable 1 Product CD 1 Accessory bag 1 (includes 6#-32 screws x 8 pcs , Key for keylock x 2) Removable Carrier SATA SATA SR2611 45cm SATA Cable Accessory bag Product CD Note : Please check above parts are included prior to installation. The accessory bag contains screws and a plastic key.
Hardware Introduction Front Panel Real Panel 6 1 5 3 3 2 1 4 4 2 1 3 5 LCD Panel Mute Button HDD Access LED 2 4 6 HDD Tray Key Lock Fail LED 1 3 eSATA Port RAID Mode 2 4 Power Socket 5cm Fan Note : Status Indications of LEDs: HDD Access LED will flash yellow when the data is accessed from the hard drive. Fail LED will light red when HD failed, temperature is higher than 60 C or fan fails. System Requirement & Environment requirement and notices Hardware Requirement 1.
4. The SR2611 is equipped with a 5.2 cm ball bearing cooling fan that will provide effective cooling for the 7200&10000 rpm hard drive. We highly recommend using computer chassis with effective cooling design to avoid disk array crashing due to ineffective cooling. 5. SR2611 supports RAID 0 & RAID 1. Hardware Installation Procedure 1. Connect the SATA cables on the removable hard drive carrier to the pins of hard drive. 2.
Connecting SR2611 to your computer 1. Connect DC12V&5V power cables and SATA cables to SR2611. 1 SATA SATA 2. Connect SATA cable to SATA port on the motherboard. 45cm SATA Cable 2 Power Supply Connector 2 2 Power Supply SR2611 1 1 Real Panel Motherboard SATA Ports Internal Case Note : We do not recommend users to disassemble the machine without proper instructions and authorization. The manufacture warranty will not cover damage caused by unauthorized disassembling.
2. RAID 1 Mode 1). Place two new hard drives into SR2611 and strongly suggest you to use two identical hard drives to get the equal capacity. If the capacity is different, SR2611 is downward to the small hard drive capacity. 2). Under RAID 1 mode, two hard drives has the identical information as one to mirror to the other one, therefore each of the hard drive failed is still able to function normally.
Computer Set Up When the hardware setup for SR2611 is complete, you are now ready to turn the machine on. 1. After the hardware installation is complete, the SR2611 will be treated as one single hard drive. Set the hard drive to AUTO in the computer’s BIOS. When the computer is turned on, the system will retrieve the following information: 2. In SR2611, the installed hard drive can be detected by the Device Manager of Computer Management for Windows. 3.
Hard Disk status on LCD screen Left Hard Drive (Primary Hard Drive) Fail 1. Right Hard Drive (Secondary Hard Drive) Normal 2. Primary hard drive storage capacity larger than secondary hard drive 3. Secondary hard drive storage capacity larger than primary hard drive Hot Swap & Auto Rebuilding The hard drive Hot Swap and Auto Rebuilding functions are available. (The Hot Swap & Auto Rebuilding functions are applicable in) 1.
4. After removing the failed hard drive and replacing with a new hard drive, if the hard drive is properly installed, the LCD display screen will display the following messages: 5. After few seconds of installing the new hard drive, the LCD display screen will display the data rebuilding progress: Pri->Sec represents that the data in the original hard drive (primary hard drive) is copied to the new hard drive (secondary hard drive). XXX % represents the rebuilding completion percentage. 6.
GUI Monitoring Software & FW Updating You can install GUI software to monitor RAID status. This can be done by installing RAID_ GUI. exe software from CD-ROM. 1. RAID information You can install GUI software to monitor RAID status. This can be done by installing RAID_GUI. exe software from CD-ROM. 2. Firmware updating 1). You may update FW through GUI by clicking “Load Firmware” to select the firmware you want.
2). After selecting, click “Start Upgrade” to start updating. 3). After updating, it will show a successful message and will start using the new firmware after you reboot your computer. Attention : Updating firmware may cause your system unable to operate normally. If your system runs normally, we suggest that you do not update firmware. Should you have any doubts on firmware updating, please contact the technical service staff of Raidon Technology Inc. or email us at: supporting@raidon.com.tw.
Appendix: Trouble Shooting / Q&A Unstable system after connecting SR2611 Q: After installing SR2611, we are unable to start the computer or the computer can not locate SR2611 upon startup. A: 1. Please check whether the readings on the SR2611 LCD display screen appear normal. 2. Please check whether the SATA Cable connection cables are properly connected to the computer system and whether SATA drives are functioning normally. 3.
About Auto Rebuilding Function Q: What will happen if we turn off the computer’s power while SR2611 is still executing data auto rebuilding? A: Under the mirror mode (RAID 1), if the power is out of the auto rebuilding process, the controller will remember when completion percentage of the auto rebuilding process and resume the rebuilding process when the power is back on.