
User manual

3.3 Quick Install
You can easily create a volume by using the “Quick install” function. On RAID levels 0, 1, 3, 5 and 6, the
system will automatically calculate the maximum available capacity, which is subject to the number of
your hard disks and currently available capacity.
“Quick install” function features a smart program. When the system is installed with 4 or 8 identical hard
disks, the system will automatically list all the available RAID levels and the total capacity. “Quick install”
function will automatically use all the available capacity according to the RAID you selected. However,
if different hard disks are attached, the system will still list the available RAID levels and capacity, but
you may fi nd some hard disks to be in the Free Status after setup. This results from the policy of “Quick
install” function:
1. Provides the maximum capacity according to the RAID selected by user
2. Selects the minimum number of hard disks according to the RAID level or volume size
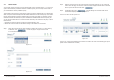
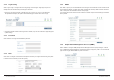
Step 1
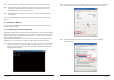
Select “Quick install” and then select a RAID level. Please refer to fi gure 3.3.1. After selecting
a RAID level, click “ ” to enter next page to confi gure “Bus ID”/“SCSI
ID”/“LUN” Please refer to Figure 3.3.2.
Figure 3.3.1
Figure 3.3.2
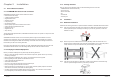
Step 2 Select an ID for each device and avoid ID confl ict in the same SCSI bus. You can change the
volume size in this page. The maximum volume size will be displayed. Please enter a value less
than or equal to that value and then click “ ”
.
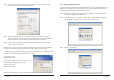
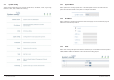
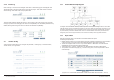
Step 3 Confi rmation page. Click “ ” if all the settings are correctUser data volume
created will be displayed as shown by Figure 3.3.3.
OK. You can start to use the system now.
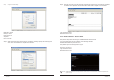
Figure 3.3.3
(Figure 3.3.3: A UDV named “QUICK10440” in RAID 0 is created. The name is automatically given by the
system and the available size is 222GB.)
32 User Interface Introduction User Interface Introduction 33