
User manual

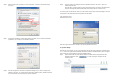
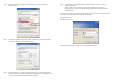

Step 2 Select an ID for each device and avoid ID confl ict in the same SCSI bus. You can change the
volume size in this page. The maximum volume size will be displayed. Please enter a value less
than or equal to that value and then click “ ”.
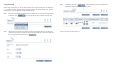
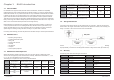
Step 3 Confi rmation page. Click “ ” if all the settings are correct user data volume
created will be displayed as shown by the fi gure below.
OK. You can start to use the system now.
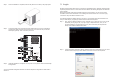
SR5650-4S-U3D Quick Installation Guide
1. Package Contents
After you open the outer package, make sure that the following items are in the box:
• SR5650-4S-U3D product body
• AC Power Cord
• RS-232 Port Cable
• CD
• User Manual
• Accessory Kit
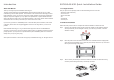
2. Hardware Installation
Please follow the following procedures to complete the hardware installation of SR5650-4S-U3D.
Step 1
Open the outer package and take out the product body. (Make sure the related accessories and the
product body are not damaged or missing. If you have any questions, contact the distributor or sales)
Step 2 Mount the product to a stable surface. Make sure that the fan is not blocked and there is
appropriate space around for heat dissipation. (Do not place the product nearby water area
or any environment that may cause damage to the product)
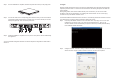
Step 3 Take out the tray and install your hard disk in it. Make sure to fasten the hard disk securing
screws to prevent damages caused by unnecessary movement.