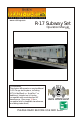
www.railking.com R-17 Subway Set Operation Manual (3V PS2) Compatibility This engine will operate on any traditional O-31 Gauge track system, including M.T.H.’s RealTrax® or ScaleTrax™ or traditional tubular track. It is also compatible with most standard AC transformers. (See page 19 for a complete list of compatible transformers and wiring instructions.
Table of Contents Set Up Checklist . . . . . . . . . . . . . . . . . . . . . . . . . . . . . . . . . . . . . . . . . . . . . . . . 3 Getting Started . . . . . . . . . . . . . . . . . . . . . . . . . . . . . . . . . . . . . . . . . . . . . . . . . 4 Assembling RealTrax . . . . . . . . . . . . . . . . . . . . . . . . . . . . . . . . . . . . . 4 Connecting the Transformer . . . . . . . . . . . . . . . . . . . . . . . . . . . . . . . . 4 Lubricating the Engine . . . . . . . . . . . . . . . . . . . . . . . . . .
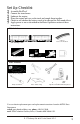
Set Up Checklist r r r r r r Assemble RealTrax® Connect the transformer Lubricate the engine Place the engine and cars on the track and couple them together Check to see whether the battery needs to be charged for full sound effects Apply power to run as described in the Basic Operation section of these instructions.
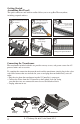
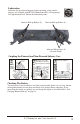
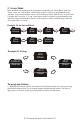
Getting Started Assembling RealTrax® The quick connectors and built-in roadbed allow you to set up RealTrax anywhere, including carpeted surfaces. STEP 1 Knock-out must be removed before remote lock-on can be installed STEP 2 Remove knock-out from outer edge of track by holding and twisting up with a pair of pliers STEP 3 Insert lock-on into knock-out tab (Lock-on is the interface between the track and transformer) REMOVE TAB FROM OUTER EDGE STEP 4 Make sure the metal contacts line up.
Lubrication Lubricate all exposed moving parts before operating, using a multiprupose, oil (available with M.T.H.’s Maintenance Kit, sold separately) or a light household oil. Follow the lubrication points. lubricate Pick up Rollers (L) DO NOT OVER OIL lubricate Pick up Rollers (L) lubricate Wheel Axles (L) (On each Truck) Coupling the Powered and Non-Powered Subway Cars STEP 1 Incorrect Position STEP 2 Place the cars on the track. Open couplers by pressing down on plunger.
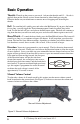
Basic Operation Throttle Throttle up the power to your track. Advance the throttle until 12 – 16 volts is applied, then put the subway set into forward motion by either firmly pressing the Direction button on your transformer or remote once or dropping and advancing the throttle. Bell - To sound the bell, quickly press and release the Bell button. If you press the button for too long, you will trigger the Transit Announcement Sounds described later in this book.
Proto-Sound 2.0 Operating Instructions This manual contains the operating instructions for Proto-Sound 2.0 in conventional mode only. Instructions for accessing DCS command mode features accompany the DCS Remote Control System equipment (sold separately.) Activating Proto-Sound 2.0 Conventional Mode Features Proto-Sound 2.0 features are activated by sequences of Bell and Horn button pushes described below. Please read the full descriptions of each feature before using it.
Operating Modes 1. Manual Mode Upon initial power application, the engine will start up in manual mode. The chart below lists the features available to the operator when in Manual Mode. Different features are available when operating in Learn and Auto Modes, which are described later.
2. Learn Mode In Learn Mode, the engine may be programmed with either an "Out & Back" route or a "Loop" route. An "Out & Back" route begins at the 1st station (as programmed by the operator), stops at intermediate stations, ends at the last station, then reverses its route until it reaches the 1st station. A "Loop" route begins at the 1st station (as programmed by the operator), stops at intermediate stations, ends at the last station, and then begins the route over again at the 1st station.
2. Enter Learn Mode by pressing Horn-Bell-Bell-Bell-Bell. The train will then announce that you have entered Learn Mode. 3. Press and hold the Bell button to scroll through the available stations until you hear the one that you would like to be your first stop. Release the button quickly as soon as you have heard the desired stop name. 4. Press and hold the Horn button until a "saved" response confirms that station's location and name are saved in memory. 5.
Auto Mode When you have finished programming your stations in Learn the car will be in Manual Mode. Running in Forward, stop the car at the location of the first programmed station by pressing the Direction button. Press Bell-Horn-Horn to put the train into Auto Mode. Press the Direction button again to begin operation in Auto Mode. Because Auto Mode operation begins at the first stop, the next stop announced will be the second stop.
Speed Control M.T.H. engines equipped with Proto-Sound 2.0 have speed control capabilities that allow the engine to maintain a constant speed up and down grades and around curves, much like an automobile cruise control. You can add or drop cars on the run, and the engine will maintain the speed you set. While the engine is programmed to start with the speed control feature activated, you can opt to turn it off.
Locking Locomotive Into A Direction You can lock your engine into a direction (forward, neutral, or reverse) so that it will not change directions. To do this, put the engine into the direction you want (or into neutral to lock it into neutral), run it at a very slow crawl (as slowly as it will move without halting), and quickly but firmly tap the Horn button once followed by three quick taps of the Bell button, allowing approximately ½ second to lapse between each quick button press.
Maintenance Lubricating and Greasing Instructions The engine should be well oiled and greased in order to run properly. DO NOT OVER OIL Regularly lubricate all axles and linkage components and pickup rollers to prevent squeaking. Use light household oil, such as that found in M.T.H.'s maintenance kit. Do not over oil. Use only a drop or two on each pivot point.
5. Repeat the procedure for the other motor and truck. 6. Reassemble the chassis and body, being careful that the wires are not caught between the body and chassis, as this can lead to a short that may damage the electronics beyond repair. 7. Before replacing body mount screws, test the unit on powered track to make sure all light housings are in place and functioning. Replace screws and door slider handles.
Lightbulb Replacement Instructions Interior Lights To replace the interior lights in the powered unit: 1. Follow the shell removal instructions found in the “Lubrication and Greasing” section of this booklet. 2. Pull bulb straight out to remove. (See figure 5) Gently Pull Bulbs Away From Socket To Remove Figure 5 To replace the interior lights in the unpowered units: 1. Remove the four Phillips screws from the chassis (same as power unit), then lift the body away from the chassis.
Headlights To replace the headlights and other end-of-car lights in the powered unit: 1. Remove the shell as described in the “Lubrication and Greasing” section of this booklet. 2. Pull out the bulb shown in Figure 8 to replace the Number/Destination Gently Pull Bulbs Board bulb. 3. To replace the headlight bulbs, remove the harness witht the blue 2 pin connector shown in Figure 9. 4. To replace the top marker lights, remove the harness with the yellow 2 pin connector shown in Figure 9. 5.
Self Charging Battery Back-Up The 2.4v NiCad self-charging battery pack recharges continuously during train operation and should last for up to five years. It is a battery type that should not leak or cause any damage to your engine. Depending upon when your engine was built, the battery may need to be charged right out of the box.
Traction Tire Replacement Your subway set is equipped with two neoprene rubber traction tires on each powered truck block. While these tires are extremely durable, you may need to replace them at some point. First, remove the truck sides from the truck block. To do this, turn your engine upside down and remove the truckside mounting screws as seen in (figure 12). Screws to Remove Trucksides Once the truck sides have been removed: 1.
Quick-Start DVD The included DVD Quick-Start video demonstrates the start-up and basic operation of this set as well as other information about model railroading. You may find it helpful to view the DVD before operating this set. RailWare Interactive CD ROM M.T.H. provides a free RailWare CD ROM in each Ready-To-Run set. It is full of helpful information on M.T.H. product history, track planning software, a dealer finder, and information and video clips on Loco-Sound and Proto-Sound 2.0.
Troubleshooting Proto-Sound® 2.0 Problems Although Proto-Sound 2.0 has been designed and engineered for ease of use, you may have some questions during initial operation. The following table should answer most questions. If your problem cannot be resolved with this table, contact M.T.H. for assistance (telephone: 410-381-2580; fax: 410-423-0009; service@mth-railking.com, 7020 Columbia Gateway Drive, Columbia MD 21046-1532).
Transformer Compatibility and Wiring Chart Proto-Sound 2.0 is designed to work with most standard AC transformers. The chart below lists the many compatible transformers. Note that many of the operational commands described in these instructions require a bell button, so if your transformer does not have its own bell button, you should consider adding one to get the full benefit of the system. In addition, the chart details how the terminals on these transformers should be attached to your layout.
Additional Features Accessible With The DCS Remote Control System (Additional equipment required) While conventional mode operation of a Proto-Sound 2.0 engine yields wonderfully realistic sound and several train control features, command mode operation allows the user to access a world of command functions never before accessible to O Gauge railroaders.
Service & Warranty Information How to Get Service Under the Terms of the Limited One-Year Warranty When you suspect an item is defective, please check the operator's manual for standard operation and trouble-shooting techniques that may correct the problem. Additional information may be found on the M.T.H. Website. Should you still require service, follow the instructions below to obtain warranty service. First, e-mail, write, call or fax a M.T.H.
AUTHORIZED SERVICE CENTER 7020 Columbia Gateway Dr. - Columbia, MD 21046 Information: 410-381-2580 Fax: 410-381-6122 www.mth-railking.com PARTICIPATING A.S.C. RETAILER LIST ALABAMA COLORADO ILLINOIS SOUTHERLAND STATION HUNTSVILLE 256-533-4720 CUSTOM RAILWAY SUPPLY COLORADO SPRINGS 719-634-4616 BERWYN'S TOY TRAINS & MODELS BERWYN 708-484-4384 ARIZONA CABOOSE HOBBIES, INC.
LOUISIANA MINNESOTA AMERICA'S TRAIN YARD BATON ROUGE 225-926-5592 DON'S HOBBY CO. MANKATO 507-387-1330 MAINE MISSOURIS WHEELS, WINGS & THINGS LUDLOW 207-532-6277 SWITCH STAND SAINT LOUIS 314-781-4458 MARYLAND MARK TWAIN HOBBY CENTER ST.
THE FREIGHT YARD SMITHFIELD 919-934-6229 CHARLEROI SWEEPER CENTER CHARLEROI 724-483-3397 RHODE ISLAND GRANDMA'S HOUSE GRANDPA'S TRAIN WARWICK 401-463-7803 LITTLE CHOO CHOO SHOP INC.
T S G HOBBIES WARRENTON 540-347-9212 NORGE STATION WILLIAMSBURG 757-564-7623 WASHINGTON EASTSIDE TRAINS KIRKLAND 425-828-4098 WEST VIRGINIA PATRICK'S TRAINS WHEELING 304-232-0714 WISCONSIN WOODCRAFTERS SHOP BURLINGTON 262-763-5239 SOMMERFELD'S TRAINS BUTLER 262-783-7797 HOBBY OUTLET FOND DU LAC 920-924-3770 G B T V & TRAINS GREEN BAY 920-496-9697 THE TRAIN ROOM FERGUS 19-787-3280 CREDIT VALLEY RAILWAY COMPANY TREETSVILLE 905-826-1306 B&H TRAINS TERREBONNE 514-793-9696 GRAMPA'S TRAIN SHOP RICE LAKE 715