
User Manual

3
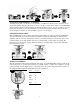
ACCESSING THE INTERNAL ASSEMBLY
To Change the nozzle or set the arc on your sprinkler, you will have to lift the cover to be able to access
the internal assembly (Fig. #5). There are two ways to do this: you may find it easiest to use the Rain Bird
wrench shown in Fig. #2 to lift and hold up the internal assembly; however, it is also possible to use your
hands. You may prefer to use your hands when you set the arc because the wrench can get in the way -
just be careful to not let the top of the sprinkler pop down on your fingers!
CHANGING THE NOZZLE
The AG-5/Maxi-Paw comes complete with a blue nozzle installed. To change it, first use the Rain Bird
wrench shown in Fig. #2 to lift and hold up the sprinkler's internal assembly. With one hand hold the
sprinkler's arm out of the way and with the other use your thumb and finger to turn the tab of the nozzle
counterclockwise (to the left). It will rotate about
1
/
4
turn and then you may pull it out (see Fig. #6).
Insert the new nozzle into the opening. Turn it clockwise (to the right) until you hear a click indicating
it has locked into position.
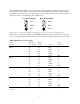
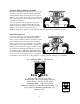
SPRING PLACEMENT
The red and black nozzles require adjusting the arm spring. Your AG-5/Maxi-Paw is shipped with the tip
of the spring in the "A" position. If you use the red or black nozzles, you will need to change it to the "B"
position (see Fig. #7). The lighter tension of the spring in the "B" position will permit better operation of
the sprinkler's arm and tripping mechanisms in low-flow situations.
#5
#6
Nozzle Position
Red B
Black B
Blue A
Yellow A
Beige A
#7