
Operating Guide


2
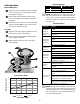
Valve Operation
Manual Operation:
A
Manual on: Turn the solenoid counter-clockwise
1/4 turn. Do not unscrew completely. To close,
hand tighten clockwise.
B
Flow control (select models only): Turn clock-
wise to restrict ow. Turn counter-clockwise to
open ow.
C
Flush valve to clear debris: Turn the bleed screw
counter-clockwise ONLY 1 turn. Flush one min-
ute and turn clockwise to close.
First Use:
D
Open the main water supply and ush one min-
ute with bleed screw to clear debris.
E
Test wiring by using the Manual Water feature
on the irrigation controller.
F
Adjust the ow control to reduce over-spray.
(select models).
1
3
2
Operating Ranges
075-CP / 075-CPF 100-CP / 100-CPF
Flow
2
0.2 - 22 GPM 0.2 - 40 GPM
Pressure 15 - 150 PSI 15 - 150 PSI
NOTE: For ows below 3 GPM (0.75 m3/h), or
any drip application, use a 200 mesh lter up-
stream and a pressure regulating lter down-
stream from the valve. 40 psi for 1” and 30 psi for
3/4” drip lines.
Troubleshooting
Symptom Solution
Valve
Won’t Turn
On when
Solenoid is
Turned
Make sure ow control is open (select
models)
Check that main water supply is on
Make sure piping is connected properly and
not blocked
Valve Won’t
Turn On at
the Timer
Verify timer settings are correct
Check and repair wiring and connections as
needed
Check and replace valve solenoid as need-
ed
Verify timer power output
Valve Won’t
Shut-o
Verify timer settings are correct
Hand tighten solenoid and bleed screw if
needed
Valve Won’t
Turn On at
the Valve
Incorrect timer settings
Check wiring
Check solenoid
Timer not supplying power to the valve
Make sure the Flow Control stem is not
turned all the way closed
Leaks at
sprinkler
heads
Clear debris by opening the bleed screw
and ushing 1 minute
Remove and clean the diaphragm. Replace
if needed.
Leaks around
the valve
Check pipe ttings connection and glue,
repair or replace as needed
Hand tighten solenoid and bleed screw if
needed
If vacuum breaker is leaking (anti-siphon
models) remove cap, gasket, and internal
piston gasket to clean and reassemble
Turn o main water supply, relieve pressure
on the valve by opening the bleed screw
and tighten the jar top bonnet
NOTE: During winter, shutdown and drain the
system to protect valves from freezing. Failure to
properly drain the lines can result in damage to
the valves, which is not covered under the cus-
tomer satisfaction policy.
Pressure Loss Chart
Pressure Loss - PSI
12
10
8
6
4
2
0
01020304
050
3/4" CP-075
1" CP-100
Flow Rate - GPM