Troubleshooting and Maintenance Guide for Residential Automatic Valves 1
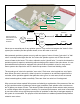
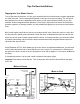
Controller Supply Line Valve Box Controller BASIC AUTOMATIC IRRIGATION SYSTEM COMPONENTS DIAGRAM Sprinklers Zone Valve Shut off Valve Water Flow Supply Line Sprinklers Water Flow Zone Valve Water Flow Valves are an essential part of any sprinkler system. They are the link between the "brains" of the system (the controller) and the sprinkler heads, to turn the water on and off. Most automatic sprinkler systems are set up with two types of valves.
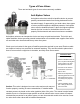
Types of Zone Valves There are two basic types of zone valves commonly available. Anti-Siphon Valves Anti-siphon valves have a built-in backflow device to prevent possibly contaminated water from flowing backward into the household supply. If approved by your local codes, these types of valves provide inexpensive backflow protection. Anti-siphon valves must be installed at least 6" above the highest sprinkler head on the line in order for the backflow device to work properly.
In-Line Valves The second type of zone valve is an "in-line" valve. It is installed below ground, preferably in a valve box for ease of maintenance. A separate backflow preventer is required for backflow protection. In-line valves are automatic valves. In-line valves are suitable for sites with all types of elevation changes. Because of their protected location, in-line valves are less likely to be tampered with by children or vandals, and less likely to incur freeze damage than above ground models.
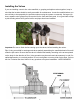
Tips On New Installations Tapping Into Your Water Source Turn off the water at the meter. Cut into your household service line and install a system appropriate tee, after the meter. The tee selected will depend on the type of service line piping. The cut can be done anywhere on the line, depending on the layout of your system and the location of your first manifold. Unless unregulated static pressure is over 80 psi, tap into the line before the household pressure regulator.
Installing the Valves If you are installing a new in-line valve manifold, or grouping anti-siphon valves together, keep in mind that the location should be easily accessible for maintenance. Locate the manifold where you are not likely to be sprayed by the sprinklers when turning the system on manually. On larger systems, separate valve groups may be required for the front and back yards. It is a good idea to keep a plan showing where all in-ground valves and pipes have been installed.
Installing the Valves (Continued) Most valves have a flush mode which allows a little extra water through the valve to clean it out. To flush valve to clear debris: Turn the bleed screw counter-clockwise ONLY 1 turn. Flush one minute and turn clockwise to close. Test and flush each line before sprinklers are attached. How to Operate Several models of Rain Bird 24 Volt valves are available for home use. Minimum current requirements for opening the smaller valves is .
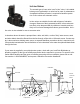
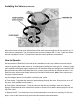
Troubleshooting How the Valve Works It is easier to troubleshoot valves if you know a little about how the valve works. When an electrical impulse is transmitted to the solenoid (black cylinder with wires), an electromagnetic field causes a small metal plunger in the solenoid to move upward. When the plunger moves upward, a small hole (port) in the valve is uncovered.
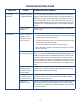
TROUBLESHOOTING GUIDE 1. For any problem, check the basics first. A. Is controller plugged in and properly programmed? B. Is master shut off valve open? C. Is flow control on valve in an "open" or "flow" position? Not all models have this feature. Check the instructions that came with your valve, or see "How to Operate" section of this packet. D.
TROUBLESHOOTING GUIDE SYMPTOM 2. Valve won't turn on with controller (continued) 3. Valve won't turn off with controller CAUSE DIAPHRAGM VALVE REMEDY See if you can flush debris from the valve by using the flush mode. If D. Valve opening mechanism damaged not, turn off the water, disassemble, inspect and clean the valve (See or clogged with debris. Diaphragm Valve Disassembly Procedure).
TROUBLESHOOTING GUIDE SYMPTOM 4. Water leaks out at sprinkler heads when station is off. CAUSE DIAPHRAGM VALVE REMEDY A. Closing mechanism See Diaphragm Valve Disassembly Procedure. Check small ports for dirty or damaged and blockage by debris; rinse and inspect diaphragm and diaphragm seat does not seat properly for dirt or damage. Replace diaphragm or valve body if damaged. B. Valve not fully in "Manual Off" mode See 3-E above. C. Solenoid burned out or obstructed Turn off water. Remove solenoid.
TROUBLESHOOTING GUIDE SYMPTOM 7. Water leaks out at valve 8. Valve slams on/off (water hammer) CAUSE DIAPHRAGM VALVE REMEDY A. Leaking round pipe connections Tighten connections (use PTFE thread tape only). B. Leaking between bonnet and body Check that diaphragm washer is properly in place. Tighten bonnet screws. If still leaking evaluate for replacement with model number appropriate for your valve.
Diaphragm Valve Disassembly Procedure To inspect the inside of the valve for cleaning or replacement of the diaphragm: 1. Shut off the water at the master shut off valve. 2. Unscrew all bonnet screws if present or unscrew jar-top lid. On some models, the bleed screw and/or flow control knob will also need to be removed. 3. Remove bonnet assembly to expose the spring, diaphragm, and rubber gasket (if any) and filter (if any). Remove and inspect the spring, diaphragm, and rubber gasket for wear or damage.
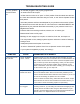
Replacement Parts Valve Model Solenoid P/N Diaphragm P/N Images CP, CPF, DASASVF B60599 B60488 JTV, JTVF B60599 B36330 20858801 21074603 236307 231900 DV, DVF, ASVF HV, HVF Rain Bird Corporation 6991 East Southpoint Rd. Bldg #1 Tucson, AZ 85756 Questions? In the USA or Canada, call Rain Bird toll free Technical Support at 1-800-RAINBIRD (800-724-6247) www.rainbird.