
Use and Care Manual

7
7
SST User Manual
Manual Operation
Choose from two Manual Watering options:
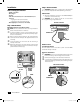
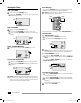
Water All Zones Now
g
Turn the dial to AUTO RUN.
Press the WATER ALL ZONES NOW button to start water-
ing.
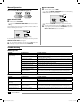
Screen displays which zone is being watered and the number of
minutes remaining for that zone.
Minutes
Remaining
Zone
To stop watering the active zone and skip to next zone, press the
WATER ALL ZONES NOW button again.
g
To stop manual watering, turn the dial to OFF, wait until
watering is stopped and then back to AUTO RUN.
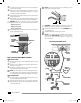
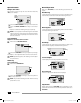
Water 1 Zone Now
g
Turn the dial to select a ZONE.
Press the WATER 1 ZONE NOW button to start watering
(default run time of 10 minutes).
Minutes
Remaining
Zone
Press the UP/DOWN arrow keys to adjust the run time.
g
To stop manual watering, turn dial to OFF, wait until water-
ing is stopped, and then turn dial to AUTO RUN, or press the
Water 1 Zone Now button a second time.
Watering Issues
Problem Possible Cause Possible Solution
Automatic and manual cycles do
not begin watering.
Water source not supplying water. Verify the main water and all supply lines are open and operating properly.
Wires not properly connected. Verify field wires are connected properly including the timer, master valve (or pump start
relay) and any spliced connections.
Wires damaged or corroded. Check field wiring for damage and replace if necessary. Check all connections and replace
with watertight connectors as needed.
Dial not set to AUTO RUN position. Turn the dial to set date and set time and use UP/Down arrows to set correct date and time.
Date and/or Time is not set correctly. Enter the current Date and Time on the controller.
An installed Rain Sensor may be
activated.
Operation will resume when sensor dries out. To test operation, disconnect the Sensor and
connect a jumper wire between the Rain Sensor terminals.
If no Rain Sensor is installed, the jumper
wire may be damaged or missing.
Connect the two yellow Rain Sensor terminals with a short length of 14 to 18 gauge jumper
wire.
An electrical surge may have damaged
the timer’s electronics.
Disconnect power to the timer for 3 minutes, press the reset button, then turn back on. If
there is no damage, the timer will accept programming and resume normal operation.
Watering cycles do not shut off. Debris trapped in valve. Flush the valve by temporarily opening the bleed-screw and re-tighten.
Electrical Issues
Problem Possible Cause Possible Solution
LCD Display is blank. Timer is not receiving power. Verify the power cord is connected and securely plugged in (indoor).
Verify the transformer is wired correctly and the circuit breaker is on (outdoor).
No red LED light on transformer
(indoor only).
Blown transformer. Replace transformer.
LCD Display is “frozen" and timer
will not accept programming.
An electrical surge may have damaged
the timer’s electronics.
Disconnect power to the timer for 3 minutes, press the reset button, then turn back on. If
there is no damage, the timer will accept programming and resume normal operation.
Valve short error message on
LCD display.
Wires damaged or corroded. Check the indicated zone wiring for damage and replace if necessary. Check all connections
and replace with watertight connectors as needed.
Troubleshooting
SST user manual (EN) web.indd 7 10/11/2016 8:17:29 PM